
Why Your Pond Spillway Could Fail (And How to Design One That Won’t)
Picture this: heavy rain pounds your pond, water rises rapidly, and suddenly you’re watching helplessly as overflow tears through your carefully landscaped banks, creating ugly gullies and threatening nearby structures. This scenario plays out far too often for pond owners who underestimated the importance of proper spillway design—or skipped it entirely.
A spillway isn’t just a nice-to-have feature; it’s the safety valve that protects your entire pond investment. Think of it as the overflow drain in your bathtub, but engineered to handle thousands of gallons during storm events. Without one, even a beautifully constructed pond can fail catastrophically when Mother Nature sends more water than your basin can hold.
The good news? Designing and installing an effective spillway doesn’t require an engineering degree. Whether you’re planning a new pond using proven pond construction methods or retrofitting an existing water feature, understanding spillway basics will save you from expensive repairs and sleepless nights during rainstorms.
In this guide, you’ll learn how to choose the right spillway type for your situation, calculate the proper size based on your watershed, and avoid the common mistakes that lead to spillway failure. We’ll walk through installation steps using straightforward language and practical tips gained from real-world pond building experience. By the end, you’ll have the confidence to create a spillway system that keeps your pond safe and beautiful for years to come.
What a Pond Spillway Actually Does (And Why You Need One)
Think of your pond spillway as a pressure relief valve—it’s the unsung hero that keeps your beautiful water feature from turning into a disaster zone during heavy rains. Let me explain what’s really going on here.
When a big storm rolls through, your pond starts filling up fast. Without a proper spillway, that rising water has nowhere to go except over your dam or berm in the worst possible spots. I learned this the hard way years ago when my first backyard pond overflowed during an unexpected downpour, washing out a section of the bank and flooding my vegetable garden. Not fun!
Here’s what actually happens: as rainwater accumulates, your pond level rises inch by inch. A spillway creates a designated exit route—a controlled escape path where excess water can flow away safely. It’s like having a specific doorway for water to leave through, rather than letting it burst through whatever barrier is weakest.
Without this safety valve, you’re risking some serious damage. Uncontrolled overflow can erode your dam, undercut structural elements, wash away soil and plants, and even compromise the entire pond structure. I’ve seen ponds lose fish, damage expensive liners, and require thousands in repairs—all because the spillway wasn’t adequate or was missing entirely.
The beauty of a well-designed spillway is its simplicity. When water reaches the spillway’s lip, it gently flows over and follows a predetermined path away from your pond. The water level never gets high enough to cause problems because the spillway automatically kicks in. It works 24/7 without electricity, pumps, or any intervention from you.
Whether you’re planning a new pond or evaluating an existing one, understanding this basic function helps you appreciate why getting your spillway design right matters so much. It’s not just an optional feature—it’s essential insurance for your investment.

The Three Main Types of Pond Spillways
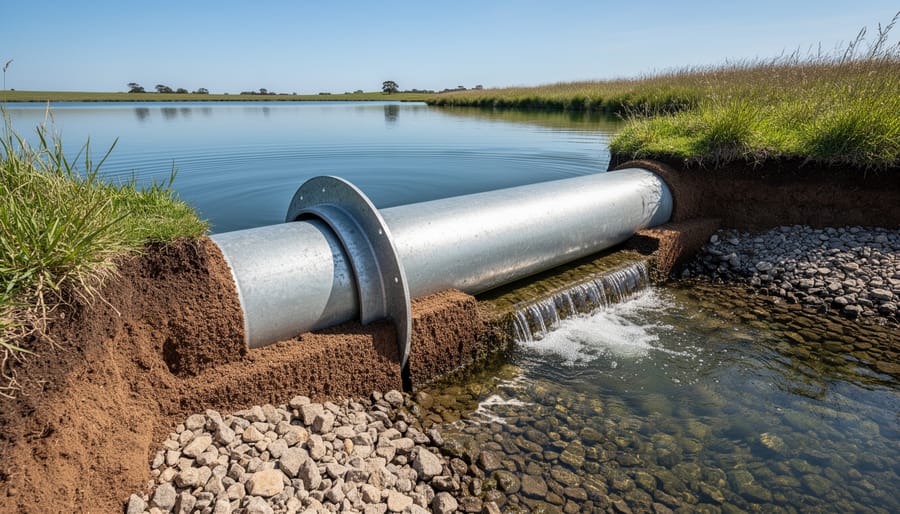
Pipe Spillways: The Most Common Choice
If you’re building or maintaining a pond, chances are a pipe spillway will be your go-to solution. I’ve installed quite a few of these over the years, and honestly, they’re popular for good reason. They’re straightforward, reliable, and work beautifully for most backyard ponds.
So how do pipe spillways actually work? Picture this: a pipe positioned horizontally through your dam or berm, with the inlet end set at exactly the water level you want to maintain. When your pond fills beyond that point, water naturally flows through the pipe and exits safely downstream. It’s gravity doing all the heavy lifting, which means no moving parts to worry about.
These spillways shine in smaller ponds, typically under an acre, where you need a predictable, consistent overflow solution. They’re especially perfect when you’re working with an earthen dam and want something you can install during construction without too much fuss.
The basic setup includes a few key components: the pipe itself (usually PVC or corrugated metal), an anti-seep collar that wraps around the pipe to prevent water from sneaking along the outside, and a trash rack or screen at the inlet to keep leaves and debris from clogging things up. You’ll also want some type of energy dissipation at the outlet end, like a simple rock apron, to prevent erosion where water exits.
The advantages are clear. Pipe spillways are budget-friendly, easy to install, and maintain a steady pond level automatically. The downside? They can clog if you don’t keep up with maintenance, and they have limited capacity compared to larger spillway types. For heavy storm events, you might need a secondary overflow system as backup insurance.
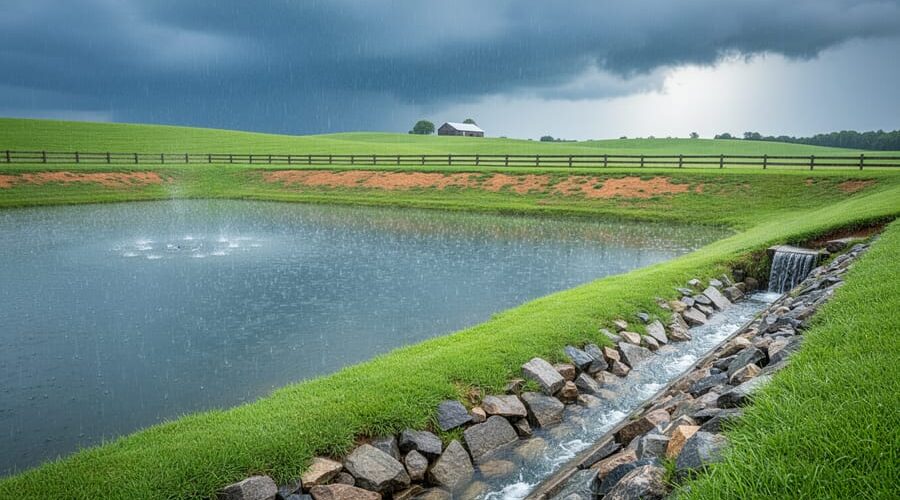
Surface Spillways: Natural-Looking Overflow
If you’re looking for a spillway that blends beautifully with your landscape, a surface spillway might be exactly what you need. These open channel designs let water flow gracefully over the top when your pond reaches capacity, creating a natural-looking waterfall effect that’s both functional and gorgeous to watch.
I remember the first time I installed a surface spillway on my backyard pond. The way water gently cascaded over the stones during spring rains transformed what could have been a flood concern into a delightful water feature my neighbors always commented on.
Surface spillways work best for smaller to medium-sized ponds where you want that aesthetic appeal front and center. The water simply flows over a designed low point in your pond’s edge, typically lined with rocks, concrete, or other durable materials. Think of it as giving your pond a designated “exit route” that looks intentional rather than accidental.
The biggest consideration with surface spillways is erosion control. Water flowing over earth can quickly carve channels and wash away soil, so you’ll need to protect the spillway path. Line your channel with riprap (large rocks), concrete, or geotextile fabric topped with stone. The goal is creating a stable surface that can handle regular water flow without degrading.
These spillways shine in ornamental ponds and water gardens where you’re prioritizing beauty alongside function. They’re relatively straightforward to build and maintain, making them perfect for DIY enthusiasts ready to add both safety and visual interest to their pond.
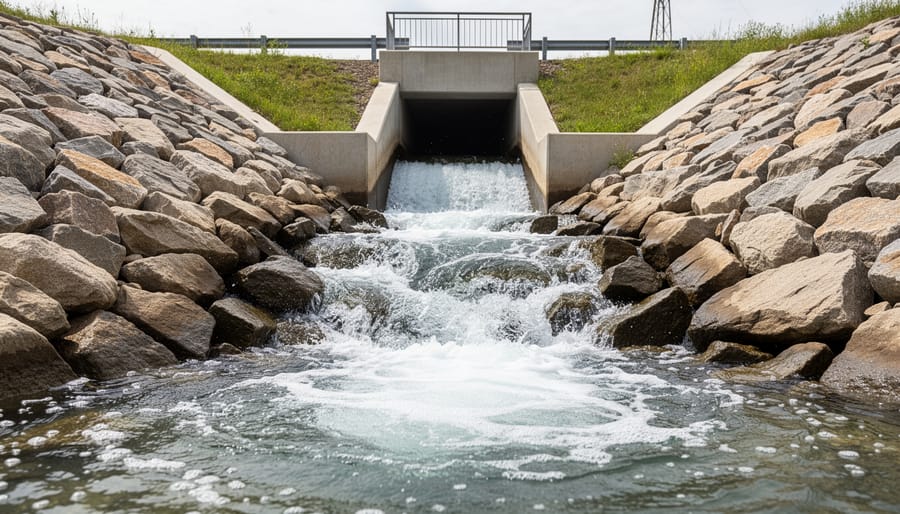
Emergency Spillways: Your Backup Plan
Think of an emergency spillway as your pond’s insurance policy. While your primary spillway handles everyday water flow, the emergency spillway only kicks in when something unexpected happens—like a sudden torrential downpour, a clogged primary outlet, or debris blocking your main system.
Here’s the key difference: your primary spillway works continuously during normal rainfall, managing routine overflow through pipes or channels. The emergency spillway, on the other hand, sits higher on your dam or berm and only activates when water levels rise beyond what your primary system can handle. It’s essentially a wide, shallow channel cut into the lowest point of your embankment (but not through the dam itself).
Every pond absolutely needs one, regardless of size. I learned this lesson after a spring storm dumped three inches of rain in an hour on my property. My primary spillway was working perfectly, but it simply couldn’t handle that volume. Thankfully, my emergency spillway took over, directing the excess water safely around my dam instead of over it. Without that backup, I could have faced serious erosion or even dam failure.
The construction is typically simpler than a primary spillway—often just a broad, grassed waterway or rock-lined channel positioned at least six inches above your normal water level. This height difference ensures it only functions when truly needed, preserving your pond’s normal depth while providing critical overflow protection when Mother Nature throws you a curveball.
Sizing Your Spillway: Getting the Math Right (Without the Headache)
Understanding Your Watershed
Your watershed is simply all the land that drains water into your pond. Think of it like a big funnel – when it rains, water flows downhill from surrounding areas straight into your pond. Understanding this drainage area is crucial because it determines how much water your spillway needs to handle during storms.
Here’s a simple way to estimate your watershed without fancy equipment or calculations. Start by walking around your property and identifying the highest points surrounding your pond. These natural ridgelines act as boundaries where water flows away in different directions. Everything on your side of these ridges drains toward your pond.
For a quick measurement, use online mapping tools like Google Earth. Trace the boundary line around your watershed, and the tool will calculate the area for you. As a general rule, rural ponds typically have watersheds ranging from 5 to 20 times the size of the pond surface itself.
Remember, surfaces matter too. A watershed covered in forest or grass absorbs more water than one with rooftops, driveways, or compacted soil, which sends more runoff rushing toward your pond. Take note of these hard surfaces when planning your spillway capacity – they significantly increase water volume during heavy rains.
Rainfall Intensity: Planning for the Worst Storm
When designing your spillway, you need to plan for the heaviest rainstorm your area might experience, not just typical weather. This is where rainfall intensity comes into play, and it’s absolutely crucial for keeping your pond safe.
Start by checking your local weather bureau or council website for rainfall data. Look for “100-year storm” statistics, which tells you the heaviest rainfall expected once every century. I know it sounds dramatic, but trust me, planning for this worst-case scenario means your spillway won’t fail when you need it most.
Most areas provide rainfall intensity figures in millimeters or inches per hour. For example, my region sees 100mm in intense storms, so I designed my spillway assuming that much water would hit in a single hour. This conservative approach means your rainwater management system can handle extreme events.
If you can’t find exact local data, always err on the side of caution. It’s better to overestimate and have a spillway that’s slightly larger than necessary than to underestimate and face overflow damage to your property.
Quick Sizing Rules for Small Ponds
Here’s a handy cheat sheet I wish I’d had when I started building a backyard pond. For ponds up to 1,000 gallons, a 3-inch diameter pipe works well as your primary spillway. Between 1,000 and 5,000 gallons, bump up to a 4-inch pipe. Larger backyard ponds over 5,000 gallons need at least a 6-inch pipe to handle heavy rain events safely.
Always position your spillway pipe at least 2 inches below your desired water level. This creates a buffer zone before overflow kicks in. I learned this the hard way after my first spring storm!
Here’s my golden rule: size your spillway to handle twice the typical rainfall in your area. This safety margin accounts for clogged pipes, leaves, or unexpected downpours. If you’re between sizes, always go bigger. A slightly oversized spillway never caused problems, but an undersized one can lead to costly erosion and structural damage to your pond edges.
Step-by-Step: Installing a Pipe Spillway
Positioning: Where to Place Your Spillway
Finding the perfect spot for your spillway can make all the difference between a system that works beautifully and one that causes headaches down the road. Start by walking around your pond and observing how water naturally flows during heavy rain. You want to position your spillway at the lowest point where overflow would naturally occur, but here’s the key: that spot also needs stable, compact ground that won’t erode or shift over time.
I learned this lesson the hard way when I placed my first spillway on what looked like solid ground, only to discover it was actually fill dirt that settled unevenly after a few months. Now I always check soil stability by digging down at least 12 inches to see what I’m working with.
Think about where the water will go after it leaves your spillway. You need a clear path that directs overflow away from structures, gardens, or areas where pooling could cause problems. Ideally, route it toward a natural drainage swale or existing waterway. Also consider access for maintenance. You’ll need to inspect and occasionally clear debris from your spillway, so don’t tuck it somewhere you can barely reach. Position it where you can comfortably work without climbing over rocks or wading through muck.
Materials and Tools You’ll Need
Before you break ground, let’s gather everything you’ll need to build a reliable spillway. For most backyard pond spillways, you’ll want PVC pipe (4-6 inches diameter works well for medium ponds), pipe fittings like elbows and couplers, and PVC primer and cement for watertight seals. Choose Schedule 40 PVC since it’s thicker and more durable than thinner alternatives.
You’ll also need landscaping fabric to prevent soil erosion, gravel or river rock for the spillway channel (smooth stones work best), and flexible pond liner if you’re creating a lined spillway. Don’t skimp on liner quality—45 mil EPDM rubber lasts decades longer than cheaper vinyl options.
For tools, have a shovel, level, tape measure, hacksaw or PVC cutter, and a rubber mallet handy. A carpenter’s level is essential for proper grading. I learned the hard way that eyeballing slope measurements leads to water pooling in all the wrong places!
Consider picking up waterproof sealant for any joints where different materials meet. Quality materials cost more upfront but save you fromredo headaches later.
The Installation Process
Now comes the exciting part—bringing your spillway design to life! I’ll walk you through this step by step, and trust me, taking your time here will save you headaches down the road.
Start by excavating your spillway channel according to your measurements. Dig about 6 inches deeper than your final grade to allow room for your foundation layers. The key is maintaining a gentle, consistent slope—typically 2 to 4 percent works beautifully. I learned the hard way that steeper isn’t better; it just creates erosion problems later. Use a string level or laser level to check your work as you go.
Once excavation is complete, compact the bottom thoroughly. I use a hand tamper for smaller spillways or rent a plate compactor for larger projects. This step prevents settling that could create low spots where water pools instead of flows.
Next, lay down a 4 to 6 inch base layer of crushed gravel and compact it firmly. This creates drainage and prevents frost heaving in colder climates. Add a layer of coarse sand on top, about 2 inches thick, and smooth it out carefully.
If your spillway is more than 4 feet long, install anti-seep collars around your pipe. These metal or plastic flanges wrap around the outlet pipe at intervals, forcing water to travel a longer path and preventing it from channeling along the pipe’s exterior. Space them about 10 feet apart for best results.
Now install your liner or concrete, depending on your design choice. For flexible liners, overlap edges generously and secure with landscape staples. Finally, add your surface layer—whether that’s riprap, concrete blocks, or natural stone. Seal all joints with waterproof mortar, ensuring water flows over your spillway, not under it.
Critical Design Mistakes That Lead to Spillway Failure
Undersizing: The Most Dangerous Mistake
Here’s the hard truth: an undersized spillway is a ticking time bomb. When heavy rains arrive and your spillway can’t handle the volume, water finds its own path, usually right over or through your dam. This erodes soil rapidly, creating channels that grow wider with each passing minute. Before you know it, you’ve got a catastrophic failure on your hands.
How do you know if yours is too small? Watch during moderate rainfall. If water flows over the dam anywhere besides the spillway, or if your spillway runs at absolute maximum capacity during typical storms, you’re undersized. Another red flag is erosion around the spillway edges or water pooling behind the dam structure.
I learned this lesson watching a neighbor’s beautiful pond nearly wash away after just one unexpected downpour. Their spillway looked fine in dry weather but couldn’t handle reality.
If you suspect undersizing, don’t wait. Consult with your local soil conservation office or a pond professional immediately. Sometimes you can widen an existing spillway, but often a complete redesign is necessary. Yes, it’s an investment, but it’s nothing compared to rebuilding an entire dam.
Poor Installation and Seepage Problems
One of the sneakiest ways spillways fail is through poor installation around pipes. When backfilling soil around your spillway pipe, loose or improperly compacted soil creates pathways for water to seep along the outside of the pipe rather than flowing through it. This seepage gradually erodes the surrounding soil, creating voids that can eventually cause the entire structure to collapse or your dam to breach.
The fix is surprisingly straightforward but requires patience. Backfill in thin layers, ideally 4-6 inches at a time, compacting each layer thoroughly before adding the next. I learned this the hard way when my first pond developed a mysterious leak that turned out to be water sneaking around my poorly installed pipe. Use clay-rich soil when possible, as it compacts better and resists water penetration. Tamp down each layer firmly with a hand tamper or your boots for smaller projects. For larger installations, consider renting a plate compactor. Pay special attention to the area directly against the pipe, working the soil underneath and around it to eliminate air pockets. This extra effort during installation saves you from heartbreaking repairs later.
Ignoring Downstream Erosion
Here’s the thing many pond owners discover too late: what happens after water leaves your spillway matters just as much as the spillway itself. I learned this the hard way when my first spillway created a beautiful waterfall that also carved out a gully you could lose a boot in!
The problem is energy. Water racing down your spillway hits the ground with surprising force, and it will dig, erode, and relocate your carefully positioned rocks and soil. Left unchecked, this erosion can undermine your dam, create muddy messes, and even threaten the structural integrity of your pond.
The good news? Simple solutions work wonderfully. A splash pad at the base of your spillway dissipates that energy harmlessly. This can be a concrete apron, or more naturally, a generous layer of riprap (those chunky, irregularly shaped stones). Place your largest rocks where the water hits hardest, gradually transitioning to smaller stones as the water calms. Think of it as creating a staircase that slows the water’s journey back to earth, protecting everything downstream.
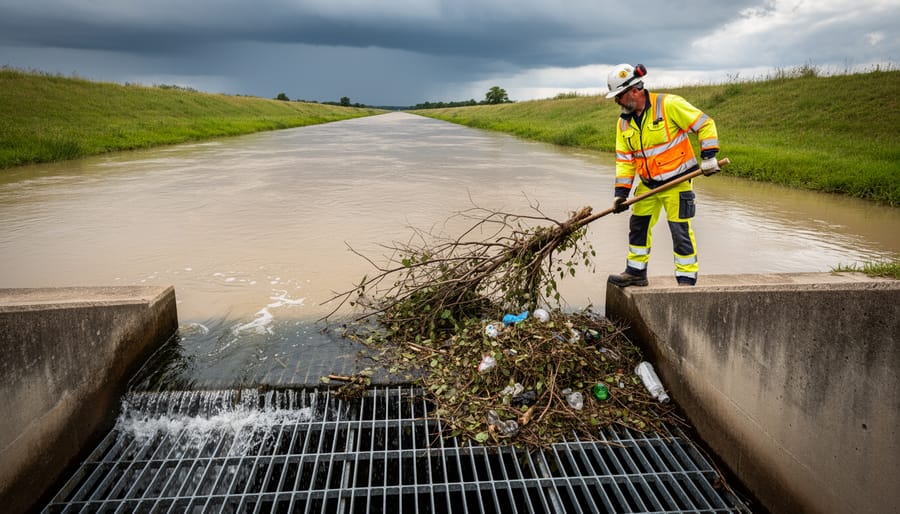
Maintaining Your Spillway for Long-Term Protection
Here’s something I learned the hard way: a spillway isn’t a set-it-and-forget-it feature. After my first winter, I discovered how quickly nature can turn a perfectly functioning spillway into a clogged mess. Regular maintenance is your insurance policy against costly repairs and potential pond damage.
Start with seasonal inspections, ideally four times yearly. Spring is crucial after winter debris accumulation, while autumn prepares your spillway for heavy leaf fall. During each inspection, walk the entire spillway length looking for erosion, settling, or cracks in concrete structures. Check that the discharge area hasn’t developed gullies or undermining.
Debris removal should happen more frequently, especially during fall. Leaves, branches, and sediment can block flow within days during peak seasons. I keep a rake and bucket near my pond specifically for quick cleanups after storms. Clear any vegetation growing in or near the spillway channel, as roots can compromise structural integrity.
Your maintenance checklist should include examining the inlet for sediment buildup, testing that water flows freely at various pond levels, and ensuring any filters or trash racks remain secure. For pipe spillways, flush the system annually to prevent clogs.
Watch for warning signs between inspections. Unexpected erosion around the spillway, water flowing outside the designed channel, or standing water where it shouldn’t be all signal problems. Soft or spongy ground near the structure might indicate underground leaks requiring immediate attention.
Keep records of your inspections and any repairs. This maintenance log helps you spot developing patterns and proves invaluable if you ever need professional help. Remember, water feature maintenance isn’t glamorous work, but it protects your investment and keeps your pond safe year after year.
There’s something wonderful about standing by your pond on a rainy day, watching water flow smoothly through your spillway exactly as it should. That peace of mind is what proper spillway design delivers. You’ve protected your investment, safeguarded your property, and created a system that works harmoniously with nature rather than fighting against it.
If you’ve been putting off addressing your pond’s overflow system, now is the time to act. Whether you’re building from scratch or retrofitting an existing pond, the principles we’ve covered give you everything you need to move forward confidently. Start by assessing your pond’s specific needs, calculate that crucial spillway capacity, and choose the design that fits your situation and skill level.
Remember, you don’t need to be a professional engineer to create an effective spillway. What you do need is careful planning, accurate measurements, and a willingness to follow proven guidelines. Thousands of DIY enthusiasts have successfully built their own spillways, and you can too. The key is taking it step by step, double-checking your work, and not rushing the process.
Your pond deserves a spillway that functions reliably for years to come. Combined with other thoughtful backyard pond ideas, a well-designed overflow system transforms your water feature from a potential worry into a true backyard sanctuary. Take what you’ve learned here, gather your materials, and start building that essential protection your pond needs.