
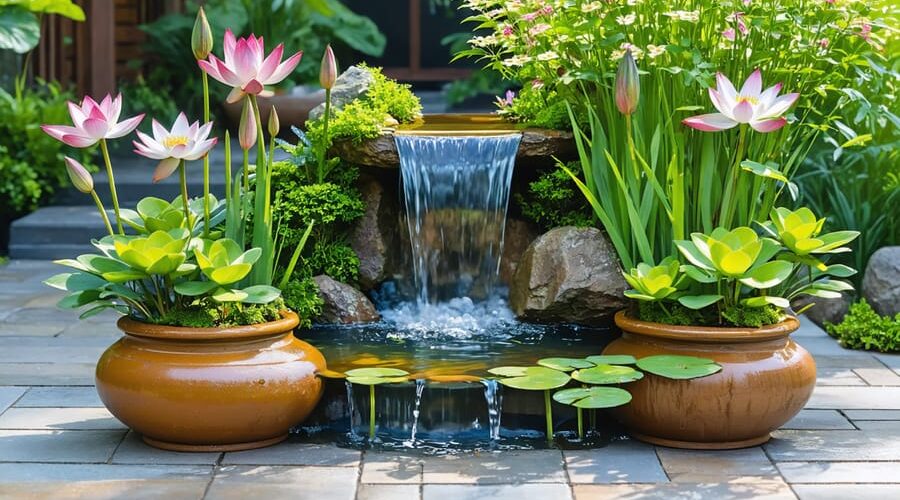
Create a Stunning Water Garden in a Pot (Perfect for Small Spaces)
Transform any ordinary container into a thriving small space water gardens with minimal effort and maximum impact. Creating a water garden in a pot combines the tranquil beauty of pond features with the simplicity of container gardening, bringing life and movement to patios, balconies, or garden corners. Select a glazed ceramic pot at least 16 inches deep, ensuring it’s water-tight and sturdy enough to support aquatic plants and small fountain pumps. Layer the bottom with clean gravel, position your chosen water plants in submerged containers, and add a small recirculating pump to keep the water fresh and oxygenated. Whether you’re drawn to floating lilies, elegant rushes, or decorative lotus, this miniature ecosystem provides a perfect starting point for aspiring water gardeners while requiring just a fraction of the maintenance of traditional ponds.
Essential Materials and Tools
Choosing the Right Container
Selecting the right container is crucial for your water garden’s success. While you can use almost any watertight container, certain features will make your project more enjoyable. Look for a pot that’s at least 15-20 inches wide and 12 inches deep to give your plants adequate space to grow and ensure proper water circulation.
Glazed ceramic pots are excellent choices as they’re durable, weather-resistant, and come in various attractive colors. Plastic containers work well too and are lighter and more affordable, though they may not last as long. If using a wooden barrel or metal container, make sure to add a reliable waterproof liner to prevent leaks and protect against rot or rust.
Consider the container’s location when choosing its size and material. Larger containers are more stable and easier to maintain but remember that once filled with water, they’ll be very heavy and difficult to move. For a balanced look, select a container that complements your outdoor space while being practical for the types of plants you plan to grow.

Water Garden Components
To create your potted water garden, you’ll need several essential components working together harmoniously. The heart of your system is the water pump, which keeps the water moving and oxygenated. Choose a submersible pump rated for small fountains or ponds – typically, a 50-100 GPH (gallons per hour) pump works well for container gardens.
A waterproof container liner is crucial if your chosen pot isn’t naturally waterproof. You can use either a flexible rubber liner or a rigid plastic insert, ensuring it fits snugly inside your container. Don’t forget to explore filters for small water gardens to keep your water crystal clear.
Other must-have items include:
– An outdoor-rated electrical cord for your pump
– A fountain head or spout for water movement
– Aquatic planting baskets or containers
– Clean gravel or river rocks
– A water treatment solution to remove chlorine
Consider adding LED lights for nighttime ambiance, though this is optional. Remember to choose components that match your pot’s size – bigger isn’t always better when working with contained water features. All these elements should be readily available at garden centers or aquatic supply stores.
Step-by-Step Assembly Process
Preparing Your Container
Before adding any plants or water, your container needs proper preparation to ensure it can safely hold water and support aquatic life. Start by thoroughly cleaning your chosen pot with mild soap and water, removing any dirt or debris. If you’re using a ceramic or terracotta pot, you’ll need to seal it to prevent water from seeping through the porous material.
Apply a high-quality pond sealant or waterproof coating to the interior of your container. Work in thin, even layers, making sure to cover all surfaces, including any drainage holes. Most sealants require at least two coats – allow each layer to dry completely before applying the next one. This typically takes 24-48 hours, depending on weather conditions.
For plastic or fiberglass containers, check for any cracks or damage. While these materials are naturally waterproof, existing damage could lead to leaks. Once sealed, test your container by filling it with water and monitoring for 24 hours to ensure there are no leaks before adding plants and decorative elements.
Position your prepared container in its final location before filling it. Remember, water is heavy, and moving a full container can be challenging and potentially dangerous.
Installing the Pump and Filtration
A reliable pump and filtration system is essential for keeping your container water garden healthy and clear. Choose a small submersible pump rated for containers under 50 gallons – a 70-120 GPH (gallons per hour) pump usually works well for most pot gardens. Position the pump at the bottom of your container, ideally slightly elevated on stones to prevent debris clogging.
Connect your pump to a small fountain head or water spout to create gentle movement. The sound of trickling water adds a soothing element to your garden while helping to oxygenate the water. For added filtration, consider attaching a small mechanical filter to your pump, though this is optional for smaller setups.
Hide the pump cord by running it discreetly up the back of the pot and securing it with waterproof tape. If your container will be far from an outlet, use an outdoor-rated extension cord and protect the connection point from moisture. Remember to keep the pump accessible for regular maintenance and cleaning.
A tip from experience: test your pump and adjust the flow rate before adding plants to ensure the water movement won’t be too vigorous for your chosen aquatic plants.
Adding Substrate and Decorative Elements
Start by adding a 2-inch layer of small gravel or aquarium substrate to the bottom of your pot. This creates a stable foundation for your plants and adds natural appeal. Next, arrange decorative rocks of varying sizes to create depth and visual interest. Consider adding a few larger stones or ceramic features as focal points, positioning them slightly off-center for a more natural look.
For an authentic aquatic environment, incorporate driftwood pieces or water-safe ornaments. These not only enhance aesthetics but also provide hiding spots for any fish you might add later. Remember to rinse all decorative elements thoroughly before placing them in your water garden to remove dust and debris.
Create different levels within your pot using stacked stones or purpose-made plant shelves. This allows you to position plants at various depths, mimicking natural pond environments while adding visual dimension to your creation.
Plant Selection and Care
Best Plants for Container Water Gardens
When choosing plants for your container water garden, it’s important to include a mix of different types for visual interest and ecological balance. Water lilies are perfect centerpieces, with dwarf varieties like ‘Helvola’ or ‘Perry’s Baby Red’ being ideal for containers. These beauties float on the surface and produce stunning blooms throughout summer.
For vertical interest, try marginal plants like Louisiana Iris or Sweet Flag, which thrive with their roots submerged and foliage above water. Water Forget-me-nots add delicate blue flowers and do well in shallow water, while Marsh Marigolds bring cheerful yellow blooms in spring.
Don’t forget to include oxygenating plants like Hornwort or Anacharis. These underwater plants help maintain water quality and provide shelter for any fish you might add. For surface coverage, consider floating plants such as Water Lettuce or Duckweed, which help reduce algae growth by limiting sunlight penetration.
Most aquatic plants prefer full sun to partial shade and require minimal fertilization when planted in nutrient-rich aquatic soil. Start with just a few plants and add more as needed – they’ll grow and multiply over time.
Planting Techniques
Position your plants carefully to create a balanced and thriving water garden. Start by placing taller plants like rushes or water iris toward the back or center of your container. Use aquatic plant baskets filled with heavy garden soil to keep plants secure and prevent soil from clouding the water.
For floating plants like water lilies, ensure their crown (where leaves emerge) sits just below the water surface. Submerged plants should be weighted down with small stones around their base to keep them in place. Space plants appropriately, leaving room for growth while maintaining aesthetic appeal.
Consider the water depth requirements of each plant – some thrive in deep water while others prefer shallow margins. Use bricks or overturned pots as platforms to achieve different water levels for various plants. Remember to remove any non-aquatic soil from plant roots before placing them in your water garden to maintain water clarity.
Maintenance Tips
Keeping your container water garden healthy requires regular water feature maintenance, but don’t worry – it’s easier than you might think! Check the water level every few days, especially during hot weather, and top it up when needed. Rainwater is ideal, but tap water works fine too.
Monitor your plants weekly for yellowing leaves or signs of overcrowding. Trim dead foliage promptly to prevent decay and maintain water quality. If you notice algae starting to form, try adding more floating plants to reduce sunlight exposure, or consider installing a small fountain to keep the water moving.
Clean your pump’s filter monthly to ensure proper water circulation. During autumn, remove fallen leaves before they sink and decompose. In winter, move tender plants to a protected area if you live in a cold climate, or consider bringing the entire container indoors if it’s manageable.
If the water becomes cloudy, perform a partial water change (about 25%) and check that your pump is working correctly. For stubborn algae problems, you might need to temporarily remove the plants and thoroughly clean the container. Remember to treat tap water with a dechlorinator before adding it to your garden to protect your aquatic plants and any fish you may have included.
Creating a water garden in a pot is a rewarding project that brings tranquility and natural beauty to any outdoor space. With just a few basic supplies and some careful planning, you can transform a simple container into a thriving aquatic ecosystem. Remember to choose the right location, select appropriate plants, and maintain proper water quality for the best results. The joy of watching your miniature water garden flourish, attracting birds and beneficial insects, makes this DIY project well worth the effort. Don’t be afraid to get creative with your design and plant combinations – each water garden can be as unique as its creator. Start small, learn from experience, and most importantly, enjoy the peaceful atmosphere your new water feature brings to your outdoor sanctuary.