
Transform Your Yard with Water Features That Actually Work
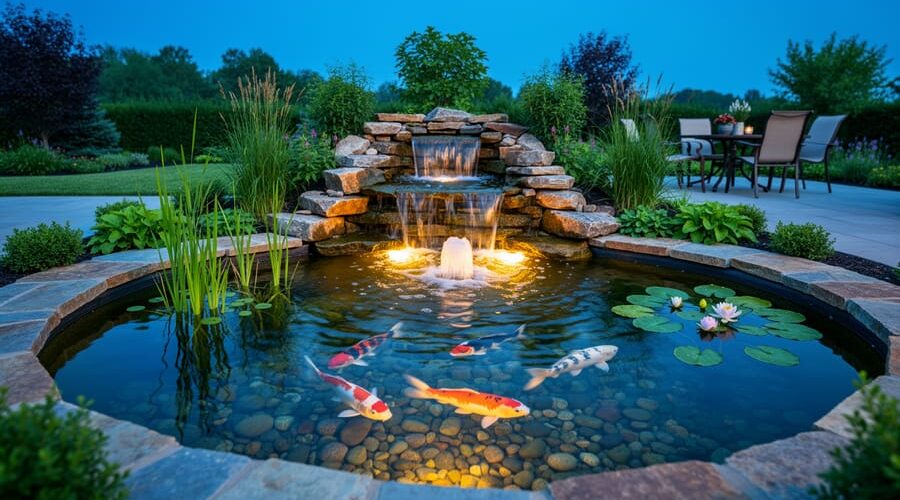
Transform your existing water feature from basic to breathtaking by layering in strategic enhancements that create depth, movement, and ambiance. Start with submersible LED lighting positioned beneath waterfalls or behind rocks to create dramatic nighttime reflections that completely change your yard’s atmosphere after sunset. Add a second pump or fountain head to introduce varied water patterns—the contrast between a gentle bubbler and a cascading stream creates visual interest that keeps your eyes moving across the entire feature.
Expand your feature’s footprint by carving out shallow beach edges where water meets stone, allowing birds to bathe while softening harsh liner boundaries that often look artificial. Install a biological filter upgrade if your water stays cloudy despite regular maintenance; this single improvement transforms murky ponds into crystal-clear showcases where you’ll actually see your fish swimming below the surface.
Consider adding aquatic plant shelves at different depths using stacked rocks or purpose-built baskets—these create natural filtration while introducing color and texture that changes with each season. For adventurous DIYers, connecting a small secondary basin with a stream creates the soothing sound of flowing water while doubling your planting opportunities along the water’s path.
The beauty of enhancements lies in their flexibility. You don’t need to tackle everything at once. Choose one upgrade that excites you most, complete it well, then move to the next when inspiration strikes.
Why Your Water Feature Needs an Upgrade
Let me tell you, I’ve seen my fair share of water features that started with big dreams but ended up as disappointments. Maybe the water turned green within weeks, or that peaceful trickling sound became an annoying drip, or the whole setup just looked… underwhelming. If this sounds familiar, you’re not alone, and the good news is that small upgrades can transform your water feature from “meh” to magnificent.
Most water features underperform because they were either installed on a tight budget, designed without thinking about long-term maintenance, or simply never evolved beyond their basic setup. But here’s what makes upgrades so worthwhile: they solve real problems while adding genuine value to your outdoor space.
First, let’s talk about wildlife. A basic water feature might attract a few birds, but with strategic enhancements like shallow edges, varied depths, and the right plants, you’ll create a genuine ecosystem. I’ve watched my own pond transform from a lonely water bowl to a bustling hub visited by dragonflies, frogs, and even the occasional heron. It’s like adding a National Geographic episode to your backyard.
The aesthetic benefits are equally impressive. Simple additions like underwater lighting, natural stone edging, or a few well-placed accent plants can elevate your feature from basic to breathtaking. You’ll actually want to spend time near it instead of just glancing at it through the window.
Water quality improvements matter too, especially if you’re dealing with persistent algae or murky conditions. Upgraded filtration, aeration systems, or adding beneficial plants doesn’t just make maintenance easier. It creates healthier water that’s clearer and more inviting.
And here’s the kicker: quality water features genuinely boost property value. Realtors consistently report that well-maintained, attractive water features are selling points that help homes stand out. You’re not just spending money; you’re investing in your property while creating something beautiful to enjoy every single day.
Lighting: The Easiest Way to Make Magic Happen
Underwater vs. Above-Water Lighting
Choosing between underwater and above-water lighting can dramatically change your water feature’s personality. I’ve experimented with both, and each creates its own magic.
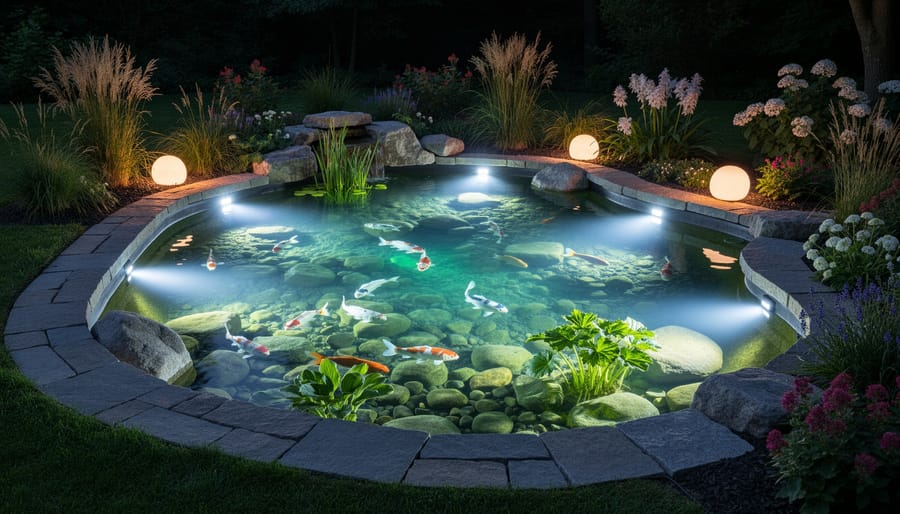
Underwater lights work beautifully for fountains and waterfalls, illuminating the water itself and creating that enchanting glow-from-within effect. They’re perfect for highlighting moving water, making splashes and cascades sparkle like liquid crystal. For ponds with fish, submersible lights let you showcase your aquatic friends swimming through beams of soft light. Just remember to choose fish-safe options that won’t overheat the water or disturb their natural rhythms.
Above-water lighting, like spotlights and up-lights, offers more flexibility and easier maintenance. Position them to shine onto water surfaces, creating dramatic reflections and silhouettes of surrounding plants. They’re ideal for smaller features like birdbaths or decorative urns where underwater installation isn’t practical.
For most backyard ponds, I recommend combining both approaches. Use submersible lights near waterfalls for that magical underwater effect, then add spotlights around the perimeter to illuminate landscaping and create depth. Explore various pond lighting options to find what suits your feature best. Start with one or two fixtures and expand as you discover what works.
Color and Timing Considerations
When it comes to lighting your water feature, less is often more. I learned this the hard way when I first installed lights around my pond and turned the whole backyard into what my neighbor kindly called a “disco fountain.” Start with subtle, warm white lights rather than bright blues or harsh whites that can look artificial. Soft amber or natural white tones create a peaceful evening atmosphere that highlights the water’s movement without overwhelming it.
Colored lights can be fun for special occasions, but use them sparingly in everyday settings. If you want to experiment with color, stick to one or two hues that complement your landscaping rather than cycling through a rainbow effect.
Timers are your best friend for both energy savings and convenience. Set your lights to come on at dusk and turn off around bedtime, typically running 3-4 hours. This gives you that magical twilight ambiance without leaving them on all night when nobody’s enjoying them. Most outdoor timers are weatherproof and incredibly simple to install, making this an easy upgrade that pays for itself quickly through reduced electricity costs.
Adding Movement: Pumps, Fountains, and Waterfalls
Upgrading Your Pump for Better Flow
Your pump is the heart of your water feature, and sometimes it just needs a boost! I learned this the hard way when my fountain started trickling instead of flowing—it was quite the wake-up call.
Calculating the right pump capacity is simpler than you’d think. First, measure your feature’s volume in gallons and aim for a pump that circulates the total volume at least once per hour. For waterfalls, you’ll need about 100 gallons per hour for every inch of spillway width. If you’ve added fish or plants since your initial setup, you’ll want even stronger circulation to maintain proper filtration and oxygen levels.
Signs you need an upgrade include weak water flow, struggling performance during hot weather, or if you’ve expanded your feature with additional fountains or streams. When shopping, look for energy-efficient models with adjustable flow rates—they’ll save money long-term and give you control over your water’s movement.
Remember, bigger isn’t always better. An oversized pump can stress delicate plants and create too much turbulence for fish. Match your pump to your specific needs, and your water feature will reward you with beautiful, consistent flow for years to come.
DIY Waterfall Additions
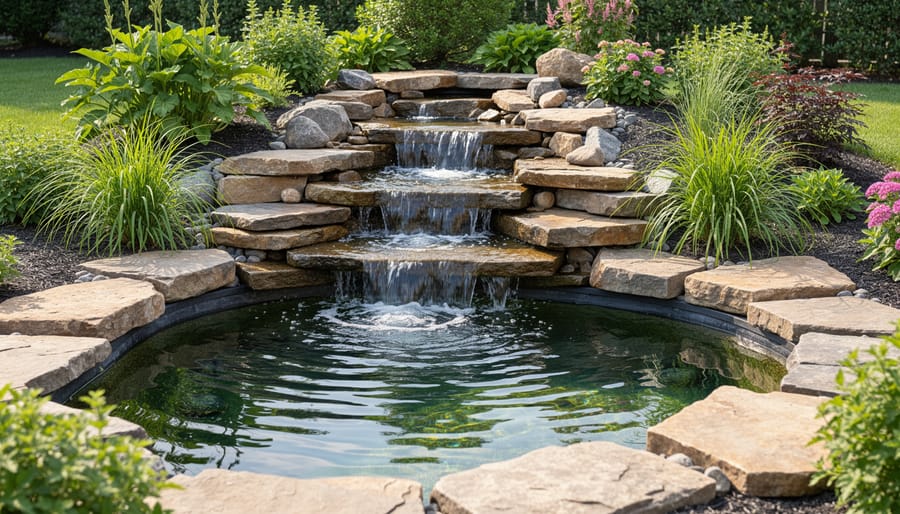
Creating your own waterfall addition is one of the most rewarding projects you can tackle, and trust me, it’s easier than you might think! I still remember the first time I stacked rocks to create a cascading effect in my backyard pond—watching that water tumble down for the first time felt like pure magic.
Start by choosing your waterfall location. The best spot is typically at the highest point of your pond or where you want to draw the eye. You’ll need a pond liner (or liner extension if adding to an existing feature), various sized rocks, a submersible pump, and flexible tubing. Here’s the fun part: raid your local landscape supply yard for interesting stones. Flat rocks work beautifully for creating ledges where water can spill over.
Begin by extending your liner up the slope where your waterfall will sit. This creates a waterproof base that channels water back into your pond. Position your largest rocks first as anchors, then build upward and backward, creating a natural-looking stone stack. The secret is layering rocks so water flows over them rather than under them—tilt each stone slightly forward.
Connect your pump to tubing that runs up through the rock formation to the top. Hide the tubing behind and between rocks as you build. Test the water flow as you go, adjusting rock positions to create the splash patterns you love. Some rocks will create gentle sheets of water, while others produce bubbly cascades.
The beauty of this project is there’s no single right way. Your waterfall will be uniquely yours, shaped by the rocks you choose and how you arrange them. Start small, and you can always expand later as your confidence grows.
Natural Enhancements: Plants That Make a Difference
Plants for Different Water Depths
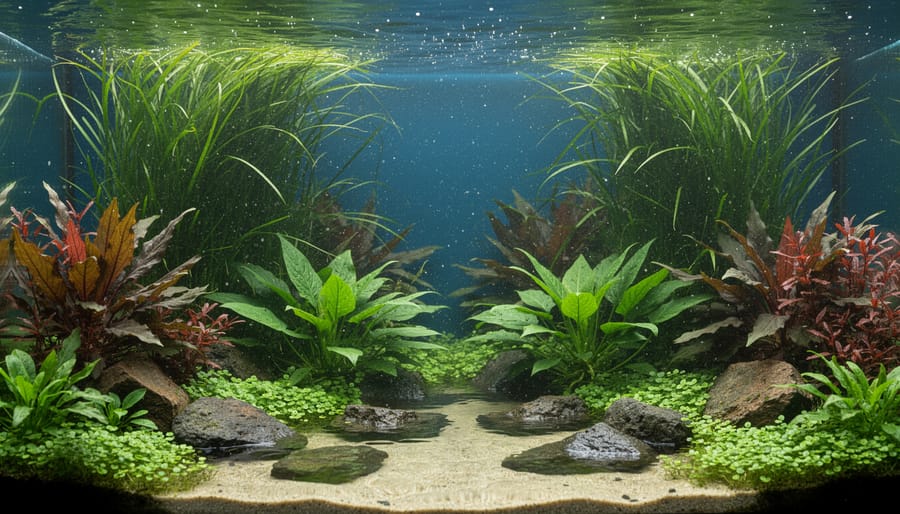
Choosing the right plants for your water feature depends entirely on how deep the water is in different areas. Think of your pond or water feature as having three distinct neighborhoods, each with its own perfect residents!
The shallow margins (0-6 inches deep) are your beginner-friendly zone. This is where I always start newcomers because these plants are practically foolproof. Try Japanese iris, which gives you stunning blooms in early summer, or pickerel rush with its lovely purple flower spikes. Marsh marigolds are another favorite – they’re one of the first to bloom in spring and really brighten things up. Keep the soil moist and give them some afternoon shade in hot climates.
The medium depth zone (6-18 inches) is perfect for marginal plants like cattails, arrowhead, and water cannas. I learned the hard way that cattails can be aggressive spreaders, so plant them in containers to keep them in check! Water cannas are fantastic if you want a tropical look without the fuss.
For the deep water zone (18+ inches), water lilies reign supreme. Hardy varieties survive winter in most climates, while tropical ones offer incredible colors but need winter protection. Position them so their roots sit at the proper depth, and they’ll reward you with stunning blooms all season.
Pro tip: Always use aquatic planting soil, never regular potting mix, which floats and clouds your water. Start with container planting until you understand each plant’s growth habits – trust me, this saves headaches later!
Creating Natural Edges
Nothing transforms a water feature quite like softening those harsh, artificial edges! When I first installed my pond, the liner edge stuck out like a sore thumb until I learned a few simple tricks.
Start by positioning flat rocks of varying sizes along the perimeter, allowing them to slightly overhang the water. This creates natural shadows and hides any visible liner. I love mixing different rock types—limestone, slate, and river rocks—for a more authentic look that mimics what you’d find in nature.
Next, tuck plants into the gaps between rocks. Low-growing ground covers like creeping Jenny or moss work beautifully, spilling over edges to blur the boundary between water and land. Add taller plants like iris or cattails at strategic points to break up straight lines.
The key is asymmetry! Nature doesn’t do perfectly even spacing, so cluster your rocks and plants in groups rather than spacing them uniformly. This natural edge design approach creates depth and visual interest.
Don’t forget to leave some areas open for wildlife access and maintenance. Your edges should look effortlessly natural while remaining functional for both you and visiting creatures.
Fish and Wildlife: Bringing Life to Your Feature
Choosing the Right Fish for Your Setup
Adding fish to your water feature brings it to life in the most delightful way! For beginners, goldfish are absolute champions – they’re hardy, colorful, and forgiving of minor water quality fluctuations. I started with simple comets in my first pond, and their cheerful presence made me instantly hooked on water gardening.
Consider your feature’s size carefully. Small fountains or container water gardens do best with just one or two goldfish, while larger ponds can accommodate koi (though they need at least 250 gallons and grow quite large). In colder climates, stick with cold-water species that can overwinter in deeper ponds. Warmer regions open up options like mosquitofish, which are maintenance superstars since they devour mosquito larvae.
Match your fish choice to your maintenance commitment. Goldfish thrive with basic filtration and weekly checks, while koi demand more robust systems and regular water testing. Start small – you can always add more fish as you gain confidence. Remember that overcrowding stresses fish and creates water quality headaches, so resist the temptation to fill your feature too quickly. A good rule of thumb: one inch of fish per square foot of surface area.
Creating Wildlife-Friendly Zones
Your water feature can become a thriving haven for wildlife with just a few thoughtful additions. I learned this firsthand when I added a simple rock ledge to my pond and watched dragonflies arrive within days!
Start by creating shallow access points around your feature’s edges. A gently sloping beach area or stacked flat stones gives frogs, birds, and beneficial insects safe drinking spots without the risk of drowning. Position rocks at varying depths, ideally 1-2 inches below the surface, to accommodate different visitors.
Native plants are absolute game-changers for attracting pollinators and local wildlife. Plant marsh marigolds, cardinal flowers, or native grasses around the perimeter. These provide shelter, breeding grounds, and natural food sources. I always recommend choosing plants native to your specific region since they’ll attract the wildlife already living nearby.
Don’t forget about adding a few hiding spots. Tuck small logs or create rock piles near the water’s edge where toads and lizards can take refuge. These creatures will reward you by munching on mosquitoes and other pests, creating a natural balance in your backyard ecosystem while making your water feature even more enjoyable to observe.
Structural Upgrades That Make a Statement
Sometimes small tweaks just aren’t enough. When you’re ready to really transform your water feature, these bigger structural projects can completely reimagine how your yard looks and feels. I won’t sugarcoat it—these upgrades require more planning, elbow grease, and investment than popping in a few plants, but the results? Absolutely worth it.
Let’s start with bridges. Even a simple arched bridge over a stream or narrow pond section creates instant charm. For a DIY approach, consider a flat bridge using pressure-treated lumber with railings on both sides. Position it at the narrowest point of your feature and ensure you have stable ground on both ends. I added a small footbridge over my pond’s inlet stream last summer, and it’s become everyone’s favorite spot for photos. Just remember to treat the wood properly and check stability regularly.
Changing your edging materials makes a dramatic difference too. If you started with basic plastic edging, upgrading to natural stone, stacked slate, or even beautiful river rock creates a polished, professional appearance. This is labor-intensive because you’ll need to drain down the water level, remove the old edging, and carefully position new materials. Pro tip: mortar isn’t always necessary for stacked stone—gravity and careful placement often do the trick.
Spillways and waterfalls add movement and sound. You can purchase pre-formed spillway units or create custom ones using flat stones. The key is creating a lip that extends slightly over the edge, allowing water to cascade rather than trickle down the face.
Beach entries—gradually sloping shallow areas—look stunning and give wildlife easy access. This works best during initial construction but can be retrofitted by reshaping one pond section with sand and small pebbles.
Finally, decorative boulders anchor your design. Choose rocks with interesting textures and colors, positioning larger specimens as focal points. Partially bury them for a natural, established look rather than just plopping them on top.
Sound and Atmosphere Enhancements
The sound your water feature creates can completely transform your outdoor experience, and the good news is that you have much more control over it than you might think! When I first installed my waterfall, it sounded more like a fire hose hitting concrete than the peaceful babble I’d imagined. A few simple adjustments changed everything.
The key to perfect water sounds lies in how and where the water lands. If your feature sounds too harsh or splashy, try adjusting the flow rate first. Most pumps have a flow control valve that lets you dial down the intensity. Sometimes slower is better, creating those gentle trickling sounds that melt stress away.
Adding multiple water levels creates richer, more complex sounds. Instead of water dropping straight from one point to another, introduce flat rocks or platforms at different heights. As water cascades from level to level, it produces varied tones that sound more natural and interesting. Think of it like adding different instruments to a song.
Strategic rock placement makes a huge difference too. Flat rocks create soft splashing sounds, while jagged edges produce livelier bubbling. Position larger rocks so water flows around them rather than directly over them for subtle variation. I spent an afternoon just moving rocks around until I found the perfect combination.
Consider your feature’s distance from seating areas. Closer placement means you’ll hear every nuance, while positioning it further away creates gentle background ambiance. Test different spots before permanently installing anything, and remember that sound travels differently in summer when foliage is full versus bare winter branches.
Smart Upgrades: Automation and Monitoring
Technology has transformed how we care for our water features, making maintenance easier and more reliable than ever. If you’re tired of constantly checking water levels or worrying about equipment while you’re away, these smart upgrades might just change your life!
Automatic water level systems are absolute game-changers. These clever devices detect when water drops below a certain point and automatically add fresh water to compensate for evaporation. I installed one on my pond three years ago, and honestly, it’s been wonderful not having to drag the hose out every few days during summer. Most systems connect directly to your garden tap and cost between $50-200, depending on features.
Smart timers take the guesswork out of running pumps and lights. Modern Wi-Fi-enabled timers let you control everything from your phone, whether you’re at work or on vacation. You can set different schedules for different seasons, run your waterfall during the day when you’re home to enjoy it, and save energy by automatically shutting things down at night.
Water quality monitors represent the cutting edge of pond care. These handy devices continuously check pH, temperature, and other parameters, sending alerts to your phone if something’s off. They’re particularly valuable for fish keepers who need to stay on top of maintenance considerations.
Remote-controlled features add convenience and fun. Imagine adjusting your fountain’s height or changing your underwater lighting colors without leaving your patio chair! Many modern pump and lighting systems now offer wireless controls, making it simple to create different moods for entertaining or quiet evenings.
Starting Small: Weekend Enhancement Projects
Let me share some projects I’ve helped dozens of beginners tackle, and trust me, the satisfaction you’ll feel by Sunday evening is absolutely worth it!
A bubbling fountain bowl is your quickest win. Grab a glazed ceramic pot (around $30-50), a small submersible pump ($20-40), and some river rocks. Drill a drainage hole, tuck the pump inside, arrange your rocks, and you’ve got a charming water feature in under two hours. Difficulty level: Easy. Total cost: $50-90.
The container water garden is my personal favorite weekend project. I started with a simple galvanized tub from the hardware store ($25) and added a few water lettuce plants and a miniature lily. No pump needed initially, though you can add one later. Within three hours, I had a complete ecosystem on my patio. The best part? You can move it around to find the perfect spot. Difficulty: Easy to moderate. Cost: $40-80.
For something slightly more ambitious, consider a disappearing fountain feature. You’ll dig a small reservoir (about 18 inches deep), install a basin with pump, cover it with metal grating and decorative stones, then stack flat rocks to create your fountain. It looks professional but honestly only takes a Saturday to complete. Difficulty: Moderate. Cost: $100-200.
My neighbor transformed her boring bird bath last weekend by adding a solar fountain pump ($25-40) right in the center. Two minutes of work, and suddenly birds were lining up like it was a spa resort.
Start with any of these projects, and you’ll gain confidence for bigger enhancements down the road. The key is choosing something that excites you, not intimidates you.
Enhancing your water feature isn’t a race to the finish line—it’s an ongoing journey that unfolds at your own pace. I’ve learned over the years that the best approach is to prioritize projects based on what matters most to you right now. Maybe you’re craving the ambiance of nighttime lighting, or perhaps you’re ready to tackle that natural filtration system you’ve been researching. Whatever calls to you, trust that instinct.
The beauty of this journey is that there’s no wrong order or timeline. Some homeowners spend years perfecting their setup, adding one element each season as inspiration strikes or budget allows. Others dive into multiple projects at once. Both approaches work beautifully when you’re following your vision rather than someone else’s blueprint.
What I love most about water feature enhancements is how each addition reveals new possibilities you hadn’t considered before. Install a fountain, and suddenly you’re noticing how sound transforms your entire yard. Add aquatic plants, and you’ll discover a whole world of seasonal changes and wildlife visitors you never expected.
My personal favorite enhancement? Adding a small bench near my pond’s edge. It wasn’t expensive or complicated, but it gave me a dedicated spot to sit with my morning coffee and watch the fish. Sometimes the simplest additions bring the greatest joy. That’s the magic of making these spaces truly your own—they evolve with you, reflecting not just your design sense but your connection to the natural world right outside your door.