
Install Your Pond Liner Like a Pro (Without the Costly Mistakes)
Installing a pond liner correctly makes the difference between decades of trouble-free enjoyment and frustrating leaks that drain both your pond and your patience. Whether you’re building a natural pond for the first time or replacing an old liner, getting this step right sets the foundation for everything that follows.
The good news? You absolutely can do this yourself, even if you’ve never worked with pond materials before. I’ve walked countless first-timers through their installations, and the ones who succeed all share one thing in common: they take their time with preparation. Rushing the underlayment or skipping proper measurements causes 90% of the problems I see in backyard ponds.
This guide walks you through every stage of the installation process, from calculating the exact liner size you need to securing those final edges. You’ll learn how to protect your liner from punctures, create professional-looking folds at corners, and avoid the rookie mistakes that lead to premature wear. We’ll cover the essential preparation work that many tutorials skip over, the actual installation techniques that ensure a wrinkle-free fit, and the finishing touches that make your pond look polished rather than DIY.
By the end, you’ll have the knowledge and confidence to install your liner properly the first time, creating a watertight foundation that’ll support your aquatic paradise for years to come.
Why Proper Installation Makes or Breaks Your Pond
I learned this lesson the hard way on my first pond project fifteen years ago. After spending a weekend carefully digging and shaping what I thought would be my dream water garden, I rushed through the liner installation because I was eager to see fish swimming by Monday. Within three months, I noticed the water level dropping faster than evaporation could explain. That small wrinkle I’d ignored? It had created a stress point that eventually tore, forcing me to drain everything, remove all my plants, and start over. That mistake cost me an entire season and twice the original budget.
Here’s the truth: your pond liner is the foundation of your entire water feature. Get the installation right, and you’ll have a leak-free pond that lasts 20 years or more. Cut corners, and you’re setting yourself up for frustration, expense, and potentially losing fish or plants you’ve grown attached to.
Proper installation prevents three major problems. First, leaks that waste water and make your pump work overtime. Second, premature liner failure from stress points, wrinkles, or inadequate underlayment protection. Third, structural issues like slumping walls or shifting edges that compromise your pond’s shape and beauty.
Think of it like wallpapering a room. You wouldn’t slap paper on a wall full of nails and rough patches, right? The same care applies here. A smooth foundation, careful fitting, and proper securing create the difference between a pond that brings years of joy and one that becomes an ongoing headache.
The good news? Installation isn’t complicated when you follow the right steps. You just need patience, attention to detail, and a clear understanding of what you’re doing. That’s exactly what we’re covering next.
Before You Begin: Essential Prep Work
Gather Your Tools and Materials
Before you start digging, let’s make sure you have everything within arm’s reach. There’s nothing worse than being knee-deep in your project only to realize you’re missing a crucial item!
First up is the pond liner itself, sized generously to cover your pond’s dimensions plus at least 12-18 inches of overlap on all sides. You’ll also need underlayment fabric or old carpet padding to protect your liner from punctures caused by roots or sharp stones underneath. Trust me, this protective layer is worth every penny.
Grab a good pair of heavy-duty scissors or a utility knife for trimming excess liner. You’ll want work gloves to protect your hands from rough edges and rocks, and safety glasses if you’re cutting materials. A carpenter’s level ensures your pond edges are even, preventing that lopsided look that screams “amateur hour.”
Don’t forget edging stones or bricks to secure and conceal the liner’s edges, plus a garden hose for filling and testing. If you’re working with EPDM or rubber liners, pick up primer and seaming tape for any necessary joins. A measuring tape and some wooden stakes with string help mark your pond’s outline before digging begins.
Having everything ready transforms installation from frustrating to flowing smoothly.
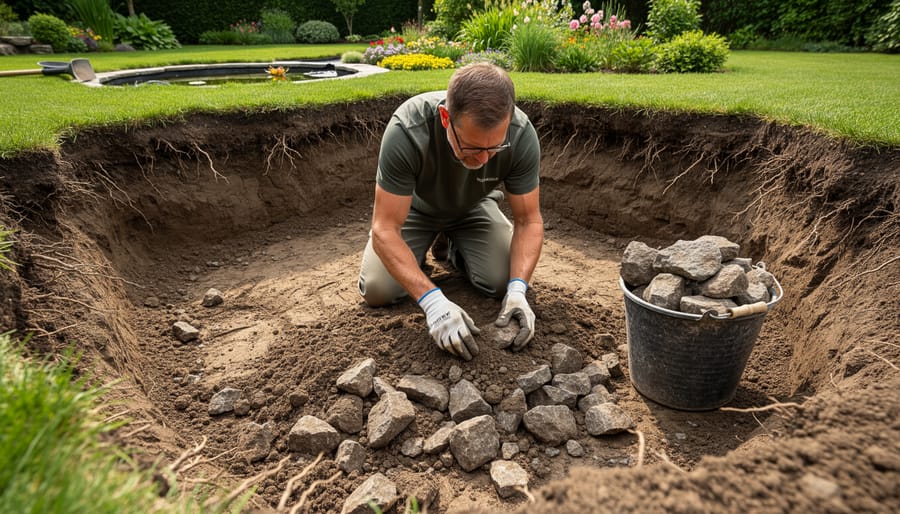
Preparing Your Pond Excavation
Before you even think about rolling out that shiny new pond liner, let’s talk about getting your hole absolutely perfect. Trust me, I learned this the hard way when a rogue rock punctured my first liner within weeks!
Start by giving your pond excavation a thorough inspection. Walk barefoot around the entire base and sides (yes, really!). Your feet will find sharp stones, roots, and debris that your eyes might miss. Remove everything that could potentially damage your liner, including protruding tree roots and any jagged edges.
Next, create smooth, gradual slopes rather than steep drops. Aim for a 20-degree angle on your pond walls, which helps the liner conform naturally without stretching or wrinkling. If you’re adding shelves for plants, make them at least 30 centimeters wide so pots won’t tip over.
Now grab a long straightedge or level to check your work. The pond’s rim should be level all the way around, otherwise water will spill over the low spots and you’ll have a permanent muddy mess on one side. A simple carpenter’s level on a long board works perfectly for this.
Finally, smooth out any rough patches with a rake and remove footprints. Some pond builders add a layer of sand at this stage, which creates an extra cushioning buffer. Think of it as giving your liner a comfy mattress to rest on.
Choosing the Right Day for Installation
Timing really does matter when you’re ready to install your pond liner! Aim for a mild, sunny day with temperatures above 60°F (15°C) if possible. Here’s why: warmer weather makes your liner much more flexible and cooperative. I learned this the hard way during my first installation on a chilly spring morning—the liner felt stiff as cardboard and fought me at every fold. When I waited for a warmer afternoon, it draped beautifully into place like fabric.
Cold liners are prone to creasing and are harder to manipulate into corners and curves. Warm ones mold easily, reducing wrinkles and making the whole process less frustrating. If you’re working with EPDM rubber or PVC, this flexibility difference is especially noticeable.
Check the weather forecast and avoid windy days too. Nothing’s worse than wrestling a billowing liner sheet while trying to position it precisely! Also, consider enlisting a helper for larger ponds. An extra pair of hands makes positioning and smoothing infinitely easier, and honestly, it’s just more fun with company. Plan ahead, pick your day wisely, and you’ll set yourself up for installation success.
Step-by-Step Pond Liner Installation
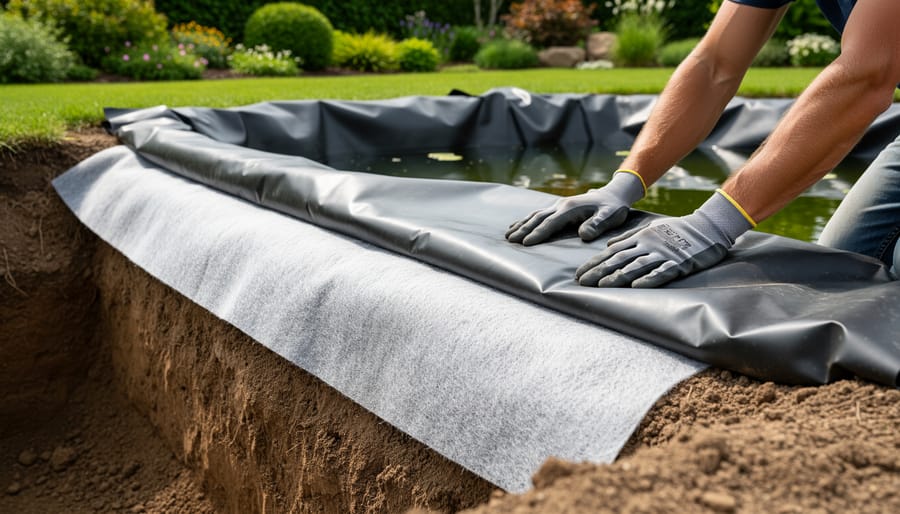
Laying the Underlayment (Your Liner’s Best Friend)
Think of underlayment as a cozy blanket between your pond’s earth and its liner—it’s the unsung hero that prevents punctures from sharp rocks, roots, or settling soil. I learned this lesson the hard way when a tiny pebble created a slow leak in my first pond!
Start by draping your underlayment material across the entire excavated area, working from the bottom up. Commercial geotextile fabric works beautifully, but old carpet, newspapers (layered thick), or sand are budget-friendly alternatives that work surprisingly well. Whatever you choose, make sure it’s at least a quarter-inch thick for adequate protection.
Here’s the key: overlap your underlayment sections by at least 12 inches wherever pieces meet. This prevents gaps from forming as the ground settles. Smooth out any wrinkles or folds as you go—these can create weak spots under your liner. Don’t worry about it looking perfect; just ensure complete coverage from the pond bottom all the way up and over the edges.
Pro tip: let your underlayment extend about 12 inches beyond your pond’s final edge. This extra material protects the liner from sharp shelf edges and gives you wiggle room during installation. Trust me, you’ll appreciate that flexibility when you’re wrestling with the actual liner!
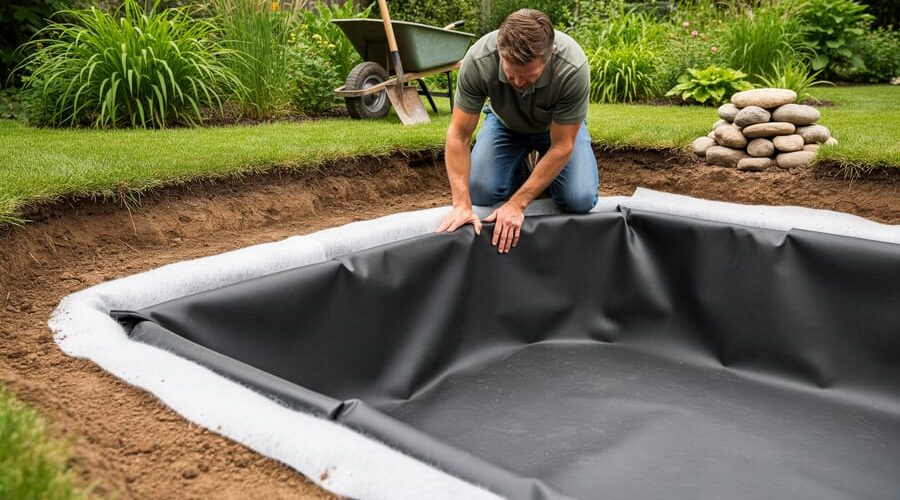
Positioning Your Liner Correctly
Getting your liner positioned properly is one of those moments where an extra pair of hands makes all the difference. Trust me, I learned this the hard way when my first liner nearly slipped into the pond while I was wrestling with it solo!
Start by draping the liner loosely across the excavated area. Here’s the key: you want roughly equal overlap on all sides. Don’t worry about perfection yet. Position the liner so it naturally falls into the deepest part of the pond, letting gravity do some of the work for you.
For larger liners, recruit at least one helper. Seriously. These things can be surprisingly unwieldy, especially on a breezy day. Have your helper hold one end while you adjust the other, checking that the overlap is fairly even around the perimeter. You’ll want at least 12 to 18 inches of material extending beyond your pond’s edge.
Now, let’s talk about wrinkles. They’re inevitable, and that’s okay. The goal isn’t to eliminate them entirely but to minimize large, awkward folds. As you begin filling the pond with water, walk around the edge and gently pull and smooth the liner, encouraging it to conform to the pond’s contours. The water’s weight will help press the liner into place.
For stubborn wrinkles in corners or shelves, try pleating them neatly rather than leaving random bunches. Think of gift-wrapping a box—neat, deliberate folds look better and function more reliably than crumpled material. Work slowly, adjusting as the water level rises, and you’ll achieve a professional-looking installation.
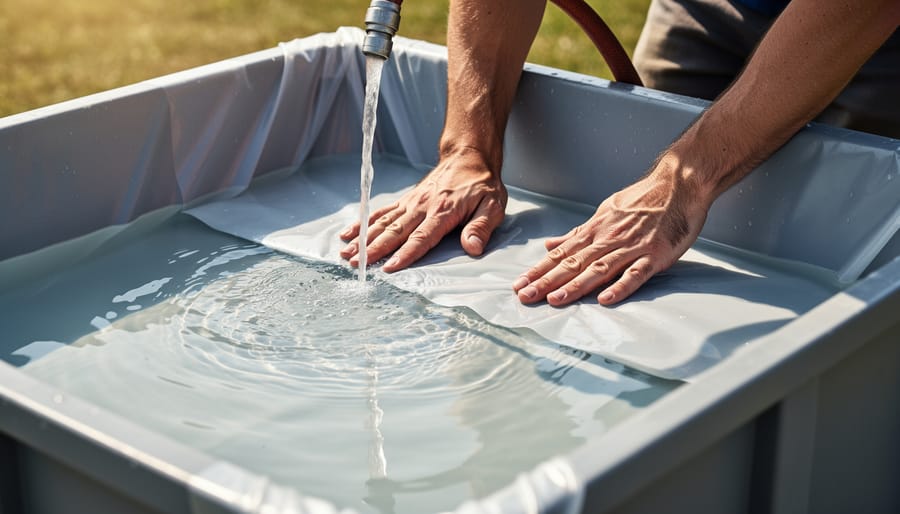
Filling While You Adjust
Here’s where patience truly becomes your best friend. Once your liner is positioned, start adding water slowly—and I mean slowly. Use a garden hose set to a gentle flow and place it in the deepest part of the pond. This initial trickle gives you time to work with the liner as it settles.
As the water begins pooling, you’ll notice the liner starting to conform to your excavation. This is your window to smooth out wrinkles and create natural-looking folds. Walk into the pond if needed (remove your shoes first!) and gently pull and adjust the liner, working from the center outward. Think of it like smoothing a bedsheet—you’re not trying to eliminate every single crease, but rather distributing the material evenly.
Here’s a tip from my own experience: don’t fight the liner. Some wrinkles are inevitable, especially in corners and along curves. Instead of trying to stretch them completely flat (which can actually stress the material), fold them into neat pleats that follow the pond’s contours. These folds will look surprisingly natural once your pond is finished and planted.
Fill the pond in stages, adding six inches of water, then stopping to adjust. Add another six inches, adjust again. This gradual approach prevents the liner from shifting dramatically or developing stubborn creases that become impossible to fix once the water weight settles.
Resist the temptation to rush this process by cranking up the water flow. I’ve learned the hard way that trying to save an hour during filling can cost you days of frustration later. Keep that hose on low, take your time walking the perimeter, and smooth as you go. Your patience now will reward you with a professional-looking installation that you’ll be proud of for years to come.
Securing the Edges
Getting your pond liner edges secure is like tucking in a fitted sheet—it needs to stay put but shouldn’t look forced! Let’s walk through the best ways to create neat, professional-looking edges that’ll last for years.
The golden rule? Always leave plenty of overlap. I recommend at least 12 to 18 inches of liner extending beyond your pond’s edge. This generous allowance gives you room to work with and compensates for any settling that might occur. Trust me, it’s much easier to trim excess later than to wish you had more to work with!
Trenching is my favorite anchoring method. Dig a shallow trench about 6 inches deep and 6 to 8 inches wide around your pond’s perimeter. Drape your liner into this trench, then backfill with soil. This creates an invisible, secure hold that looks completely natural. Just make sure there aren’t any sharp rocks in that soil before covering your liner.
For a more decorative finish, coping stones work beautifully. These flat stones sit directly on the liner edge, holding it down while creating a finished border. Place them carefully to avoid puncturing the liner—no dropping them! If your stones have rough undersides, consider placing a protective barrier like old carpet scraps underneath the liner in those spots.
Other securing options include landscape staples for the trench method, rocks and boulders for naturalistic edges, or manufactured pond edging systems. Whatever you choose, never use anything that could pierce or damage your liner. Remember, gentle but firm is the way to go!

Trimming Excess Liner
Resist the urge to trim immediately after installation! Your liner needs at least 24 hours to settle and stretch into its final position. I learned this the hard way when I trimmed too soon and ended up short on one edge. Once you’re ready, leave about 6-12 inches of excess material beyond your pond’s edge—this gives you a comfortable margin for securing the liner with rocks, edging, or coping stones.
For clean, professional cuts, use sharp utility scissors or a fresh utility knife blade. Dull blades create ragged edges that can fray over time. Work your way around the perimeter slowly, cutting in small sections rather than trying to trim everything at once. If you’re installing edging stones or other decorative features, you can always trim more later, but you can’t add material back! Mark your cutting line with chalk before making any cuts—this simple step prevents costly mistakes and ensures an even border all the way around your beautiful new pond.
Common Installation Mistakes (And How to Avoid Them)
I’ll be honest with you—I made nearly every mistake in the book when I installed my first pond liner. The good news? You can learn from my fumbles and skip right to the success part!
The most common error I see (and committed myself) is rushing through the underlayment stage. I was so excited to get my liner in place that I skimmed on the protective padding underneath. Big mistake. Within months, a sharp rock I’d missed poked through, and I spent a weekend patching instead of enjoying my pond. Take your time here. Crawl around on your hands and knees if you need to, and remove every stone, root, and sharp object. Then add a generous layer of sand or specialized underlayment fabric. Your future self will thank you.
Another classic blunder is cutting the liner too soon. I once measured my pond, added what I thought was enough extra, and triumphantly trimmed away the excess. Then I realized I’d miscalculated the depth curves. Always, always leave extra material around the edges until your pond is completely filled and settled. You can trim later, but you can’t add material back!
Not allowing for settling is another frequent issue. Your pond will settle and shift slightly as the weight of water compresses the soil beneath. If you anchor your edges too tightly right away, you might end up with stress points or pulling. Fill your pond completely, then wait at least 24 hours before permanently securing and trimming the edges.
Finally, many DIYers forget about expansion and contraction. Pond liners shift with temperature changes. Leave some slack in the material rather than stretching it drum-tight. This flexibility prevents stress tears during freezing winters or hot summers. Think of it like wearing comfortable pants versus ones that are too snug—you want room to move!
Special Situations and Problem-Solving
Installing on Slopes or Uneven Ground
Working with slopes can feel intimidating, but with the right approach, you can create a stunning water feature on challenging terrain. The key is working with gravity rather than fighting against it.
Start by creating terraced shelves or ledges into your slope. These step-like levels provide stable platforms for your liner and prevent it from sliding downhill over time. Think of it like building natural stairs for your pond. I learned this the hard way when my first sloped pond’s liner kept creeping downward—not fun!
Use extra underlayment on slopes, overlapping pieces generously. Gravity pulls everything downward, so you’ll want at least 50% more material than you’d use on flat ground. Secure the liner at multiple anchor points along the slope using heavy rocks or landscape staples. Don’t rely on just the top edge to hold everything in place.
Consider installing a retaining wall on the downhill side. This creates a barrier that supports both your excavation and liner, preventing erosion and giving your pond a finished, professional look. Even a simple stacked stone wall works beautifully and adds natural charm to your water garden’s design.
Working with Waterfalls and Streams
Adding waterfalls and streams takes your pond to the next level, but they need extra attention during liner installation. Here’s the secret: treat each feature as an extension of your main pond liner. For waterfalls, dig your stream channel before laying the liner, then extend a single piece of liner material from the pond up through the entire waterfall path. Overlap sections by at least 30 centimeters if you need multiple pieces, always positioning the upper piece over the lower one so water flows over the seam, not under it. Secure edges with rocks or specially designed waterfall foam to prevent water from sneaking behind the liner. I learned this the hard way when my first stream lost half its water to seepage! For streams, create a gentle slope and use underlayment generously to protect against roots and sharp stones. Finally, test your water flow before completing your edging work to ensure everything stays properly positioned and watertight.
What to Do If You Find a Sharp Object Mid-Installation
Don’t panic if you encounter a sharp rock, root, or piece of debris while laying your liner. This happens more often than you’d think, even after careful site prep. Stop immediately and don’t pull the liner further. Carefully lift the liner section and remove the object. Check for any punctures or tears—a small nick now is easier to fix than a leak later. Add extra underlayment or sand to that spot, creating a protective cushion. Smooth it out and continue installation. Keep a patch kit nearby just in case you need it during the process.
After Installation: First 48 Hours
Congratulations! You’ve successfully installed your pond liner, and now comes the exciting part—watching your pond come to life. But don’t rush things just yet. The first 48 hours are crucial for your pond’s long-term success.
Right after installation, your pond water will likely look a bit cloudy. This is completely normal! The disturbance from filling has stirred up particles, and the water needs time to settle. Resist the temptation to add anything immediately. Your pond is essentially finding its balance, and patience here really pays off.
During these first two days, check your pond daily for any signs of liner movement or water loss. A small amount of evaporation is normal, but significant drops might indicate a leak or an edge that needs adjusting. Walk around the perimeter and ensure all edges remain securely anchored.
You’ll want to get your water circulating as soon as possible. If you’ve installed filtration systems and pumps, now’s the time to fire them up. Moving water helps oxygenate and prevents stagnation while your pond establishes itself.
As for adding life to your pond, hold off for at least 48 hours. If you’ve used tap water, let it sit for several days to allow chlorine to dissipate, or use a dechlorinator to speed things up. Start with hardy aquatic plants first—they’ll help establish beneficial bacteria. Wait at least two weeks before introducing fish, giving your pond’s ecosystem time to mature and stabilize.
Congratulations! You’ve just completed the most challenging part of building your pond. Take a moment to step back and admire what you’ve accomplished. That perfectly installed liner is the foundation of countless peaceful mornings watching dragonflies skim the water’s surface and relaxing evenings listening to your fountain’s gentle sounds.
The hard work is behind you, and now comes the exciting part: bringing your vision to life. As you move forward with adding water, rocks, plants, and perhaps some fish, remember that you’ve already tackled the trickiest technical aspect. Everything from here gets more fun and creative.
Your pond will evolve and mature over the coming weeks and months, developing its own unique ecosystem. Stay patient during the initial settling period, and don’t worry if the water looks cloudy at first. This is completely normal. Regular pond maintenance will keep your water feature looking beautiful for years to come.
You’ve joined a wonderful community of water gardeners who understand the special joy these features bring. Welcome to pond ownership, and enjoy every moment of your new backyard oasis!