
Why Your Pond Water Stays Murky (And the Treatment Design That Finally Fixed Mine)
Map your pond’s unique ecosystem before selecting any equipment by testing water weekly for ammonia, nitrite, and pH levels—problems you can’t see will derail even the most expensive filtration system. Calculate your actual water volume using length times width times average depth, then multiply by 7.5 for gallons, because undersized filters are the number one reason treatment systems fail in backyard ponds.
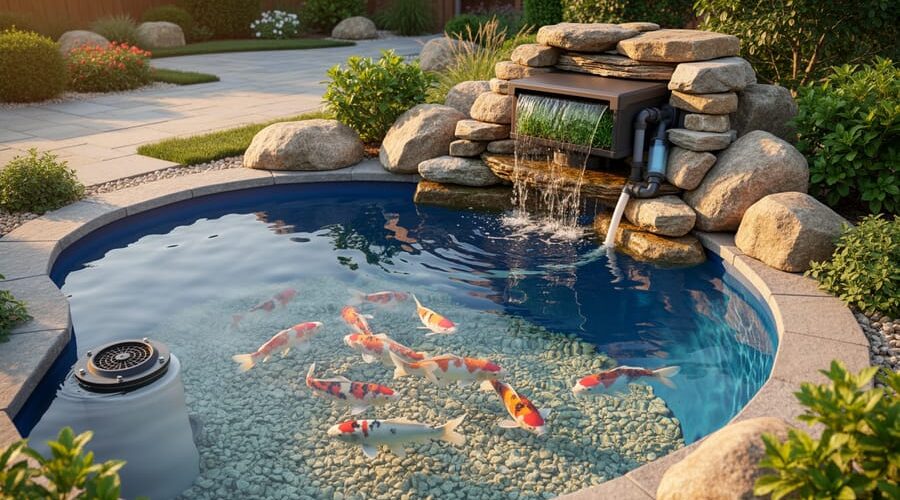
Design your treatment system in three connected stages: mechanical filtration to catch debris, biological filtration to convert toxic ammonia into safer compounds, and clarification through UV sterilizers or plant uptake. I learned this the hard way after installing a beautiful waterfall that looked spectacular but created dead zones where waste accumulated and algae bloomed uncontrollably.
Match your pump’s flow rate to your pond volume by circulating the entire water capacity every two hours for fish ponds or every four hours for plant-only water gardens. A 2,000-gallon koi pond needs a minimum 1,000 GPH pump, while that same volume supporting only water lilies and marginal plants functions well with 500 GPH—overpumping wastes electricity and stresses fish.
Position your biological filter media where beneficial bacteria colonies receive constant oxygen-rich water flow and stay submerged year-round. The bacteria converting ammonia to nitrite, then nitrite to nitrate, need stable temperatures above 50 degrees Fahrenheit and die off rapidly when exposed to air or chlorinated tap water during cleaning.
Account for seasonal changes by installing bypass valves that let you reduce flow during winter months and flexible plumbing that accommodates adding supplemental filtration during summer when fish metabolism and feeding rates peak. Your treatment design isn’t finished until you’ve planned for both January freezes and August heat waves.
What Water Treatment Design Actually Means for Your Pond
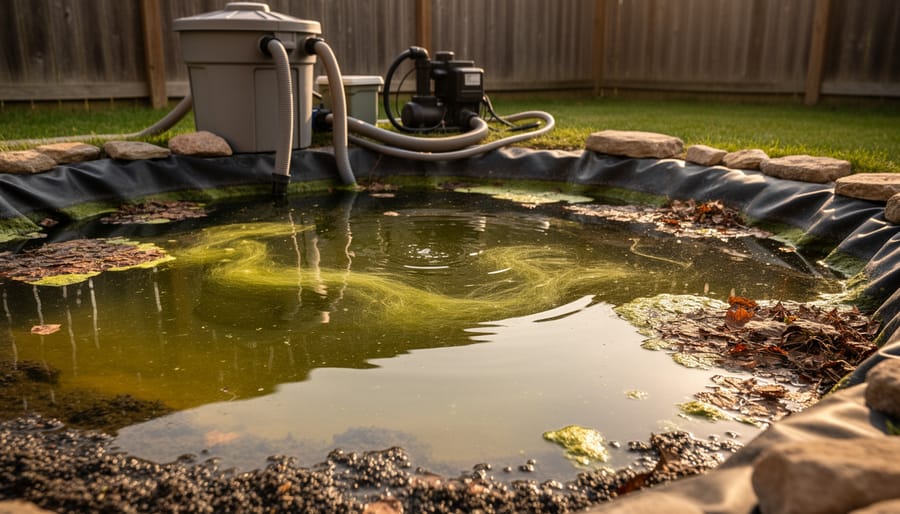
Let me share something I learned the hard way: throwing random equipment at pond problems rarely works. When my first pond turned into a murky mess despite having “all the right stuff,” I realized I was treating symptoms, not causes. That’s when I discovered what water treatment design really means.
Think of water treatment design as creating a game plan before problems arise. Instead of scrambling when algae blooms or fish gasp at the surface, you’re building an integrated system where everything works together from day one. It’s the difference between randomly buying filters at the garden center and understanding how those filters fit into your pond’s bigger picture.
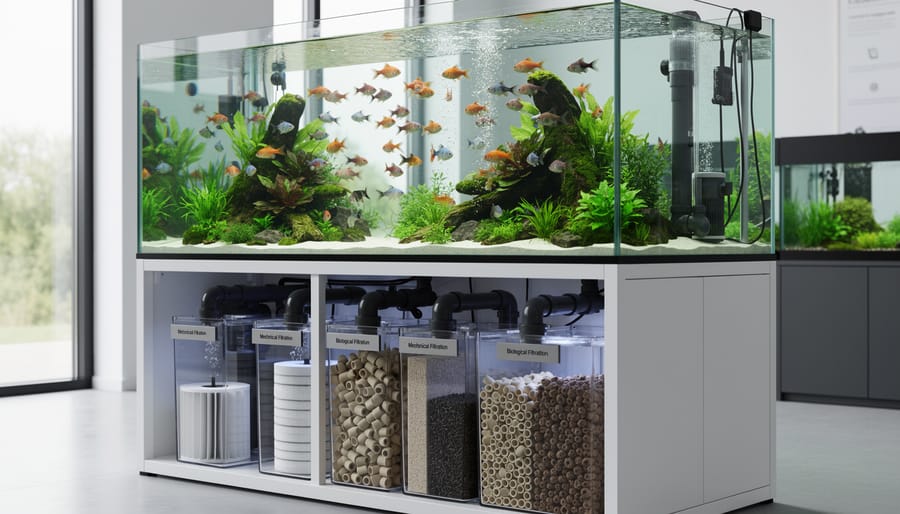
Here’s the beautiful part: water treatment design isn’t complicated once you break it down. You’re essentially orchestrating three teammates that handle different jobs.
First, there’s biological filtration, which is nature’s workhorse. Beneficial bacteria colonize surfaces in your filter media, converting toxic fish waste into safer compounds. This invisible army does the heavy lifting if you give them the right environment.
Next comes mechanical filtration, the physical cleanup crew. This captures leaves, uneaten food, and debris before they decompose and create water quality issues. Think of it as your pond’s strainer, catching the big stuff so biology can handle the microscopic work.
Finally, chemical filtration fine-tunes everything. Activated carbon, zeolite, or other media remove dissolved organics and odors that the other systems miss. It’s your finishing touch.
The magic happens when you design these three elements specifically for your pond’s size, fish load, plant coverage, and climate. A hundred-gallon koi pond in Arizona needs a completely different approach than a two-thousand-gallon natural pond in Oregon. Water treatment design means matching your system to your unique situation, creating a custom blueprint where biological, mechanical, and chemical processes work in harmony rather than competing against each other.
Understanding Your Pond’s Unique Treatment Needs
The Fish Load Factor
Understanding your fish load is like knowing how many guests are coming to dinner – it determines everything about your preparation! The number and size of your fish directly influence how much waste your system needs to process, which shapes your entire treatment design.
Here’s a simple way to calculate your bioload: measure the total length of all your fish in inches. A common guideline suggests one inch of fish per square foot of pond surface area for ponds with basic filtration, or one inch per 10 gallons of water for heavily filtered systems. For example, if you have ten 6-inch goldfish, that’s 60 inches of fish total.
Keep in mind that fish grow, so plan ahead! I learned this the hard way when my three small koi quickly outgrew my original filtration setup. Also consider feeding habits – heavily fed fish produce more waste than those fed moderately. A 12-inch koi produces significantly more waste than twelve 1-inch goldfish, even though the total length is the same.
Temperature matters too, since fish metabolism increases in warmer water, leading to more waste production during summer months. Calculate your current bioload, then add 25-50% capacity for growth and seasonal fluctuations. This buffer ensures your treatment system can handle the real-world demands of your pond.
Sun Exposure and Your Water Quality
The amount of sunlight your pond receives dramatically influences which treatment strategies will work best for you. I learned this the hard way when I installed a beautiful UV clarifier in my heavily shaded backyard pond, only to realize my real challenges stemmed from leaf debris, not sun-driven algae blooms.
Sunny ponds typically face more aggressive algae growth patterns, especially during summer months. If your pond gets six or more hours of direct sunlight daily, prioritize UV clarification, robust biological filtration, and plenty of floating or marginal plants to create shade. These ponds benefit from stronger circulation systems that prevent warm surface water from becoming algae nurseries.
Shaded ponds present different considerations. With less than four hours of direct sun, you’ll likely deal with slower beneficial bacteria development and potentially cooler water temperatures. Focus your design on mechanical filtration to handle organic debris, and consider adding aeration to compensate for reduced plant oxygenation. You might actually need fewer chemical interventions since algae struggles in low-light conditions. Understanding your specific sun exposure helps you avoid purchasing equipment that addresses problems you don’t actually have.
Volume, Surface Area, and Flow Rates
Understanding the relationship between your pond’s size and your filtration needs is like figuring out how many air conditioners you need for your house – bigger spaces require more capacity. Here’s the simple math that matters.
First, calculate your pond’s volume. For rectangular ponds, multiply length times width times depth. Got a kidney-shaped beauty? Break it into sections and add them up, or use the average length and width method. Remember to convert feet to gallons (multiply cubic feet by 7.5). I learned this the hard way when I undersized my first filter system!
Next comes flow rate, which is how many times your pond’s entire volume should pass through your filter each hour. Most healthy ponds need their full volume filtered every one to two hours. So if you’ve got a 1,000-gallon pond, you’ll want a pump moving 500-1,000 gallons per hour minimum.
Surface area matters too, especially for biological filtration and gas exchange. More surface means better oxygen levels and more beneficial bacteria colonization space. This is why shallow, wider ponds often stay clearer than deep, narrow ones with the same volume.
The Three-Layer Approach to Effective Water Treatment
Mechanical Filtration: Your First Line of Defense
Think of mechanical filtration as your pond’s security guard – it catches the troublemakers before they can cause real problems! This is where you physically remove debris like leaves, fish waste, and that pesky string algae before it breaks down and clouds your water.
Let me share what I’ve learned works best. Your mechanical filtration setup should follow a simple path: start with a skimmer at the water’s surface to grab floating debris (aim for one that handles your pond’s entire volume every two hours), then move water through a settlement chamber where heavier particles sink to the bottom, and finally push it through progressively finer filter media.
Here’s the trick most beginners miss: size your settlement chamber at least 10% of your pond’s total volume. For a 1000-gallon pond, that’s a 100-gallon chamber. It sounds big, but trust me, this breathing room lets solids actually settle instead of just swirling around.
For filter media, think layers. Start coarse with filter brushes or matting, then move to medium foam pads, finishing with fine material. Many modern filtration systems stack these beautifully in one unit.
Place your mechanical filter before biological filtration – always. You wouldn’t vacuum after mopping, right? Same principle. Clean mechanical media weekly during growing season, but just rinse it in pond water. Tap water kills beneficial bacteria you’ll need downstream.
Biological Filtration: The Living Heart of Your System
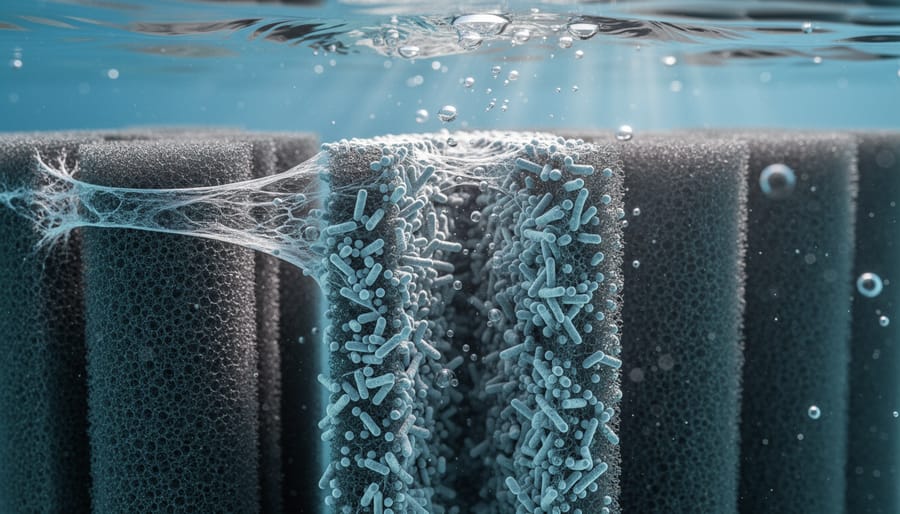
Think of biological filtration as creating a thriving neighborhood for the good guys in your pond. These beneficial bacteria are your water’s best friends, breaking down harmful ammonia and nitrites into safer nitrates. I learned this the hard way when my first pond stayed cloudy for months until I realized I hadn’t given these microscopic helpers enough space to work their magic.
The secret is providing the right real estate. Biological filter media creates surfaces where bacteria colonies can establish themselves as biofilm, that slightly slimy coating that’s actually gold for your water quality. Popular media choices include Japanese matting, ceramic rings, and bio-balls, each offering different surface areas. Japanese matting is my personal favorite for beginners because it’s affordable and packs tremendous surface area in a small space.
Here’s your rule of thumb: plan for at least 1 square foot of biological media surface area per 100 gallons of pond volume. For heavily stocked koi ponds, double that. Your bacteria need time to colonize, typically 4-6 weeks for a new system, so patience is essential during startup.
Maintenance is beautifully simple. Rinse your media gently in old pond water during cleanings, never tap water, as chlorine kills your beneficial bacteria instantly. These colonies are surprisingly resilient once established, but they need consistent water flow and oxygen to thrive. Position your biological filter after mechanical filtration so debris doesn’t clog those precious bacteria homes.
Plant-Based Filtration: Nature’s Water Purifier
Here’s what I discovered when I started using plants as natural filters—they’re absolute workhorses! Your pond plants aren’t just pretty faces; they’re actively removing nutrients, filtering particles, and supporting beneficial bacteria.
Let’s start with marginal plants, those beauties that grow in shallow water around your pond’s edges. Water iris, rushes, and pickerelweed are fantastic choices. Aim for coverage of about 30-40% of your pond’s perimeter with marginals. They absorb nitrates and phosphates directly through their roots while providing surface area for beneficial bacteria.
Floating plants like water lettuce and water hyacinth are nutrient-hungry champions. They shade the water (reducing algae), remove excess nutrients, and multiply quickly—sometimes too quickly! I learned to harvest about half my floating plant coverage every few weeks during growing season. Target 40-50% surface coverage for optimal filtration without blocking all sunlight.
Now, bog filters are where things get really exciting. Create a separate gravel-filled zone where water flows through plant roots before returning to your pond. Think of it as a living filter box! Fill it with moisture-loving plants like canna lilies, papyrus, or horsetail. The combination of plant uptake and bacterial action in the gravel provides incredible biological filtration.
Smart plant selection means choosing varieties suited to your climate zone and water depth. Mix aggressive growers with slower varieties to maintain balance, and remember—diversity strengthens your natural filtration system.
Designing Water Flow Patterns That Actually Work
Pump Selection and Placement
Choosing the right pump feels like finding the heartbeat for your pond’s treatment system. I learned this the hard way when my first pump couldn’t push water through my UV filter properly, leaving me with green water for weeks!
Start by calculating your pond’s volume in gallons, then select a pump that circulates at least half that amount per hour. For example, a 2000-gallon pond needs a minimum 1000 gallons-per-hour pump. However, if you’re running water through multiple treatment stages like mechanical filters, biological media, and UV clarifiers, bump that up to account for head height and friction losses. Each foot of vertical lift and every elbow joint reduces flow by about 10 percent.
Position your pump at the pond’s lowest point where debris naturally settles. This creates the most efficient circulation pattern and prevents dead zones where waste accumulates. I place mine opposite from where water returns, establishing a complete circulation loop that sweeps the entire pond.
Consider using two smaller pumps instead of one large unit. This approach gives you backup protection and lets you adjust flow rates seasonally. During winter, you can run just one pump at lower speeds, saving energy while maintaining essential filtration. Always choose pumps designed for continuous operation and protect them with pre-filters to extend their lifespan.
Creating Return Flows That Prevent Stagnation
Even the best filtration system can’t help if water never reaches it! I learned this the hard way when I discovered a stagnant pocket in my pond where debris had accumulated for months, completely bypassing my beautiful new filter setup.
The secret is understanding circulation patterns. Water naturally takes the path of least resistance, so without proper design, some areas simply never get treated. Think of your pond like a room with one fan – corners stay stuffy unless you direct airflow intentionally.
Start by positioning your return flow opposite your pump intake. This creates a circuit that sweeps across the entire pond rather than short-circuiting straight back to the pump. If you have a rectangular pond, place the pump at one end and return at the other. For irregular shapes, you might need multiple return points to reach every nook.
I like to test circulation by dropping biodegradable food coloring near problem areas and watching where it travels. Dead zones become immediately obvious! Adjusting return flow direction with simple elbow fittings can redirect water into these stagnant pockets.
Consider adding gentle aeration in far corners – not for oxygenation alone, but to nudge water toward your filtration system. Even a small bubbler creates enough movement to prevent settling and keeps your entire pond volume actively participating in the treatment cycle.
Building Your Treatment System on a Budget
Let me share a secret I learned the hard way: you don’t need to install everything at once! When I first designed my treatment system, I felt overwhelmed by the price tags. Then a fellow pond keeper told me something brilliant: build in phases.
Start with what you absolutely need right now. For most ponds, that’s mechanical filtration to remove debris and basic biological filtration for ammonia control. Everything else can wait. I installed my settling chamber and biofilter first, then added UV clarification six months later when algae became problematic. This approach spread my costs over time and let me learn what my pond actually needed rather than guessing.
Here’s how to prioritize: tackle water quality issues first (biological filtration), then clarity problems (mechanical filtration), and finally refinements like UV sterilizers or automatic dosing systems. Think of it like building a house – foundation before fancy fixtures.
DIY alternatives can slash your budget dramatically. Instead of expensive commercial filter media, I’ve successfully used lava rock and plastic pot scrubbers for biological filtration. They work beautifully at a fraction of the cost. Similarly, building your own settling chamber from food-grade plastic containers costs pennies compared to manufactured versions. Just ensure any materials you use are pond-safe and won’t leach harmful chemicals.
For pumps and essential equipment, though, invest in quality. I learned this lesson after a cheap pump failed and stressed my fish. Check out budget-friendly equipment options that balance affordability with reliability.
Consider future expansion when designing your initial system. Leave extra space in your filter housing for additional media. Use slightly oversized plumbing so you can upgrade pump capacity later without redoing pipework. These small planning decisions make future upgrades painless and affordable.
Remember, the best system is one you can actually build and maintain, not the most expensive one you saw online.
When Peer-Reviewed Research Meets Backyard Reality
I’ll never forget the first time I read a university study on biofilm development in recirculating aquaculture systems. My initial thought? “This is fascinating, but how does this help my backyard pond?” Turns out, it helps tremendously once you know how to translate the science.
Professional water treatment research focuses on principles that scale beautifully to home ponds. The key is understanding which findings matter for your specific situation. For instance, studies on biological filtration media show that surface area matters far more than volume. That’s why those fancy ceramic rings in pond filters work better than simple foam, even in a 500-gallon backyard pond. The bacteria colonizing those surfaces do the same job whether you’re treating a commercial fish farm or your koi pond.
Here’s what I’ve learned from bridging these two worlds: researchers measure things like nitrogen conversion rates and dissolved oxygen levels because these numbers predict success. You don’t need laboratory equipment to apply these insights. When a study shows that beneficial bacteria populations double every 24 hours in optimal conditions, that tells you patience matters. Your new filter won’t work miracles on day one, but give it two weeks and you’re looking at a fully colonized biological powerhouse.
The real magic happens when you adapt professional techniques to smaller scales. Commercial systems use UV sterilizers calculated by flow rate and wattage. That same math works for your 1,000-gallon pond, just with smaller numbers. Settlement chambers in professional setups? Your pond skimmer does the same thing. The principles don’t change, they just become more accessible and affordable when you’re working with garden-scale projects instead of industrial operations.
Testing and Adjusting Your Design
Once your treatment system is up and running, the real adventure begins! Think of this phase as getting to know your pond’s personality. Just like learning what makes your garden plants thrive, understanding how your water responds to treatment takes a bit of detective work, but it’s incredibly rewarding.
Start by establishing a testing routine within the first week. I recommend checking your water quality parameters daily for the first seven days, then weekly for the next month. The key parameters to monitor include pH levels (aim for 6.5-8.5), ammonia (should be zero), nitrite (also zero), and nitrate (below 40 ppm). Don’t forget dissolved oxygen, especially on warm days when fish are most active.
Keep a simple notebook or use your phone to track these numbers. You’ll start noticing patterns that tell you how your pond breathes and behaves. For instance, my own pond consistently showed pH spikes every Tuesday morning until I realized my weekend feeding routine was throwing things off balance.
When interpreting your results, remember that gradual changes are your friend. If pH is creeping too high, don’t panic and dump chemicals in. Instead, increase biological filtration or add more aquatic plants. Low oxygen readings might mean you need to adjust your fountain or add an aerator.
The most important lesson I’ve learned is patience. Your treatment system needs time to stabilize, usually four to six weeks. During this period, you might see algae blooms or slight cloudiness. This is normal as beneficial bacteria colonize your filters and establish their routine.
If something seems off, adjust one element at a time and wait three days before making another change. This methodical approach helps you identify what actually works rather than creating a guessing game. Your pond will thank you for the thoughtful attention.
Here’s the thing about water treatment design that I’ve learned through years of trial, error, and plenty of green water moments: your pond isn’t just a container of water. It’s a living, breathing ecosystem with its own personality and quirks. The most effective treatment systems aren’t the ones that fight against nature, but the ones that work alongside it.
Think of yourself as a conductor rather than a controller. You’re orchestrating biological filtration, water movement, plant activity, and sunlight exposure to create harmony. Sometimes the symphony hits the perfect note, and sometimes you need to adjust the tempo. That’s completely normal and part of the journey.
Start with that honest assessment we talked about earlier. Measure twice, build once, as they say. Design your system thoughtfully, keeping your specific pond conditions in mind rather than copying someone else’s setup. What works beautifully for a shaded koi pond won’t necessarily suit a sunny goldfish basin.
Once your system is running, pay attention. Watch how your pond responds. Clear water one week and cloudy the next? That’s your pond talking to you. Adjust, experiment, and refine. Keep notes if you’re like me and forget what you changed last month.
I’d love to hear about your own experiences. What challenges have you faced? What unexpected solutions worked for you? Drop a comment below and let’s learn from each other. After all, the best water gardening wisdom comes from our shared experiences.