
Keep Your Kids and Pets Safe Around Your Pond Without Ruining the View
Install graduated shelving around your pond’s perimeter to create natural barriers that prevent accidental falls while providing perfect planting zones for marginal plants. These stepped ledges, positioned at 12-inch intervals descending into the water, give anyone who slips a safe foothold to recover while supporting lush vegetation that softens hard edges.
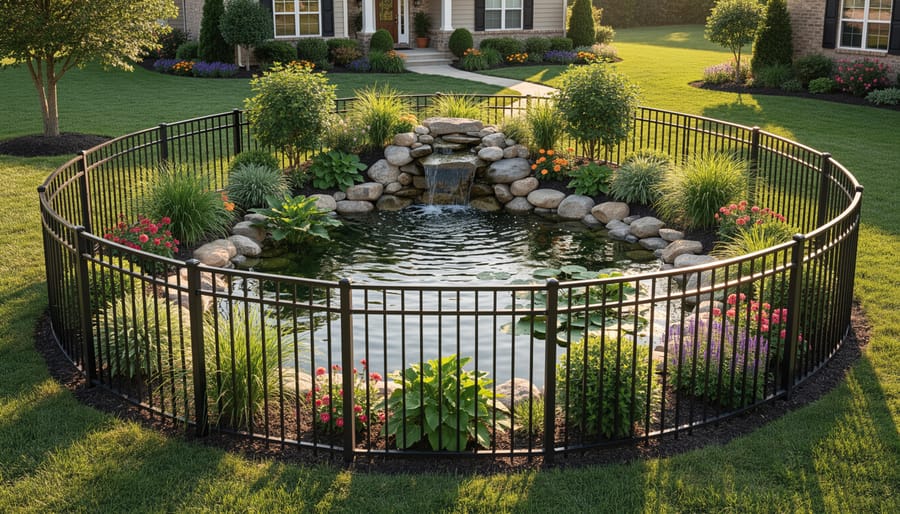
Position decorative fencing 2-3 feet from your pond’s edge rather than directly at the waterline. This safety buffer creates a protected viewing corridor where visitors can admire your water feature safely, and it gives you practical workspace for maintenance. Choose materials like powder-coated aluminum or vinyl-coated wire that withstand moisture while complementing your landscape design.
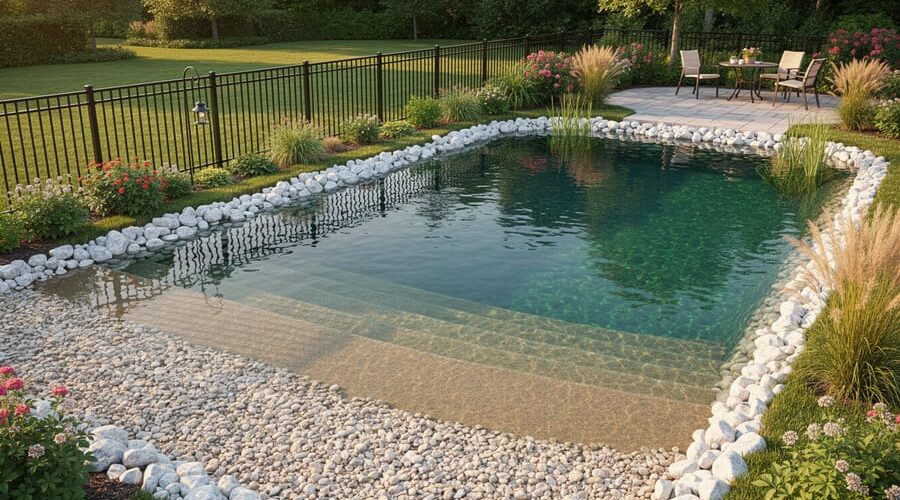
Create visual warning zones using contrasting materials around drop-offs and deep sections. A 6-inch border of white river rock against darker pond edging, for instance, naturally guides foot traffic while catching light in evening hours when visibility drops. This simple technique works especially well when incorporating backyard pond ideas that blend into naturalistic landscapes.
Slope your pond beaches at no more than a 3:1 ratio in areas where children or pets access the water. This gentle gradient prevents sudden depth changes and gives smaller swimmers an easy exit path. Combined with textured liner or carefully placed stones for traction, sloped entries transform potential hazards into controlled interaction points.
Keep rescue equipment within 10 steps of your water feature. A shepherd’s hook mounted on decorative fencing or a reaching pole disguised as garden art provides emergency assistance without broadcasting anxiety to guests.
Why Pond Safety Structures Matter More Than You Think
The Hidden Dangers in Even Shallow Water
Here’s something that surprised me when I first started my water gardening journey: it doesn’t take much water to create a dangerous situation. Just six inches of water can pose a serious drowning risk, especially for certain groups.
Toddlers and young children are most vulnerable. Their natural curiosity draws them to water, but their head-to-body ratio makes it surprisingly easy to lose balance and fall forward. Once face-down in even shallow water, panic and disorientation can prevent them from righting themselves. I’ve talked with parents who thought their shallow pond edges were safe, only to realize how quickly a child can stumble.
Elderly visitors face different challenges. Reduced mobility, balance issues, or vision problems mean that pond edges can become tripping hazards. A simple slip near the water’s edge can lead to falls and potential submersion.
Our furry friends aren’t immune either. Small dogs and cats can struggle with steep pond edges, and pets with health conditions might lack the strength to climb out if they accidentally fall in. Even confident swimmers can tire quickly in cold water or when weighted down by wet fur.
Understanding these specific risks helps us design safety features that truly protect everyone who enjoys our water gardens.
What Your Homeowner’s Insurance Actually Requires
Before diving into specific safety solutions, let’s chat about what your homeowner’s insurance actually expects from pond owners. Most insurance policies don’t spell out exact pond requirements, but they do hold you liable if someone gets injured on your property. Here’s the thing—I learned this the hard way when my insurance agent stopped by for a routine visit and started asking detailed questions about my pond’s depth and accessibility.
Generally speaking, insurance companies get concerned when ponds exceed 18-24 inches deep, especially if you live in a neighborhood with children or have frequent visitors. They’ll want to know about your safety measures during your policy review. Some insurers may require fencing for deeper ponds, while others simply increase your liability coverage. The good news? Proactively installing safety structures often demonstrates responsible ownership and can sometimes even lower your premiums.
I always recommend calling your insurance agent before building a new pond or adding significant depth to an existing one. Document your safety features with photos and keep records of any barriers, lighting, or warning systems you install. This simple step protects both your visitors and your wallet.
Beautiful Barriers: Fencing That Actually Looks Good
Natural Look Options: Living Fences and Planted Borders
Who says safety has to look boring? Some of my favorite pond landscaping solutions actually double as protective barriers, and nobody even realizes they’re there for safety!
Dense shrub borders create natural fences that gently discourage little ones and pets from wandering too close to the water’s edge. I love using rosemary, lavender, or ornamental grasses planted about two feet from the pond perimeter. They’re beautiful, fragrant, and just dense enough to act as a visual and physical reminder to stay back.
Raised stone beds around your pond work wonderfully too. Build them 12 to 18 inches high with stacked rocks or timber, then fill them with colorful perennials. Kids naturally see them as boundaries, and you get gorgeous elevated plantings that frame your water feature perfectly.
Thorny plants like barberry or rose bushes provide an extra layer of deterrence without looking unwelcoming. Just keep them pruned and positioned where they won’t snag anyone walking nearby.
The beauty of living barriers is they blend seamlessly into your landscape while providing year-round protection. As they mature, they actually become more effective, creating layered defense that feels completely organic. Plus, you’re adding habitat for butterflies and beneficial insects, making your pond ecosystem even richer.
Decorative Metal and Wood Solutions
When I first started adding fencing around my pond, I worried it would ruin the natural look I’d worked so hard to create. But decorative metal and wood options completely changed my perspective on safety barriers.
Ornamental metal fencing offers an elegant solution that doesn’t block sightlines. Look for options with decorative scrollwork or simple vertical bars spaced no more than 4 inches apart to prevent small children from squeezing through. Wrought iron and powder-coated aluminum both resist rust beautifully in wet environments. I recommend a minimum height of 42 inches, though 48 inches provides even better security for deeper ponds.
Cedar and redwood fencing bring warmth to your pond perimeter while naturally resisting moisture damage. Picket-style designs work wonderfully, creating cottage-garden charm while maintaining safety. Before installation, treat all cut ends with waterproof sealant to extend the life of your fence, especially where posts enter the ground.
Installation tip: Set fence posts at least 2 feet deep in concrete, positioned 6 to 8 feet apart for stability. This is especially important in softer soil near water features where ground shifting occurs.
Consider combining materials too. I’ve used decorative metal panels between stained wood posts for a custom look that complements my garden’s existing structures. The key is choosing materials that enhance rather than hide your beautiful water feature while keeping everyone safe.
Removable vs. Permanent: Choosing What Works for Your Space
Removable fencing gives you wonderful flexibility throughout the year. I love using sectional panels around my pond that come down in summer when we’re constantly supervising outdoor activities, then go back up during quieter months. They’re perfect if you’re testing different layouts or expect your family’s needs to change as kids grow. The downside? They require regular attention to stay secure and weather-resistant.
Permanent structures offer peace of mind without ongoing maintenance. Once installed, they’re there protecting your pond 24/7. I’ve found them ideal around larger ponds where consistent boundaries matter most. However, they limit future redesign options and represent a bigger upfront investment.
Consider your situation honestly. Young children or frequent visitors? Permanent might be worth it. Seasonal pond use or evolving landscape plans? Removable offers adaptability. Many pond owners, myself included, find a hybrid approach works best—permanent barriers at high-risk areas with removable sections elsewhere.
Pond Netting and Covers That Don’t Look Industrial
Choosing the Right Mesh Size for Safety and Function
When selecting netting for your pond safety structure, think of it like choosing the right fence for your yard—it needs to match your specific needs. For homes with young children, I recommend mesh sizes no larger than 1 inch square. This prevents little fingers and toes from slipping through while still allowing leaves and debris to pass, making cleanup easier.
The netting strength matters just as much as size. Look for materials rated to support at least 250 pounds per square foot. This ensures the netting can safely hold a child or pet who might venture onto it. Marine-grade nylon or polypropylene works wonderfully and resists UV damage, which is essential for outdoor use.
Here’s a practical tip from my own pond: choose black or dark green netting. It practically disappears over the water, maintaining that beautiful view you worked so hard to create. The darker colors blend naturally with shadows and water reflections.
Consider accessibility too. If you regularly feed fish or maintain plants, opt for removable panel sections rather than permanent installation. This way, you get full access when needed without compromising safety. Some pond owners create hinged sections that lift up easily—think of it as a trapdoor system that locks securely when closed but opens conveniently for pond care.
Installation Tricks That Keep Netting Nearly Invisible
Getting your pond netting to practically disappear is all about the setup. I learned this the hard way when my first attempt looked like I’d thrown a volleyball net over my beautiful koi pond! Here’s what actually works.
Start with proper tensioning. This is your secret weapon. Loose netting sags and catches the light, making it super obvious. Pull it taut from corner to corner, working in small sections. I use ratchet straps on the perimeter posts, tightening just until the net becomes flat but not overstretched. You want firm, not guitar-string tight.
Frame placement makes a huge difference. Position your support posts slightly back from the pond edge rather than right at the water line. This creates a subtle shadow zone that helps hide the netting. Aim for posts every 6 to 8 feet to prevent drooping between supports.
For color matching, choose black netting for darker pond surroundings or green for gardens with lots of foliage. Hold sample pieces against your backdrop in different lighting conditions before committing.
Height matters too. Install netting at least 18 inches above the water surface. This prevents that dreaded hammock effect when leaves pile up, which basically screams “look at this net!” The gap also gives your fish more swimming space.
Finally, angle matters. A slight slope from the perimeter toward the center helps debris slide off naturally rather than collecting in saggy pockets. Think of it like a tent roof, not a trampoline.
Edge Protection: Making Pond Borders Safer and Prettier
Gradual Slopes vs. Shelving: Building in Natural Escape Routes
One of the smartest safety features you can build into your pond isn’t a barrier at all—it’s the shape of the pond itself. When I redesigned my first pond after a neighborhood cat took an unexpected swim, I learned that thoughtful pond edge design can be a lifesaver, literally.
Think of your pond edges like a natural beach. Instead of straight, deep sides, create gradual slopes that ease from the surrounding landscape into the water. Aim for a gentle grade of about 20 degrees or less on at least one side of your pond. This gives any creature—child, pet, or wildlife—a natural pathway to walk back out if they tumble in.
Shallow shelves work beautifully too. Build ledges at different depths, starting at just a few inches below the surface and stepping down gradually. These shelves serve double duty: they provide escape routes and create perfect planting zones for marginal plants that enhance your pond’s ecosystem.
The key is avoiding those dangerous vertical drops. Even if you want deeper areas for fish, make sure at least one section of your pond has that gradual, walkable exit. It’s a simple design choice that could prevent tragedy while looking completely natural.
Non-Slip Surfaces and Textured Borders
Creating safe walkways around your pond doesn’t mean sacrificing style. The secret lies in choosing the right materials and placing them thoughtfully.
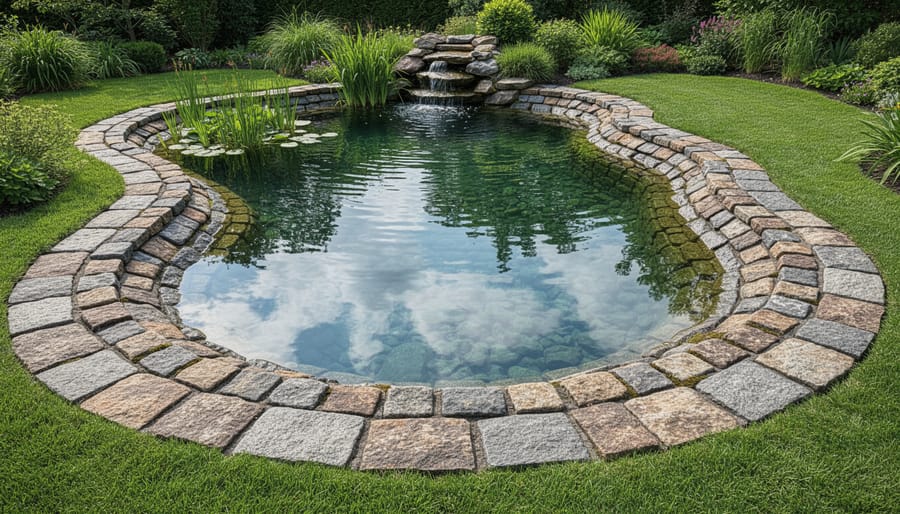
Start by selecting stones with naturally textured surfaces. Flagstone, slate, and quartzite are fantastic choices because their rough surfaces provide excellent grip, even when wet. I learned this the hard way after slipping on smooth river rocks during my early pond-building days! Avoid polished limestone or smooth granite for pathways, as these become slippery hazards near water.
When placing stones, position them with the most textured side facing up. Create borders using materials with different textures to provide a subtle warning that you’re approaching the water’s edge. For example, transition from smooth pavers on your main path to rougher cobblestones as you near the pond.
Consider adding a slightly raised textured border using stacked stones or rough-cut pavers. This creates both a tactile and visual boundary that alerts visitors they’re approaching the water. The height difference doesn’t need to be dramatic, just two to three inches works perfectly.
For extra safety without compromising aesthetics, brush decomposed granite or pea gravel between larger stones. This fills gaps that could catch small feet while adding a natural, cohesive look to your pond surround.
Lighting That Guides and Protects
Well-placed lighting serves double duty around your pond—it prevents nighttime accidents and creates stunning visual effects. Install low-voltage pathway lights along walkways at least every six feet to clearly mark routes for family and guests. Position accent lights to highlight pond edges, steps, and any changes in elevation that could catch someone off guard. Strategic pond lighting with warm tones works beautifully to define boundaries without harsh glare. I’ve found that uplighting nearby plants or rocks creates natural markers that feel inviting rather than purely functional. Consider motion-sensor lights near access points for added security and convenience when checking on your pond after dark.
Smart Accessibility Features for Every Age and Ability
Easy-Access Viewing Platforms and Seating Areas
Creating a comfortable viewing area lets you and your guests enjoy your pond without venturing too close to the water’s edge. I learned this lesson after watching my niece edge closer and closer to see the koi, giving me a minor heart attack! Now I always design dedicated spots for pond appreciation.
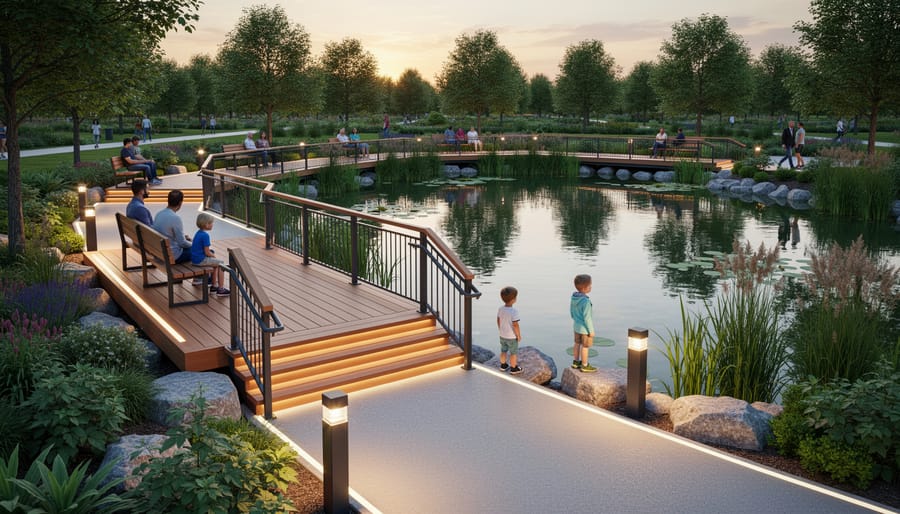
Start by building a stable platform or deck at least 2-3 feet back from the pond edge. Use pressure-treated lumber or composite decking materials that can handle moisture without becoming slippery. Ensure the platform is level and anchored securely to the ground with concrete footings or sturdy posts.
Add built-in benches or strategically placed seating that naturally guides people to safe viewing positions. I like placing a bench perpendicular to the pond so viewers sit facing the water at a comfortable distance. This creates a natural barrier while offering the perfect vantage point.
Consider installing a low border around your platform using decorative stones, planters, or low garden edging. This subtle boundary helps define the safe zone without obstructing the view. For families with young children, make the platform wide enough that little ones can move around without getting near the edge.
Remember, your viewing area should feel inviting, not restrictive. With thoughtful placement, you create spaces where everyone can relax and enjoy your beautiful water feature safely.
Handrails and Grip Points That Blend In
The secret to safety rails that don’t scream “hospital corridor” is making them look like they belong. I discovered this when installing a beautiful copper handrail along my pond’s stepping stone path—visitors assume it’s decorative, but it’s saved me from a few slippery moments!
Consider natural materials that complement your landscape. A sturdy branch rail made from cedar or locust wood blends seamlessly into garden settings while providing reliable support. You can mount these between stone pillars or wooden posts that look like intentional design elements. For a more polished look, wrought iron rails with decorative scrollwork or contemporary steel cables strung between posts offer both style and substance.
Strategically placed boulders serve double duty as grip points and landscape features. Position flat-topped rocks at key locations where someone might need stability—near steep slopes or water edges. Make sure they’re stable and large enough to lean against.
Built-in seating with armrests provides natural handholds without looking institutional. A stone bench beside your pond offers a perfect resting spot while its edges give visitors something to hold onto. Even decorative shepherd’s hooks or lamp posts near pathways can serve as discreet grip points when needed. The key is thinking creatively about structures that enhance your space while quietly offering support.
Emergency Planning: The Safety Layer You Can’t See
Where to Keep Rescue Tools Within Easy Reach
The best rescue tools won’t help much if you can’t grab them quickly during an emergency. I learned this lesson after watching my neighbor sprint halfway across their yard looking for their shepherd’s hook when their dog slipped into their pond. Thankfully, everything turned out fine, but it was a wake-up call for both of us.
Your rescue equipment should be within a 10-second dash from your pond’s edge. Consider installing a decorative storage bench near your water feature that doubles as seating and emergency equipment storage. These benches blend beautifully into your landscape while keeping ropes, hooks, and throw rings hidden but accessible.
Wall-mounted brackets disguised as garden art can hold shepherd’s hooks vertically against fences or garage walls. Paint them to match your outdoor decor so they practically disappear. For flotation devices, weatherproof deck boxes positioned strategically around your pond work perfectly. Label the inside of lids clearly so family members and guests know what’s inside.
Keep duplicate tools at multiple access points if you have a large pond. Your future self will thank you for this simple planning.
Teaching Your Family the Pond Safety Rules
Establishing clear pond safety rules is just as important as installing physical barriers. I’ve found that simple, memorable guidelines work best with kids. Start with the “Three Ps”: Permission first, Parent present, and Pal system—never visit the pond alone. Make these rules non-negotiable from day one.
Create a “no running near water” rule to prevent slips on wet surfaces. Designate specific viewing areas where children can safely observe fish and plants. Consider making a colorful sign together that lists your family’s pond rules—kids are more likely to follow guidelines they helped create.
For guests, casually mention your pond safety rules during their visit. I keep it light but clear: “We love showing off our pond, but we always walk slowly around it and keep little ones within arm’s reach.” Most parents appreciate the heads-up.
Practice emergency scenarios annually, showing children where rescue equipment is stored and reinforcing that they should get an adult immediately if someone falls in. Repetition makes these rules second nature.
Budget-Friendly Safety Upgrades You Can Do This Weekend
You don’t need to break the bank to make your pond safer this weekend. I’ve found that some of the most effective safety improvements are surprisingly simple and affordable. Let me share a few projects that have made a real difference around my own pond.
Start by creating a simple visual barrier with bamboo stakes and brightly colored string or rope. Space the stakes about two feet apart around your pond’s perimeter, then weave the rope between them at knee height. This costs under twenty dollars and takes about an hour, but it clearly marks the pond boundary for children and visitors. I used orange rope around mine, and it’s saved countless toys from taking an unplanned swim.
Next, tackle those slippery areas with grip tape or textured paint. The same anti-slip tape you’d use on stairs works perfectly on stepping stones, decking, or flat rocks near the water. Cut pieces to size and press them firmly onto clean, dry surfaces. For larger areas, outdoor-rated textured paint provides excellent traction and only needs a Saturday afternoon to apply.
Consider adding reflective markers or solar path lights around the pond edge for nighttime visibility. These stick-in-the-ground solar lights cost just a few dollars each and require zero electrical work. Space them every four to six feet for clear boundary definition after dark.
Finally, designate a safety station near your pond. Mount a simple hook or storage box containing a life ring, first aid kit, and emergency contact numbers. Like other DIY pond projects, this straightforward addition provides peace of mind without compromising your pond’s beauty. These weekend projects prove that safety doesn’t require major construction or expense.
Here’s the wonderful truth I’ve learned through years of water gardening: you absolutely don’t have to choose between a stunning pond and a safe one. They go hand-in-hand beautifully when you approach design with intention.
Take a moment this weekend to walk around your pond with fresh eyes. Look at it from a safety perspective. Is there one feature that makes you a little nervous? Maybe it’s that steep edge near the patio, or the fact that you don’t have a nearby rescue pole. Pick just one thing to improve. Start small if you need to.
I promise you, even a single thoughtful change creates ripples of peace of mind. Installing that decorative fence section you’ve been considering, adding some strategically placed stepping stones, or simply keeping a life ring mounted on your garden shed—these aren’t huge projects, but they make an enormous difference.
Your pond should bring you joy, not worry. Every safety improvement you make is an investment in relaxation, allowing you to truly enjoy those quiet mornings by the water without that nagging voice of concern. You’ve got this, and your pond will be both safer and more beautiful for it.