
Crystal Clear Water in 48 Hours: How UV Clarifiers Finally Solve Green Pond Problems
Look into your aquarium right now. If you’re seeing a cloudy green haze or milky water that won’t clear up no matter how often you change the water, you’re dealing with free-floating algae or microscopic organisms that standard filters can’t catch. A UV clarifier might be exactly what you need—and it’s easier to use than you think.
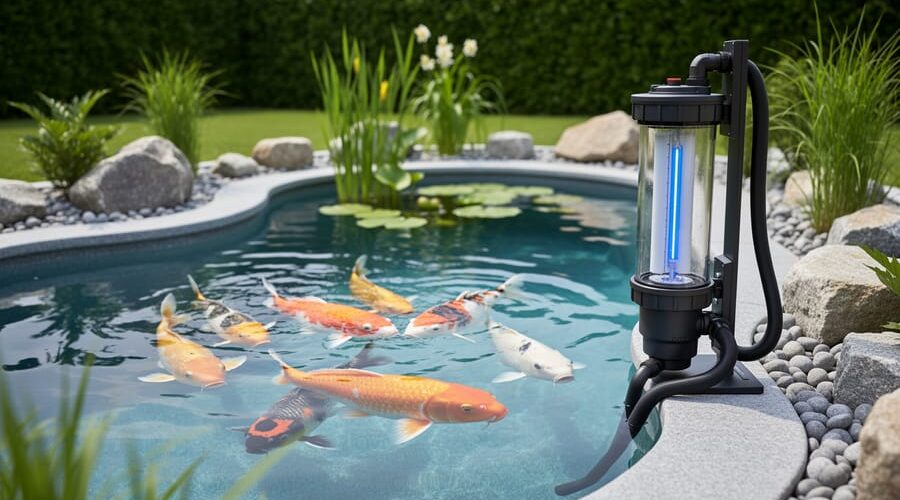
UV clarifiers work by passing your aquarium water through a chamber containing an ultraviolet light bulb. As suspended algae cells and bacteria flow past this light, the UV rays scramble their DNA, causing them to clump together or die off. Your regular filter then catches these larger particles, leaving you with sparkling clear water. The best part? The UV light doesn’t harm your fish, beneficial bacteria living in your filter media, or the water chemistry you’ve worked so hard to balance.
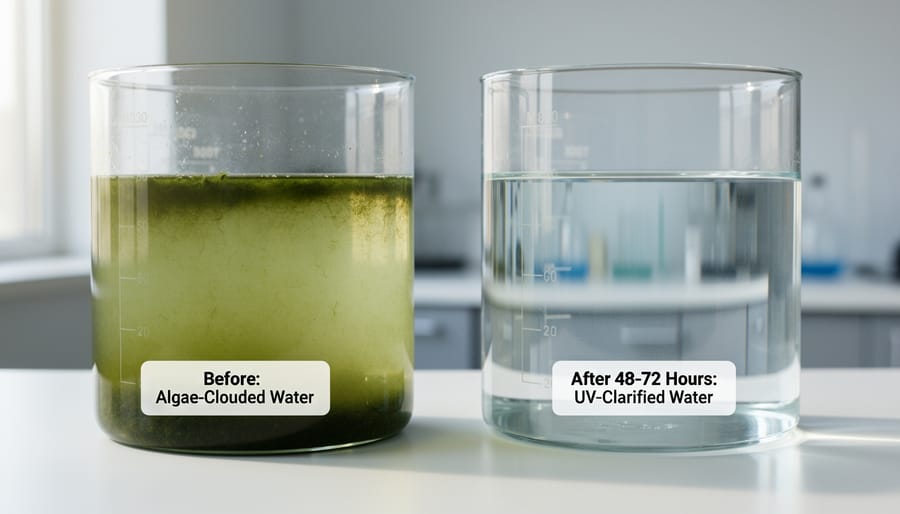
The transformation typically happens within 48 to 72 hours of installation. You’ll watch that frustrating green tint gradually fade away, revealing the beautiful underwater landscape you’ve created. Maintaining crystal clear water becomes significantly easier once you understand how UV clarifiers fit into your overall filtration system.
Whether you’re setting up your first aquarium or you’re an experienced hobbyist tired of battling persistent cloudiness, choosing the right UV clarifier involves understanding wattage requirements, proper placement, and realistic expectations about what these devices can and cannot do.
What Exactly Is a UV Clarifier and How Does It Work?
The Science Made Simple
Here’s how UV clarifiers work their magic, and trust me, it’s simpler than you might think! Imagine your aquarium water flowing through a special chamber with a UV-C light bulb inside. As water passes by this light, something remarkable happens at a microscopic level.
The UV-C light acts like an incredibly precise disruption tool. When those pesky algae cells float past the bulb, the ultraviolet rays penetrate their cell walls and scramble their internal DNA structure. Think of it like scrambling the instruction manual that tells the algae how to grow and reproduce. Once their DNA is damaged, these algae cells can’t multiply anymore, and they eventually die off.
The same process works on free-floating bacteria and other microorganisms that make your water look murky and green. The beauty of this system is that it only affects what flows directly past the light. Your beneficial bacteria living in your filter media stay safe and sound because they’re not exposed to the UV rays.
Within days of running a properly sized UV clarifier, you’ll notice your water becoming noticeably clearer as those damaged algae cells get filtered out of your system.
Clarifiers vs. Sterilizers: Which Do You Actually Need?
Here’s the thing that confused me when I first started researching UV units: clarifiers and sterilizers might look identical, but they work at completely different power levels for different purposes.
A UV clarifier uses lower wattage to clump together single-celled algae (the stuff that makes water look like pea soup). Once clumped, these particles become large enough for your filter to catch. Clarifiers don’t kill everything that passes through – they’re specifically targeting that green water algae that drives pond owners crazy.
UV sterilizers, on the other hand, pack much more punch. They’re designed to kill bacteria, parasites, and pathogens, not just clump algae. The water flows through much more slowly, giving the UV light time to actually destroy these microscopic nasties at the DNA level.
So which do you need? If you have a pond with recurring green water problems, a clarifier is your best friend. It’s what I use in my backyard pond, and it keeps the water crystal clear without going overboard on power consumption.
For aquarium owners, though, consider a sterilizer if you’re dealing with disease outbreaks or want extra protection for sensitive fish. Sterilizers are particularly valuable in quarantine tanks or if you’re battling persistent ich or other parasites. They’re more expensive to run but offer that extra disease-fighting capability indoor aquariums sometimes need.
Signs Your Aquarium or Pond Needs a UV Clarifier
Green Water That Won’t Quit
You’ve been diligent about your weekly water changes, cut back on feeding your fish, and even reduced the lighting hours. Yet that frustrating pea-soup green water just keeps coming back, sometimes within days. Sound familiar? When your aquarium water looks like someone dumped green food coloring in it despite your best efforts, you’re dealing with a stubborn free-floating algae bloom. These microscopic algae particles multiply faster than traditional methods can control them. Regular maintenance helps prevent many aquarium problems, but when single-celled algae get out of control, they reproduce at an incredible rate, turning your beautiful display into a murky mess. The algae suspended in the water column are so tiny that standard filters can’t catch them, and they’re simply too numerous for manual removal. This is exactly the situation where a UV clarifier shines. While good aquarium habits remain important, sometimes you need specialized equipment to break the cycle of persistent green water.
When Other Methods Have Failed
Sometimes you do everything right, but the water just won’t clear up. You’ve been diligently scooping out debris every few days, your gravel vacuuming game is strong, and you’ve even cut back on feeding. Maybe you’ve tried chemical treatments that promised crystal-clear water in days, but the cloudiness returned almost immediately. Or perhaps you added plants hoping they’d outcompete the algae for nutrients, yet that stubborn green tint just won’t budge.
This is where a UV clarifier really shines. These situations often point to free-floating algae or bacterial blooms that simply won’t respond to traditional methods. Manual cleaning can’t catch microscopic particles that make water look like pea soup, and chemicals often provide only temporary relief without addressing the root cause. Plants are wonderful long-term helpers, but they can take months to establish properly, and in the meantime, you’re stuck staring at murky water. If you’ve exhausted these options and still can’t enjoy a clear view of your fish, a UV clarifier might be exactly what your aquarium needs to finally win the battle.
Cloudy Water After Adding New Fish or Plants
We’ve all been there – you excitedly add new fish or plants to your aquarium, and within a day or two, the water turns cloudy and milky. Don’t panic! This is typically a bacterial bloom, and it’s actually a natural part of your tank’s ecosystem adjusting to the change.
When you introduce new inhabitants, you’re also adding organic matter and nutrients. The beneficial bacteria in your tank go into overdrive, multiplying rapidly to process everything. While this is a good thing overall, these free-floating bacteria make your water look like someone poured milk into it.
Here’s where your UV clarifier becomes a helpful tool. As water passes through the unit, the UV light damages the cell structure of these suspended bacteria, causing them to clump together. Your filter can then easily remove these clumps, clearing up the cloudiness much faster than waiting it out naturally. Most bacterial blooms resolve themselves within a week, but with UV assistance, you might see crystal-clear water in just a couple of days. Just remember to keep up with regular water changes and avoid overfeeding during this adjustment period.
Choosing the Right Size UV Clarifier for Your Setup
Calculate Your Water Volume
Getting your water volume right is the secret to choosing a UV clarifier that actually works! Don’t worry—you don’t need to be a math whiz here.
For rectangular tanks, multiply length times width times height in inches, then divide by 231 to get gallons. So a 48″ x 24″ x 20″ aquarium would be: 48 x 24 x 20 = 23,040 ÷ 231 = approximately 100 gallons.
Round tanks are slightly trickier. Measure the diameter, divide by two to get the radius, then use this formula: 3.14 x radius x radius x height in inches ÷ 231.
Here’s a tip I learned the hard way: always round up! If your calculation shows 95 gallons, treat it as 100. You’ll also want to account for decorations, substrate, and rocks that displace water—they can reduce your actual volume by 10-15 percent.
For oddly shaped ponds, the easiest method is checking your original fill records or using an online pond calculator. When in doubt, go bigger with your UV clarifier. It’s better to oversize than undersize!
Understanding Wattage and Flow Rate
Choosing the right UV wattage and flow rate can feel a bit like matching puzzle pieces, but once you understand the basics, it’s really straightforward! The wattage of your UV clarifier determines how powerful the ultraviolet light is. Higher wattage means more killing power against those pesky algae spores and harmful microorganisms. For most aquariums, you’ll need about 3-5 watts per 50 gallons of water to effectively clear green water.
Here’s where flow rate comes into play. The water needs to pass slowly enough through the UV chamber to get properly exposed to the light. Think of it like baking cookies – they need enough time in the oven to cook through! If your pump pushes water too quickly, the algae simply rushes past without getting zapped. The sweet spot is usually around 30-60 seconds of exposure time.
Your pump’s flow rate should match your UV clarifier’s specifications. Most units will indicate the maximum recommended flow rate, typically measured in gallons per hour. Running water too fast reduces effectiveness, while too slow might not circulate enough water to maintain a healthy pond ecosystem. When sizing your system, always check both wattage and recommended flow rates together for crystal-clear results!
Why Bigger Isn’t Always Better
I get it—when you’re dealing with green, murky water, the temptation is to go big or go home. But here’s the thing: a UV clarifier that’s too powerful for your aquarium isn’t just a waste of money. It can actually work against you by creating unnecessary flow issues and using more electricity than needed. The sweet spot is matching your UV wattage to your tank size and flow rate. A properly sized unit will cycle your water through at the right speed, giving the UV light enough contact time to zap those algae cells without creating a tornado in your tank. Most manufacturers provide clear sizing charts, so trust them. Going one size up might seem like insurance, but you’ll end up with higher energy bills and potentially shorter bulb life without better results. Save your budget for quality features like a good flow rate controller instead.
Top UV Clarifiers for Aquariums: What We Recommend
Best for Small to Medium Aquariums (Up to 75 Gallons)
For smaller home aquariums, you don’t need to break the bank to get crystal-clear water. I’ve tested several compact UV clarifiers over the years, and these models consistently deliver great results without overwhelming your space or budget.
The Green Killing Machine Internal UV Sterilizer is my go-to recommendation for beginners. This ingenious little unit hangs right inside your tank and works surprisingly well for aquariums up to 50 gallons. At around $30-40, it’s perfect if you’re dealing with occasional green water issues. I love that there’s no complicated plumbing—just hang it on the rim, plug it in, and you’re done. The 9-watt bulb effectively handles free-floating algae without taking up valuable cabinet space.
For slightly larger setups between 50-75 gallons, consider the Coralife Turbo-Twist UV Sterilizer. This external unit connects inline with your filter system and packs more power with its 18-watt bulb. Yes, it requires a bit more installation effort, but the twist-flow design maximizes water contact with UV light, making it incredibly efficient. It’s built like a tank and typically lasts years with just annual bulb replacements.
Both options give you professional-grade water clarity without the professional price tag, making them ideal starting points for your aquarium journey.
Best for Large Aquariums and Small Ponds (75-500 Gallons)
When you’re dealing with a larger aquarium or small pond up to 500 gallons, you’ll need a UV clarifier with more muscle to keep the water crystal clear. Here are a couple of reliable mid-range options that won’t break the bank.
The AquaTop UV Sterilizer (18-36 watt models) is a fantastic choice that I’ve recommended to several fellow pond enthusiasts. It handles tanks and ponds from 75 to 400 gallons depending on the wattage you choose. The unit comes with everything you need to get started, including mounting brackets and hose connections. What I really appreciate is the easy-access design that makes bulb changes a breeze when that time comes around every 10-12 months.
Another solid performer is the Coralife Turbo Twist UV Sterilizer in the 18-watt size. This unit features a unique twisted design inside that increases contact time between water and UV light, making it more efficient than straight-tube models. It works beautifully for tanks up to 125 gallons or small ponds around 250 gallons. The compact size means it tucks away nicely in your filtration setup without taking up too much precious space.
Both options deliver great results within 5-7 days of operation and offer excellent value for their price range.
Premium Options for Serious Aquarists
If you’re dealing with a large aquarium or multiple tanks and want the absolute best, premium UV clarifiers deliver outstanding performance and durability that’ll serve you for years to come.
The Pentair Aquatics Smart UV Sterilizer stands out as a top-tier choice for serious aquarists. I’ve seen these units run flawlessly in 200-gallon reef tanks for over five years without missing a beat. What makes it special? The digital ballast automatically adjusts power output as the bulb ages, maintaining consistent sterilization throughout the bulb’s life. The unit includes a viewing window so you can confirm the lamp is working without taking anything apart. Built with marine-grade materials, it handles saltwater environments beautifully. The flow-through design ensures maximum contact time, and the heavy-duty quartz sleeve resists scratching and clouding far better than standard models.
Another excellent option is the Aqua Ultraviolet Advantage series. These American-made units feature thick-walled housings that protect against UV degradation and include lifetime warranties on the transformer. The extra-long contact chambers mean you can run higher flow rates while still achieving crystal-clear water. Professional aquarium maintenance crews often choose these because they’re virtually maintenance-free and incredibly reliable.
Installation Made Easy: Setting Up Your UV Clarifier
Where to Position Your UV Unit
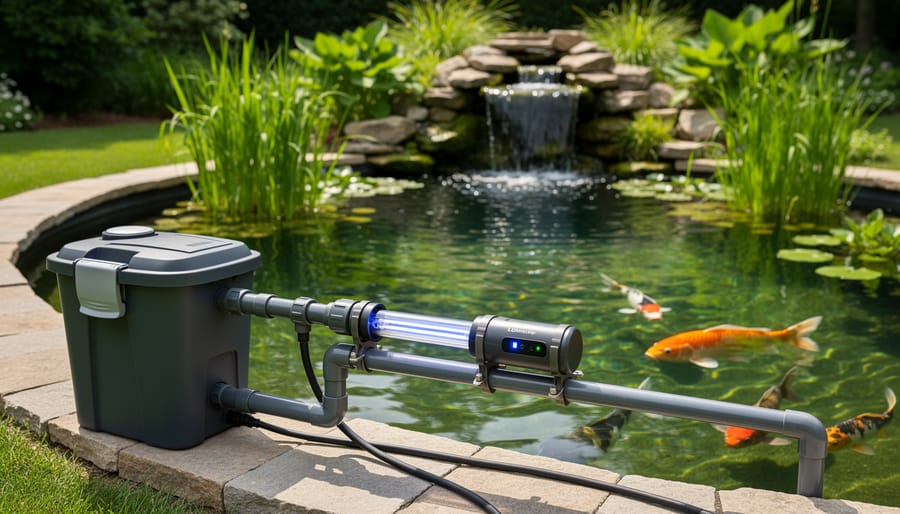
Getting the placement right makes a real difference in how well your UV clarifier works! The golden rule is to install your UV unit after your mechanical filter. Why? Because you want that water as clean as possible before it passes through the UV chamber. If debris and larger particles hit the quartz sleeve first, they’ll block the UV light and reduce effectiveness.
Think of it this way: your mechanical filter removes the chunks, then the UV zaps the microscopic nasties floating in the now-clear water. This setup also means you’ll clean that quartz sleeve less often, which is always a win in my book!
Make sure your UV unit sits somewhere you can easily reach. You’ll need to check it occasionally and replace the bulb once a year, so tucking it behind a tangle of hoses isn’t doing yourself any favors. I learned this the hard way when I had to move half my equipment just to swap a bulb!
Keep the unit level and protected from direct sunlight if it’s outdoors. And remember, UV clarifiers work alongside proper pond filtration, not as a replacement for it.
Connecting to Your Existing System
Getting your UV clarifier connected properly is easier than you might think, and I promise it’s worth taking a few extra minutes to get it right! Most clarifiers come with standard hose fittings, typically ranging from 1/2 inch to 1 inch in diameter. Before you start, measure your existing tubing to ensure compatibility.
Here’s my tried-and-true approach: First, check if your clarifier’s inlet and outlet match your current hose size. If they don’t, don’t panic! Barbed adapters and reducer fittings are your best friends here. I keep a few different sizes in my garage because, honestly, nothing ever fits perfectly on the first try. These inexpensive adapters slip right into your tubing and connect to the clarifier ports.
When connecting hoses, push them firmly onto the barbed fittings until they’re seated about an inch deep. The barbs create a tight seal, but I always add hose clamps for extra security. Trust me, discovering a leak after filling your system is no fun. Tighten the clamps snugly with a screwdriver, but don’t go overboard or you’ll damage the tubing.
Before turning everything on, do a visual inspection of all connections. Run your fingers along each joint to feel for proper seating. Once you’re confident, turn on your pump gradually and watch for drips. A tiny bit of initial weeping is normal and often stops as connections settle, but steady dripping means you need to reposition or tighten that connection. Take your time here, and you’ll enjoy crystal-clear water without any unwanted surprises!
Keeping Your UV Clarifier Running Strong
Cleaning the Quartz Sleeve
Here’s the thing about UV clarifiers – they only work when light can actually pass through that protective quartz sleeve. Over time, mineral deposits from your water (especially if you have hard water) build up on the glass surface, blocking those essential UV rays. It’s like trying to get a tan through a dirty window!
You’ll want to check your quartz sleeve every month and give it a good cleaning whenever you notice a white, chalky film forming. In my experience with my own aquarium, I found myself cleaning it monthly during summer when algae blooms were most active, but every six weeks worked fine in cooler months.
The easiest cleaning method? Simply remove the sleeve according to your manufacturer’s instructions (always unplug first!), then soak it in white vinegar for 15-20 minutes. The acid in the vinegar dissolves those stubborn mineral deposits beautifully. After soaking, use a soft cloth or paper towel to wipe it clean – never use abrasive scrubbers that might scratch the glass. Rinse thoroughly with clean water, let it dry completely, and reinstall. The whole process takes less than 30 minutes, and your UV clarifier will be working like new again!

When to Replace Your UV Bulb
Here’s something many pond and aquarium owners don’t realize: your UV bulb stops working effectively long before it actually burns out. I learned this the hard way when my crystal-clear pond gradually turned murky again, even though the light was still glowing!
UV bulbs lose their algae-fighting power over time because the ultraviolet output decreases, even though visible light continues shining. Think of it like an old battery that looks fine but doesn’t hold a charge anymore. Most manufacturers recommend replacing your bulb every 12 months for optimal performance, though some higher-end bulbs can last up to 14-18 months.
How do you know it’s replacement time? Mark your calendar when you install a new bulb, or better yet, set a phone reminder for 11 months later. If your water starts getting cloudy or developing that telltale green tint before your scheduled replacement, that’s a clear sign the bulb has lost effectiveness.
A helpful tip: buy your replacement bulbs in advance during off-season sales. I keep a spare in my garage so I’m never caught without one when springtime algae blooms hit. Regular replacement keeps your water sparkling and your fish happy, making it one of the easiest maintenance tasks you can tackle.
Quick Fixes for Common Problems
If your clarifier isn’t turning on, first check that it’s properly plugged in and the outlet has power. Look for a glowing light inside the unit, which tells you the bulb is working. No glow? Your bulb might need replacing, even if it hasn’t reached its recommended lifespan yet.
Still dealing with green water after two weeks? Your flow rate might be too fast, giving the UV light less time to work its magic. Try adjusting your pump speed downward. Also double-check your clarifier is sized correctly for your tank volume. I learned this the hard way when my undersized unit couldn’t keep up with my 75-gallon tank.
Reduced flow usually means debris buildup on the quartz sleeve. Turn everything off, remove the sleeve carefully, and clean it with white vinegar and a soft cloth. While you’re at it, inspect the O-rings for cracks or wear. These inexpensive rubber seals are often the culprit behind leaks and performance issues. Keep spares handy so you’re never caught without one during routine maintenance.
What UV Clarifiers Can’t Do (And What to Use Instead)
String Algae and Surface Algae
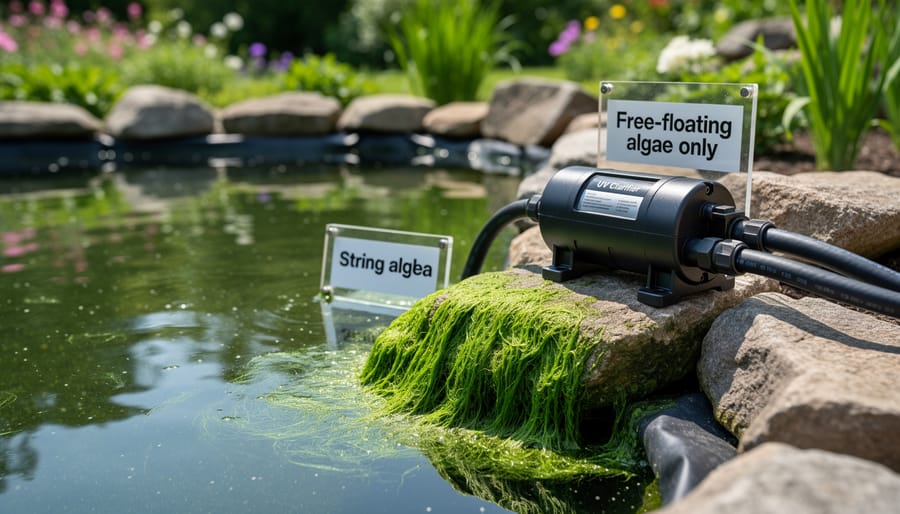
Here’s something important to understand: UV clarifiers work wonderfully on green water algae because those tiny plant cells are floating freely through the water, passing directly under that UV light. But they won’t help with string algae hanging from your decorations or that fuzzy green film coating your aquarium glass. Why? Because UV light only affects what flows past it.
Think of it like this: your UV clarifier is a checkpoint that only catches travelers passing through. The algae already settled and attached to surfaces never make that trip. For string algae clinging to rocks or surface algae on glass, you’ll need to roll up your sleeves and use good old-fashioned elbow grease with an algae scraper or pad. Maintaining proper water chemistry and adding algae-eating fish like plecos or snails can also help keep these stubborn types under control. A UV clarifier is your green water solution, not your entire algae-fighting arsenal.
Addressing the Root Cause
Here’s something I learned the hard way during my first summer with a backyard aquarium: a UV clarifier is like taking aspirin for a headache. It helps with the symptom, but it won’t fix what’s causing the problem in the first place.
Think of green water as your aquarium’s way of saying something’s out of balance. Maybe you’re feeding your fish a bit too generously, or perhaps your tank is getting too much direct sunlight streaming through that nearby window. Excess nutrients from fish waste, decaying plant matter, or overfeeding are usually the real culprits behind algae blooms.
Your UV clarifier will absolutely clear up that cloudy green water, and it does a fantastic job at it. But if you don’t address why the algae keeps growing back, you’ll be fighting the same battle again and again. It’s a bit like mopping the floor while the tap’s still running.
The best approach combines your UV clarifier with good aquarium practices. Regular water changes, proper filtration, controlled feeding schedules, and managing light exposure all contribute to pond water clarity. When you tackle both the symptoms and the root causes together, you’ll enjoy crystal-clear water that stays that way.
So there you have it – UV clarifiers really are one of the best tools in your aquarium-keeping arsenal for achieving beautifully clear water without relying on harsh chemicals. I can’t tell you how many times I’ve seen aquarium owners struggle with green water, trying every product under the sun, only to finally install a UV clarifier and wonder why they didn’t do it sooner.
The key to success is matching the right model to your specific tank size and flow rate. Don’t skimp on sizing – a slightly oversized unit will always outperform an undersized one. Remember to consider your stocking levels and whether your tank gets natural sunlight, as these factors can influence which wattage you’ll need.
Here’s the part that requires a bit of patience: give your new UV clarifier 48 to 72 hours to work its magic. I know it’s tempting to keep checking every few hours, but trust the process. By the third day, you’ll likely notice a dramatic transformation as that murky water becomes increasingly transparent. It’s genuinely one of the most satisfying moments in aquarium keeping – like watching fog lift from a morning landscape.
Once you’ve experienced the difference crystal-clear water makes, you’ll never look back. Your fish will look more vibrant, your plants more lush, and you’ll actually enjoy gazing at your aquarium again instead of squinting through the haze. Here’s to clear water and happy fishkeeping!