
Sediment Ponds: The Secret to Crystal-Clear Water Without Constant Maintenance
Cloudy, murky pond water doesn’t mean you’ve failed as a water gardener—it means sediment has built up and needs a strategic management system. A sediment pond is your secret weapon for crystal-clear water: it’s a separate, smaller basin positioned before your main pond that captures dirt, debris, and particles before they cloud up your beautiful water feature.
Think of it as a pre-filter that works with gravity and time rather than expensive equipment. Water flows into this settling basin first, slows down dramatically, and drops its sediment load before moving into your showcase pond. The heavy particles sink to the bottom where you can easily remove them during routine maintenance, keeping your main pond pristine and your fish healthy.
You’ll find sediment ponds particularly valuable if you’re dealing with runoff from slopes, construction areas, or garden beds that naturally wash soil toward your water feature. They’re also essential for anyone tired of constantly cleaning filters or watching their pond turn brown after every rainstorm.
The beauty of this system lies in its simplicity—no moving parts, minimal maintenance, and it works around the clock without electricity. Whether you’re installing a brand-new pond or rescuing an existing one from chronic murkiness, understanding sediment pond design transforms frustrating water quality battles into straightforward, manageable solutions that let you actually enjoy your backyard oasis.
What Exactly Is a Sediment Pond?
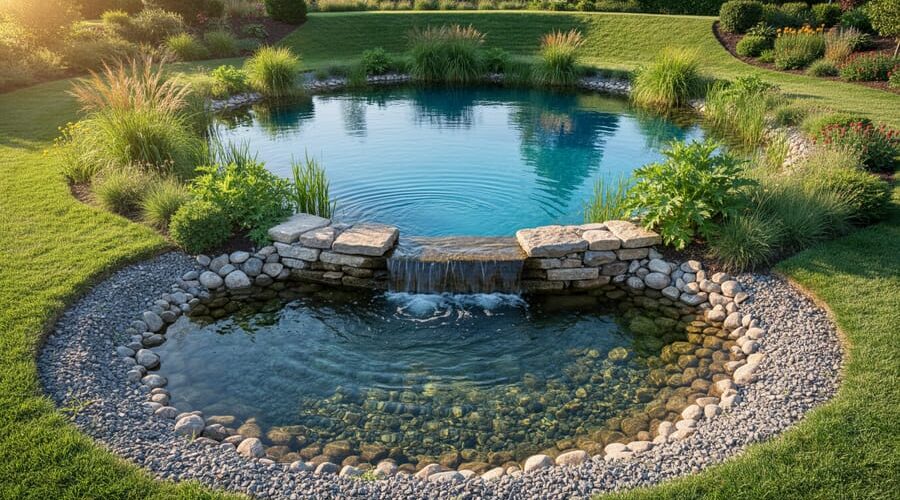
Think of a sediment pond as your pond’s personal butler, quietly working behind the scenes to keep things tidy. In the simplest terms, a sediment pond is a smaller, preliminary basin that sits upstream from your main pond, catching dirt, debris, and particles before they reach your beautiful water feature.
Here’s how it works: imagine you’re making coffee through a filter. The sediment pond acts just like that filter, letting water flow through while trapping the “grounds” – in this case, soil, leaves, organic matter, and other particles. As water enters the sediment pond, it slows down significantly. This slower movement gives gravity a chance to do its magic. Heavier particles sink to the bottom and settle there, while cleaner water continues flowing into your main pond.
The beauty of this system is its simplicity. There are no moving parts, no electricity required, and no complicated mechanisms. It’s pure physics at work. The sediment pond becomes a sacrificial space that collects the muck so your main pond doesn’t have to.
In a thriving pond ecosystem, water clarity matters enormously. Excessive sediment can cloud water, smother beneficial bacteria, clog filtration systems, and create an unhealthy environment for fish and plants. By intercepting sediment before it becomes a problem, you’re essentially giving your main pond a fighting chance to stay balanced and beautiful.
The sediment pond typically requires periodic cleaning – you’ll scoop out the accumulated material once or twice a year – but that’s far easier than dredging your entire main pond or constantly battling murky water.
Why Your Pond Needs Sediment Management
The Real Cost of Ignoring Sediment
Let me share something I learned the hard way during my first year as a pond owner: ignoring sediment isn’t just about murky water. It triggers a domino effect of problems that can genuinely damage your pond ecosystem.
When suspended sediments settle on the pond bottom, they create a nutrient-rich layer that becomes a breeding ground for algae. You’ll notice those frustrating green blooms that seem impossible to control, no matter how much you try. The sediment also harbors harmful bacteria that multiply quickly in warm weather.
Your equipment suffers too. I’ve watched friends replace expensive pump filters twice in one season because sediment clogged them beyond cleaning. The constant debris wears down mechanical parts faster than you’d expect, turning what should be routine maintenance into costly repairs.
Perhaps most concerning is what happens beneath the surface. That sediment layer consumes oxygen as it decomposes, leaving less for your fish and beneficial bacteria. During summer months especially, this can create dangerous low-oxygen zones.
Over time, accumulated sediment literally steals your pond’s depth, shrinking the usable water volume. What started as a beautiful three-foot pond gradually becomes shallower, affecting fish health and temperature stability. Trust me, preventing sediment buildup is far easier than removing years of accumulated muck.
How Sediment Ponds Fit Into Sustainable Management
Here’s what I love about sediment ponds: they’re all about working smarter, not harder. Rather than constantly battling murky water with chemicals and endless scooping, you’re setting up a system that prevents problems before they start. It’s one of those brilliant natural pond solutions that works with nature instead of against it.
Think of it this way: every time you let gravity and natural settling do the heavy lifting, you’re reducing your reliance on expensive treatments and backbreaking labor. The sediment stays where it belongs, quietly settling out before it reaches your main pond. This means less time cleaning filters, fewer chemical additives, and healthier conditions for your fish and plants.
I’ve watched friends transform their pond maintenance routines from weekly battles to monthly check-ins, simply by adding a sediment pond. The environmental benefits are fantastic too: you’re creating habitat diversity while protecting water quality using nothing but clever design and patience. It’s sustainable pond keeping at its finest.
Where Sediment Ponds Work Best
Not every pond needs a sediment pond, but when the conditions are right, they can be absolute game-changers for water quality. Let me share where these hardworking systems really shine.
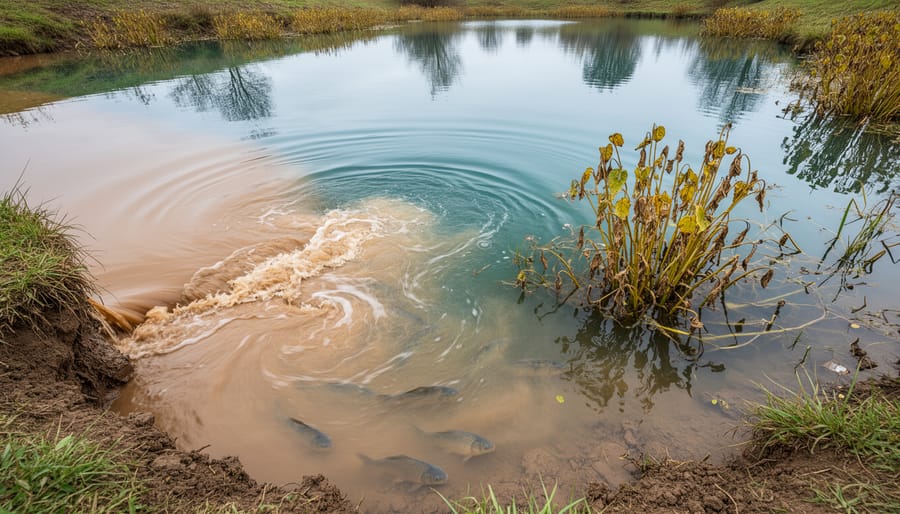
If your pond receives water from a stream, drainage ditch, or natural runoff channels, you’ve got a perfect candidate for a sediment pond. I learned this the hard way when my backyard pond turned murky brown every time it rained. The runoff from my neighbor’s property was carrying soil directly into my beautiful water feature. A small sediment pond upstream solved the problem completely.
Properties with sloped terrain particularly benefit from sediment ponds. Gravity becomes your ally here, naturally moving water downhill while the sediment pond catches soil particles before they reach your main pond. Even gentle slopes can generate surprising amounts of sediment over time, especially during heavy rainfall.
New construction sites near your pond are red flags for sediment issues. Whether you’re building a deck, installing a patio, or your neighbors are developing nearby land, exposed soil means trouble for your pond. A temporary or permanent sediment pond positioned between the construction zone and your water feature acts like a protective shield.
Gardens and landscaping projects adjacent to your pond also create prime conditions for sediment ponds. When you’re tilling soil, planting new beds, or refreshing mulch, particles inevitably wash away during watering or storms. I always recommend positioning a small catch basin between vegetable gardens and ponds.
The common thread? Anywhere bare soil meets moving water, a sediment pond makes practical sense. If you can trace a path where water flows from disturbed earth toward your pond, that’s your signal to consider this simple but effective solution.
Building Your Own Sediment Pond: A Step-by-Step Approach
Planning and Placement
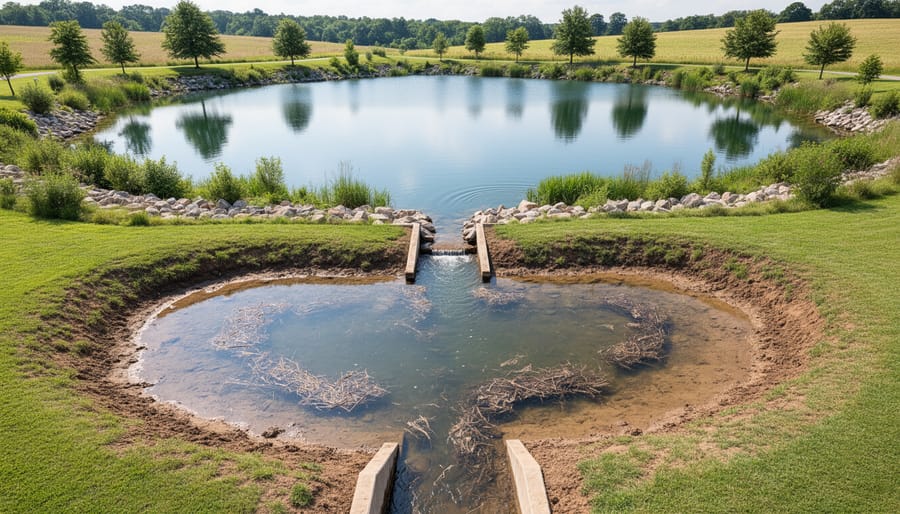
Getting your sediment pond in just the right spot makes all the difference in how well it works. Think of yourself as a water detective for a moment – you’ll want to spend some time watching how water moves across your property, especially during and after rainfall. The ideal location is anywhere water naturally flows before reaching your main pond, like at the end of a drainage ditch, below a slope, or where runoff enters your property.
The golden rule for placement is simple: upstream is your friend. Your sediment pond should always sit higher up in the water flow path than your main feature pond. This way, gravity does the heavy lifting, allowing dirty water to settle in the sediment pond first before cleaner water continues its journey downstream.
Sizing doesn’t have to be complicated. A good starting point is making your sediment pond about 10-15% the size of your main pond, though this can vary based on how much sediment you’re dealing with. If you live at the bottom of a steep hill or have lots of bare soil nearby, consider going bigger. I learned this the hard way when my first sediment pond filled up after just one major storm because I’d made it too small!
Pay attention to natural low spots and where water already wants to go. Working with your landscape’s existing flow patterns is easier and more effective than trying to redirect everything. Look for areas where you notice silt accumulating naturally – that’s nature showing you exactly where a sediment pond would work best.
Digging and Shaping Your Sediment Pond
Grab your shovel and let’s get digging! The excavation phase is where your sediment pond really starts to take shape, and honestly, this is where I always feel like a kid playing in the dirt again.
For most backyard sediment ponds, you’ll want to aim for a depth of 2 to 3 feet. This sweet spot gives you enough capacity to catch sediment without making excavation a major construction project. I learned the hard way on my first pond that going too shallow (just 18 inches) meant I was cleaning it out way too often. Think of it like a coffee filter – you need enough depth to trap the gunk before water moves on to your main pond.
Creating gentle slopes around the edges is crucial, and here’s why: steep sides collapse, especially after heavy rain. Aim for a 3:1 ratio, meaning for every 3 feet of horizontal distance, you drop 1 foot in depth. This gradual grade keeps your banks stable and makes maintenance much safer. Trust me, slipping down a muddy bank while holding a shovel isn’t fun!
Different soil types will test your patience differently. Clay soil is heavy but holds shape beautifully – nature’s own pond liner. Sandy soil excavates easily but may need reinforcement along the edges. Rocky soil? Keep a pickaxe handy and take frequent breaks. If you hit extremely rocky terrain, consider adjusting your pond’s location slightly rather than battling boulders for days.
Mark your pond’s outline with spray paint or stakes before you start, and remove topsoil separately – you can use it elsewhere in your garden.
Adding the Finishing Touches
Now for those final touches that’ll make your sediment pond truly shine! First up, let’s talk overflow. You’ll want to install a simple overflow pipe near the top of your pond to handle heavy rains. I usually use a PVC pipe fitted into the sidewall, positioned so water flows gently into your main pond. This prevents flooding and ensures only the cleanest water makes its way downstream.
Access is crucial because you’ll need to clean out accumulated sediment eventually. I learned this the hard way when I built my first sediment pond without a proper access point and had to wade through muck to clean it! Create a gentle slope on one side or add stepping stones that let you reach the deepest part safely. Trust me, your future self will thank you.
Here’s where it gets really fun – planting time! Adding vegetation isn’t just pretty, it’s practical. Rushes, cattails, and water irises are fantastic sediment trappers. Their roots slow water flow even more and grab onto fine particles. Place these around the edges and in shallow areas. I’ve found that three to five plants per square yard works beautifully without overcrowding.
Finally, connect your sediment pond to the main pond. This connection should be at the surface level where the cleanest water sits. Use flexible tubing or a small channel, keeping the flow gentle and steady. Position it opposite from where water enters your sediment pond to maximize the settling journey. Stand back and admire your handiwork – you’ve just created a natural filtration system!
What You’ll Need
Good news – you probably have most of what you need already! For a basic sediment pond, you’ll need a shovel or small excavator for digging, a pond liner (a tarp works great as a budget option), and some rocks or gravel to help filter sediment naturally. If you’re building a settling chamber before your main pond, grab a few heavy-duty storage containers or concrete blocks. A simple mesh screen or filter fabric helps catch debris before it settles. For maintenance, keep a pond net and bucket handy. Many pond lovers repurpose old aquarium supplies or rain barrels for their sediment systems. The beauty of this project is its flexibility – you can start small with materials you already have and upgrade as you go!
Maintaining Your Sediment Pond
Cleaning Out Accumulated Sediment
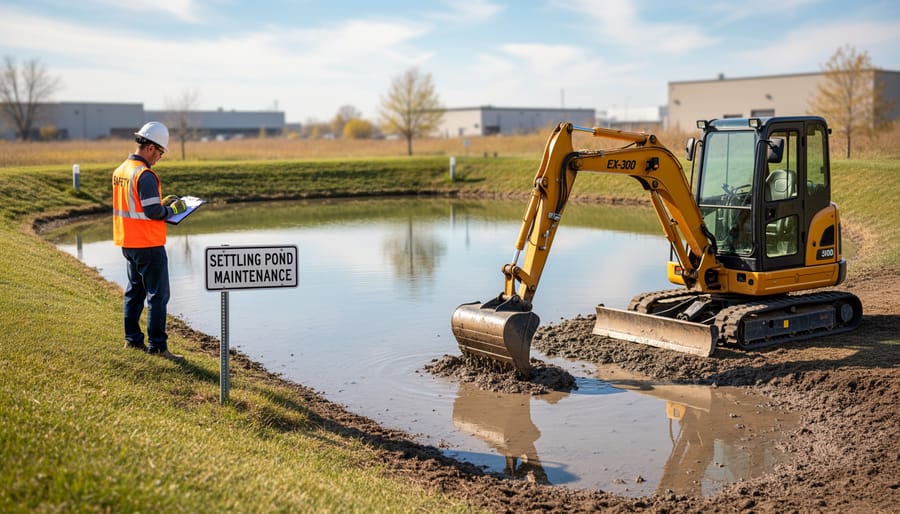
Keeping your sediment pond working efficiently means regular cleanouts, and here’s the good news – it’s easier than you might think! Most sediment ponds need attention once or twice a year, typically in spring and fall. If you notice water flowing more slowly or sediment reaching halfway up your pond’s depth, it’s definitely time to roll up your sleeves.
The best approach is to use a pond vacuum or simply a sturdy shovel and bucket for smaller ponds. I like to do this on a warm day when getting a bit muddy feels refreshing rather than miserable! First, temporarily redirect your water flow if possible. Then scoop out the accumulated sediment, working from the bottom up. A flat-bottomed shovel works wonders for this task.
Now here’s where it gets exciting – don’t toss that sediment away! That nutrient-rich material is absolute treasure for your garden beds. The settled particles contain minerals and organic matter that plants absolutely love. You can transform your pond muck into garden gold by composting it first or spreading it directly around non-edible plants. Just let it dry out a bit for easier handling, and your roses, shrubs, and perennials will thank you with vigorous growth!
Monitoring and Troubleshooting
Knowing your sediment pond is doing its job gives you real peace of mind. You’ll notice clearer water flowing out than what comes in, and sediment visibly settling at the bottom rather than clouding your main pond. The outlet should have a gentle, steady flow without debris rushing through.
Watch for bypass flow, where water cuts channels around your pond instead of flowing through it. This usually means your inlet or outlet needs adjustment or your pond has filled with sediment and needs cleaning. I learned this the hard way when spring runoff carved a path around my pond overnight!
Excessive vegetation can actually clog your system. A few plants are fine, but if cattails or algae take over, they’ll restrict flow and trap sediment before it settles properly. Simply remove overgrowth by hand or with a rake every few months.
If you notice your pond draining too slowly, check for debris blocking the outlet. A quick clear-out usually fixes this. Conversely, if water rushes through too fast, adding baffles or rocks can slow the flow and improve settling. Regular visual checks every few weeks keep small problems from becoming big headaches.
Beyond Basic Sediment Ponds: Creative Variations
Your sediment pond doesn’t have to look like a muddy construction site! With a bit of creativity, you can transform this functional feature into something that genuinely enhances your outdoor space.
Consider integrating your sediment pond into a tiered waterfall system. By positioning it as the top basin, sediment settles naturally before water cascades down into your main pond. I’ve seen this work beautifully in countless backyards, where the sediment pond becomes an attractive water feature in its own right.
Planting is your secret weapon here. Marginal plants like water iris, cattails, and pickerel rush not only disguise the sediment pond’s edges but actually help with filtration. Their root systems trap particles while adding lovely vertical interest. Just remember to choose plants appropriate for your climate and keep them in the sediment zone, not your main pond.
Edge treatment makes all the difference. Instead of bare liner, use stacked stone, natural boulders, or even weathered timber to create attractive borders. This softens the appearance and helps blend the pond into your landscape naturally.
You might also incorporate your sediment pond into a bog garden design. By extending the shallow settling area and densely planting it, you create a wetland feature that’s both functional and stunning. This approach aligns perfectly with sustainable pond practices while giving you another gardening opportunity to enjoy.
Creating a sediment pond system might seem like a big undertaking at first, but here’s the exciting truth: you absolutely can do this! Whether you’re starting with a simple bucket setup or designing a more elaborate settling system, every step you take toward better sediment management brings you closer to the clear, healthy pond you’ve always wanted. The beauty of this approach is that it works with nature rather than against it, giving sediment a place to settle peacefully before water enters your main pond. You’re not fighting an endless battle with muck and murky water anymore.
I’ve watched countless pond owners transform their struggling, cloudy ponds into crystal-clear havens simply by implementing these sediment management strategies. The results don’t happen overnight, but they do happen, and they last. You’ll spend less time scrubbing, less money on treatments, and more time actually enjoying your water garden. Your fish will thrive in cleaner water, your plants will flourish, and you’ll finally see straight to the bottom on those sunny mornings. That’s the real reward, and it’s waiting for you just a few simple steps away.