
Transform Your Pond Into a Creative Canvas (Art Projects That Bring Your Water Garden to Life)
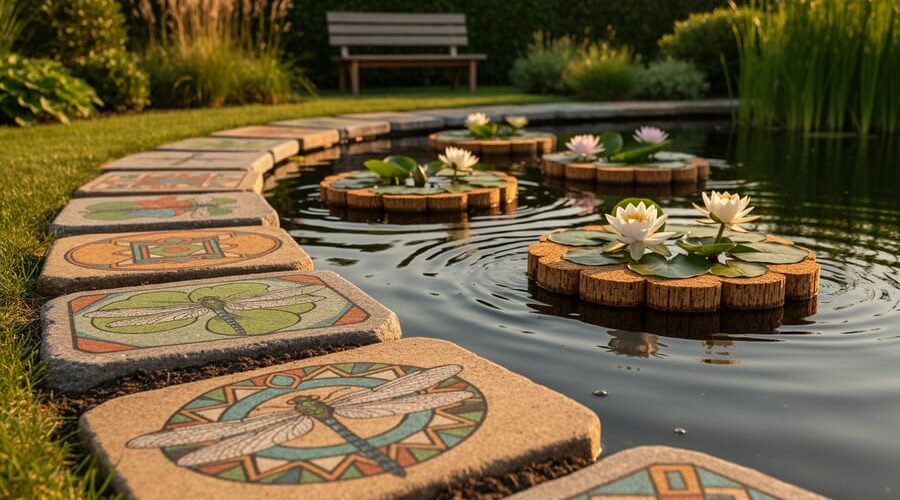
Transform plain rocks into hand-painted stepping stones by cleaning smooth, flat stones and using outdoor acrylic paints to create colorful designs—dragonflies, lily pads, or geometric patterns—then sealing them with waterproof varnish for placement around your pond’s edge. Create floating flower platforms using recycled cork trivets or small pieces of untreated wood, drilling drainage holes and planting with low-growing aquatic plants like dwarf water lilies or floating heart to add mobile color that drifts naturally across your water surface.
Your pond offers more than just visual beauty—it’s a canvas waiting for personal touches that reflect your style while creating a space for pondside art sessions with family and friends. The combination of creative expression and water’s natural tranquility taps into the therapeutic aspects of working with your hands in an outdoor setting, reducing stress while beautifying your landscape.
Whether you’re a weekend warrior tackling your first DIY project or an experienced crafter looking for new challenges, pond art projects range from simple afternoon activities to more ambitious installations. The key is starting with projects that match your skill level and gradually building confidence as you discover which materials withstand moisture, which techniques work best in outdoor conditions, and how to balance artistic expression with your pond’s ecosystem needs. Each completed project adds character to your water garden while giving you stories to share and skills to pass along.
Why Your Pond Deserves More Than Fish and Plants
Your pond is already a beautiful feature—the gentle ripple of water, the shimmer of sunlight on the surface, those gorgeous water lilies you planted last spring. But here’s something I’ve learned after years of tending my own backyard oasis: a pond can be so much more than just fish and plants. It can be a canvas for your creativity and a true reflection of who you are.
Adding art to your pond space transforms it from a lovely water feature into an unforgettable destination in your garden. Think about it—when guests visit, where do you want them to linger? A thoughtfully placed sculpture, a mosaic stepping stone, or decorative lighting can turn your pond into the star attraction of your outdoor space. These artistic touches create natural focal points that draw the eye and invite people to pause, sit, and truly appreciate what you’ve created.
The beauty of pond art is that it doesn’t compete with nature—it complements it. A hand-painted rock nestled among your marginal plants or a piece of driftwood sculpture adds personality without overwhelming the serene atmosphere. And let’s talk practical benefits too. Art projects can cleverly disguise that pump box you’ve been trying to hide or define pond edges for both safety and style. Strategic placement of decorative elements can even enhance your nighttime pond ambiance, turning evening hours into something magical.
Most importantly, pond art projects give you the chance to stamp your personal style onto your water garden. Whether you’re drawn to rustic charm, modern minimalism, or whimsical fantasy, there’s an art project waiting to bring your vision to life.
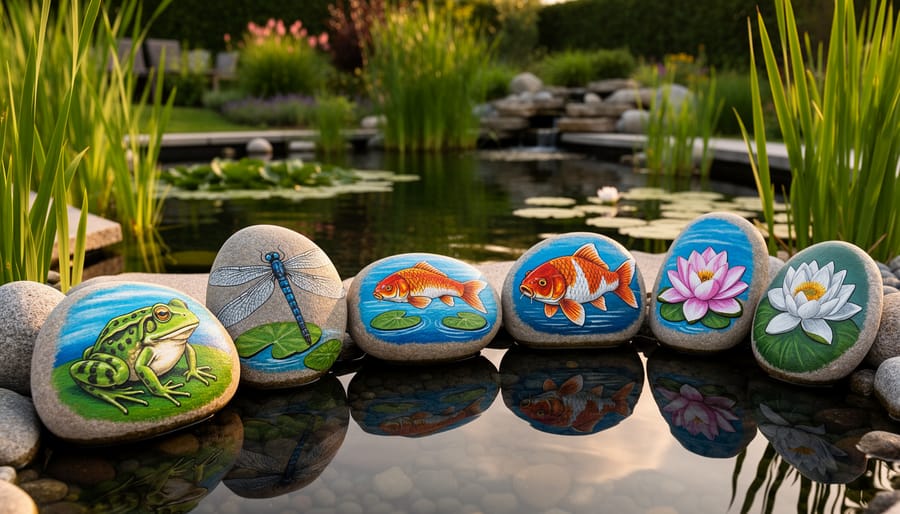
Painted Rock Characters and Critters
Painted rocks add instant charm to your pond area, and I absolutely love how they catch visitors’ eyes before they even notice the water itself! The best part? You don’t need artistic training to create delightful pond creatures that’ll make you smile every time you stroll past.
Start by collecting smooth, flat rocks from landscaping suppliers or home improvement stores. River rocks work beautifully because their naturally rounded surfaces are easier to paint than jagged stones. Look for rocks ranging from fist-sized pieces to larger statement stones about 6-8 inches across. Wash them thoroughly with soap and water, then let them dry completely before painting—this simple step helps paint adhere much better.
For paints, acrylic craft paints are your best friend. They’re inexpensive, come in countless colors, and work wonderfully for outdoor projects. I keep a basic palette of greens, blues, yellows, oranges, and black on hand for most pond critters. You’ll also need brushes in various sizes—small detail brushes for eyes and fine lines, plus larger flat brushes for base coats.
Creating simple pond characters is easier than you might think. For a cheerful frog, paint the entire rock bright green, add two white circles for eyes with black dots in the center, and finish with a curved smile. Dragonflies look impressive but require just a few steps: paint an elongated body down the center, add two pairs of simple wing shapes on either side, and dot on eyes at the top.
Fish designs work wonderfully on oval rocks—paint scales with overlapping semicircles, add a triangular tail, and don’t forget that distinctive round eye. Turtles practically paint themselves on rounded stones: divide the rock into shell segments with curved lines, paint each section a slightly different green shade, add a small head bump, and you’ve got an adorable turtle.
After your designs dry completely (usually 24 hours), protection is crucial. Apply at least two coats of outdoor polyurethane sealer, allowing drying time between coats. This weatherproofing step ensures your artwork survives rain, sun, and moisture.
Position your finished rocks along pond edges, nestle them between plants, or place them partially in shallow water where they’ll peek out beautifully.
DIY Floating Art Installations
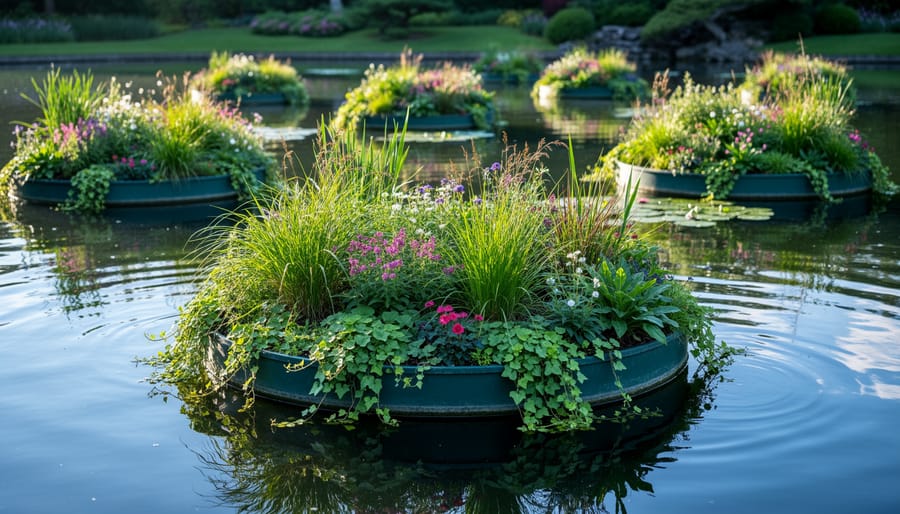
Flower Raft Gardens
Flower raft gardens are one of my favorite pond projects because they combine creativity with practicality, and watching them drift peacefully across the water never gets old. These floating platforms create constantly changing displays as they move with gentle breezes, giving your pond a dynamic, living quality.
Start by choosing your base material. Wine corks glued together in a circular or rectangular pattern make charming rustic rafts for smaller ponds. For larger platforms, pool noodles formed into rings and covered with burlap or mesh work beautifully. I’ve also had great success with foam board wrapped in coconut fiber matting, which looks natural and provides texture for plants to grip.
The key is ensuring your raft floats level and stays stable. Test it in the water without plants first, adjusting weight distribution as needed. For planting surfaces, cut holes in your platform just large enough to nestle small pots, or create shallow depressions filled with aquatic planting media.
Aquatic plants like dwarf papyrus, water lettuce, or miniature irises work wonderfully, but you can also anchor decorative elements like smooth stones, driftwood pieces, or even small solar lights. I once created a series of rafts featuring different colored succulents in waterproof containers, which looked stunning floating together.
Anchor your rafts loosely with fishing line attached to submerged weights if you want to control their movement, or let them roam freely for maximum whimsy. During strong winds, you might want to temporarily secure them to prevent collisions with pond edges.
Waterproof Floating Sculptures
There’s something magical about watching a handcrafted sculpture drift gently across your pond’s surface, catching the sunlight as it moves with the breeze. Floating sculptures add a dynamic element to your water garden that stationary art just can’t match.
For your first floating project, sealed wood pieces work beautifully and are surprisingly easy to create. I started with simple geometric shapes cut from lightweight cedar, sealed with several coats of marine-grade varnish. The key is ensuring complete waterproofing on all surfaces and edges. Let each coat dry thoroughly before applying the next, usually about 24 hours between applications.
Resin sculptures offer another fantastic option. You can embed flowers, leaves, or colorful objects within clear casting resin to create eye-catching pieces. Just remember to work in small batches and ensure your mold is completely waterproof before pouring.
When designing floating art, safety comes first. Avoid any materials that could leach chemicals into your pond water, like untreated metals or certain paints. Stick with non-toxic, pond-safe sealants and finishes. Make sure there are no sharp edges that could harm fish, and avoid small pieces that koi or goldfish might try to eat.
Weight distribution is crucial for stability. Your sculpture should float level rather than tipping to one side. Test each piece thoroughly in a bucket before introducing it to your pond. Consider adding a discrete anchor point if you want to prevent your creation from floating into hard-to-reach corners, though many pond owners enjoy the natural movement these pieces provide.
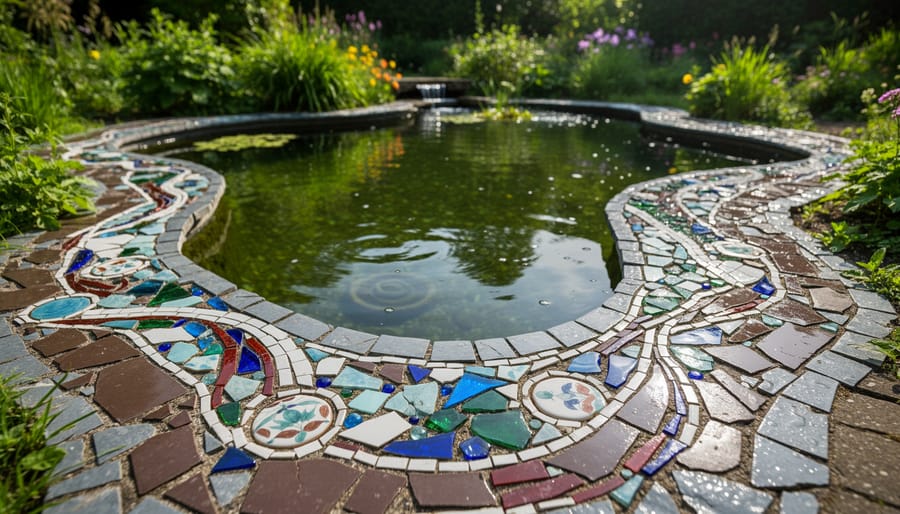
Mosaic Magic Around the Pond Edge
There’s something absolutely magical about catching the sunlight dancing across colorful mosaic tiles around your pond. I still remember the first time I completed a simple mosaic border around my fish pond—every morning, those vibrant pieces would catch the light differently, creating an ever-changing artwork that made my coffee ritual even more special.
Creating mosaics around your pond edge is more accessible than you might think, and it’s incredibly forgiving for beginners. Let’s walk through how to bring this beautiful art form to your water garden.
Start by gathering your materials. You can use broken ceramic tiles, glass pieces, smooth river stones, or even old china with sentimental value. I’ve used chipped teacups from my grandmother’s collection to create touching memorial pieces around my pond. Visit tile shops for discounted broken tiles, or check construction sites where they often discard perfectly usable fragments.
For adhesives, this is crucial: standard craft glue won’t survive constant moisture. You’ll need waterproof thin-set mortar or specialized outdoor tile adhesive. I learned this the hard way when my first attempt peeled away after one winter. Look for products labeled “exterior grade” or “pool and spa” approved.
Begin with a clean, dry surface. If you’re working on concrete pond edging, scrub away algae and let it dry completely. For stepping stones, purchase plain concrete pavers as your base.
Design-wise, start simple. Lay out your pattern before adhering anything—I use my phone to snap photos of different arrangements. Simple borders work beautifully: alternating colors in geometric patterns, or concentric circles radiating from the pond center. As you gain confidence, try pictorial designs like fish, dragonflies, or water lilies.
Apply your adhesive in small sections, working quickly before it sets. Press each piece firmly, leaving small gaps for grouting. Once everything is secured and dried for at least 24 hours, mix outdoor-rated, waterproof grout and work it into the gaps using a rubber float.
After grouting, wipe away excess with a damp sponge, being careful not to pull grout from between pieces. Let it cure for several days before exposing it to heavy moisture.
The beauty of mosaic work is its imperfection—there’s no wrong way to arrange your pieces, and happy accidents often create the most interesting effects.
Wind Chimes and Moving Art for Pondside Ambiance
Adding gentle sound and captivating movement to your pond area creates an enchanting sensory experience that draws you outside more often. Wind chimes and kinetic sculptures are surprisingly easy to craft, and when made from natural or recycled materials, they blend beautifully into your water garden landscape.
For a simple driftwood wind chime, collect pieces of weathered wood in varying lengths during your lakeside walks. Drill small holes near the top of each piece and thread them onto fishing line or waterproof cord at different heights. Hang them from a sturdy branch or garden hook where breezes will let them knock together with soft, hollow tones. Add shells or small copper tubes between the wood pieces for contrasting sounds.
Copper develops a gorgeous blue-green patina near water, making it perfect for pond art. Create a simple spinner by cutting a spiral from thin copper sheeting (available at craft stores), then suspend it from monofilament line. As it catches the wind, it twirls and reflects sunlight across your pond surface. I’ve watched mine spin for hours on breezy afternoons, creating dancing light patterns on the water.
Recycled materials work wonderfully too. Old silverware can be flattened and shaped into chime pieces, vintage keys create delightful tinkling sounds, and colorful glass beads catch light beautifully when strung between larger elements.
Placement requires thoughtful wildlife-friendly considerations. Position your moving art where prevailing winds will activate it, but not so close to the water that it startles visiting birds or frogs. Avoid blocking sight lines to your pond from favorite viewing spots. Mount chimes at least six feet from nesting areas, and choose softer-sounding materials if you have skittish wildlife. The goal is enhancement, not disturbance, creating peaceful ambiance for both you and your pond’s natural visitors.
Nature-Inspired Sculpture and Found Object Art
There’s something deeply satisfying about transforming natural materials from around your pond into beautiful sculptures that feel like they’ve always belonged there. I discovered this quite by accident one autumn when I started arranging driftwood pieces along my pond’s edge, and visitors kept asking where I’d bought my “amazing art installation.” The secret? I hadn’t bought anything—nature provided everything for free.
Start by taking a slow walk around your property with fresh eyes. Look for interesting driftwood with unique curves, smooth stones in varying sizes, twisted branches with character, or even weathered roots exposed by erosion. These found treasures become your artistic palette. The beauty of working with natural materials is that there’s no wrong way to arrange them—if it pleases your eye, you’re doing it right.
Stone cairns make wonderful pond accents and are surprisingly meditative to build. Begin with your largest, flattest stone as a base, then carefully stack progressively smaller stones on top. The key is finding each stone’s natural balance point. I like placing cairns at different heights along my pond’s edge, creating visual rhythm. They’re also temporary by nature, which means you can rebuild them differently whenever the mood strikes.
For a more permanent installation, try creating a driftwood arrangement. Anchor larger pieces into the ground or secure them with hidden stakes, then lean smaller branches against them to create height and dimension. Adding a weathered metal garden stake or ceramic bowl filled with water plants brings an artistic contrast between natural and crafted elements.
The materials you choose will age beautifully alongside your pond. Wood silvery-grays, stones develop moss and lichen, and metal develops a rich patina. This weathering process becomes part of the artwork itself, constantly evolving with the seasons. Choose materials that embrace this transformation rather than fighting against it—skip treated lumber and painted items in favor of raw, honest materials that celebrate the passage of time.
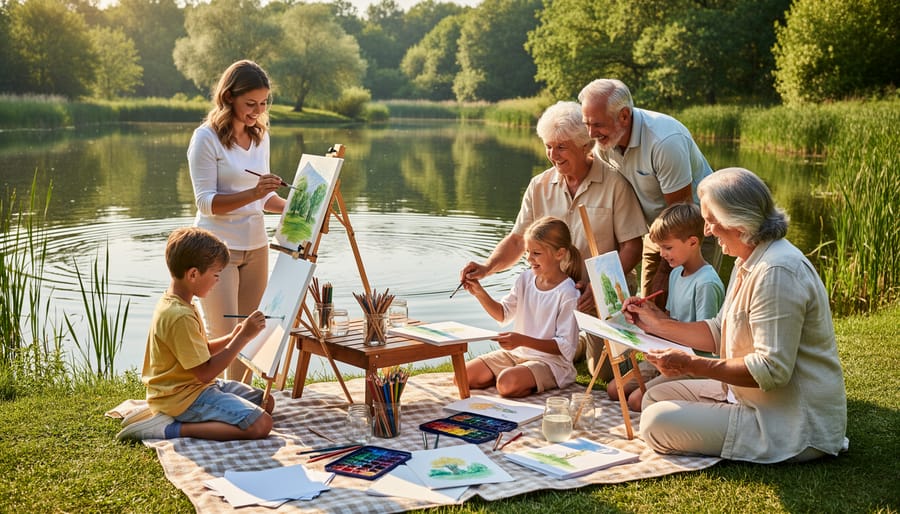
Making Your Art Sessions Family-Friendly
Creating art by your pond with family can become one of those cherished traditions everyone looks forward to. I’ve found that my Sunday afternoon pond painting sessions have evolved from solo time into gatherings my kids and their friends actually request!
Safety comes first when working near water with children. Always establish clear boundaries about how close to the edge they can sit, and consider placing non-slip mats or outdoor rugs as your designated crafting zone. For younger children, life jackets aren’t overkill during family pond activities, especially if you have an unfenced pond. Keep a first aid kit nearby and assign one adult as the dedicated water supervisor during group sessions.
Setting up your crafting station properly makes everything run smoother. A folding table with washable tablecloth, portable storage bins for supplies, and a dedicated water bucket for brush cleaning prevents pond contamination. Bring out a cooler with drinks and snacks so nobody wanders off mid-project. Sun protection matters too—pop-up canopies or large umbrellas keep everyone comfortable during longer sessions.
Match projects to age levels for success. Younger children excel at painting rocks with simple designs, pressing leaves into clay, or decorating pre-cut wooden shapes. Older kids can tackle watercolor landscapes, create mosaic stepping stones, or design elaborate fairy gardens. The key is having multiple project options available so everyone stays engaged.
Turn these sessions into seasonal traditions by tying them to occasions. Host a spring bulb-planting party where everyone decorates pots, organize summer stone-painting afternoons, or create autumn leaf art when colors peak. Invite friends to bring their own supplies and share techniques. These gatherings naturally encourage creativity while building community around your pond space, making your water feature a true gathering place rather than just a landscape element.
Protecting Your Masterpieces from the Elements
Your beautiful pond art deserves protection from sun, rain, and temperature swings! I learned this the hard way when my first painted flower pot faded to an unrecognizable blur after just one summer. Let me share what I’ve discovered about keeping your creations looking fantastic season after season.
Start with the right sealant for your project. For painted surfaces like rocks or wooden signs, use a marine-grade polyurethane or outdoor Mod Podge. Apply at least three thin coats, letting each dry completely. I like to reapply sealant each spring as part of my pond opening routine. For metal sculptures or garden stakes, spray them with a rust-inhibiting primer before painting, then finish with a clear rust-preventive coating.
UV-resistant finishes are your best friend against sun damage. Look for products labeled “UV-resistant” or “UV-blocking” at your local hardware store. These contain special ingredients that prevent colors from fading. If you’re using outdoor spray paint, check that it specifically mentions UV protection on the can.
Think about materials that actually improve with age. Copper develops a gorgeous green patina, natural stone weathers beautifully, and certain woods like cedar and redwood resist rot naturally. These can save you maintenance headaches down the road.
Here’s something crucial: always use non-toxic, aquarium-safe sealants near water where fish live. Standard wood stains and certain paints can leach harmful chemicals. When in doubt, let sealed pieces cure for several weeks in your garage before placing them near the pond.
Bring delicate pieces like mosaic stepping stones or painted ceramic planters indoors during harsh winters if you live in freeze-thaw climates.
You don’t need to be a professional artist to add personality and charm to your pond area. The beauty of pond art projects is that they’re about your unique vision and connection to your water garden. Start small—maybe paint a single stone, create one simple mosaic stepping stone, or add a handmade garden stake. As you work alongside your pond, you’ll discover what brings you joy and what feels right for your space.
Remember, there’s no such thing as perfect when it comes to personalizing your outdoor sanctuary. A slightly wobbly mosaic or a whimsically painted rock that makes you smile is infinitely better than a pond that looks like everyone else’s. Your projects should reflect who you are, whether that means bold colors, natural earth tones, playful designs, or elegant simplicity.
Consider making your pondside crafting sessions a regular ritual. There’s something wonderfully therapeutic about creating art near water, letting the gentle sounds and reflections inspire your work. These moments become more than just projects—they’re opportunities to slow down, connect with nature, and put your personal stamp on the outdoor space you’ve cultivated. Grab your supplies, settle in by the water, and let your creativity flow as freely as your pond’s fountain.