
Why Your Aquaponics System Needs a Solids Filter (Before Everything Goes Wrong)
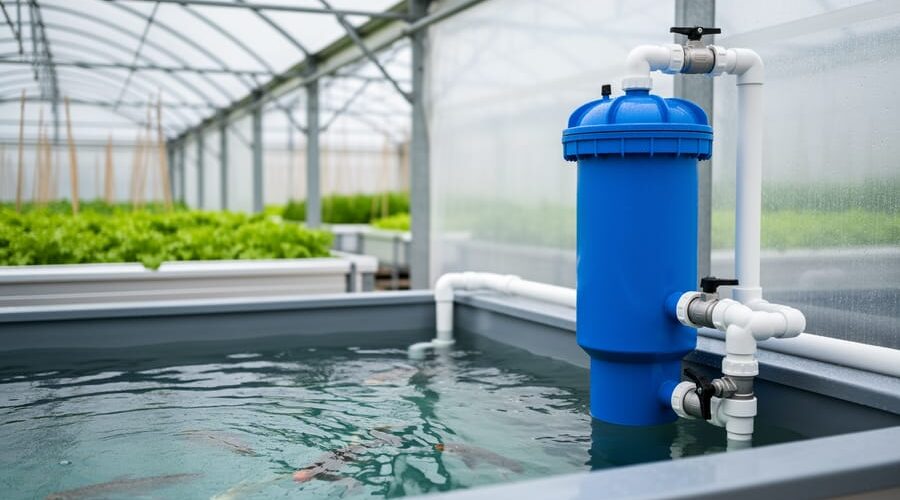
Remove fish waste solids before they break down in your fish tanks—this single step prevents toxic ammonia spikes, keeps your water crystal clear, and protects your fish from stress and disease. Install a radial flow separator or settling tank immediately after your fish tank to capture solid waste through gravity, allowing heavier particles to sink while clean water flows to your grow beds. Position a drum filter or swirl filter as your primary solids removal system if you’re running a larger setup with more than 500 liters of fish tank capacity, ensuring particles don’t clog plant roots or create anaerobic dead zones.
Connect your captured solids to a separate mineralization tank where beneficial bacteria convert that waste into plant-available nutrients—this transforms what would be system pollution into valuable fertilizer your plants desperately need. Think of your solids filter as the gatekeeper between waste and wealth in your aquaponics cycle. Without it, you’re literally flushing nutrients down the drain while simultaneously creating water quality problems.
The reality is that setting up your aquaponics system without proper solids filtration means you’re fighting an uphill battle. You’ll spend more time managing water quality crises than harvesting fresh vegetables and healthy fish. But here’s the good news: solids filtration doesn’t require expensive equipment or complex engineering. Whether you’re working with a backyard system or planning something more ambitious, you can build effective solids filters using readily available materials and straightforward designs.
This guide walks you through choosing the right solids filter for your specific setup, building it yourself with step-by-step instructions, and integrating it into a complete mineralization loop that maximizes nutrient cycling.
What Is an Aquaponics Solids Filter (And Why You Can’t Skip It)
Think of your aquaponics system like a kitchen sink. When you wash dishes, you’ve got two kinds of mess: chunks of food (solid waste) and greasy residue that dissolves in the water (dissolved waste). Your aquaponics system works the same way. Fish produce solid waste you can see, like uneaten food and fish poop, plus dissolved waste you can’t see, like ammonia.
Here’s where it gets interesting. A solids filter is basically a strainer for your system. It catches those solid chunks before they break down and turn into sludge. Without one, those solids float around, clog your pipes, settle in your grow beds, and create dead zones where water can’t flow properly.
I learned this the hard way in my first system. I skipped the solids filter, thinking my plants would handle everything. Within three weeks, my pump was struggling, my water looked murky, and my bell siphons kept jamming. Not fun.
But here’s the cool part: those solids you’re filtering out aren’t garbage. They’re gold for your system if you handle them right. When you remove solids quickly, you prevent them from decomposing in places you don’t want, like around your pump or in your fish tank. Instead, you can collect them and let them break down in a controlled way, which we’ll talk about later when we discuss mineralization loops.
The key takeaway? Solids filters aren’t optional equipment for serious aquaponics. They’re your first line of defense against system failure. They keep water flowing freely, protect your fish from toxic ammonia spikes caused by decaying waste, and give you control over where and how nutrients enter your system. Skip this step, and you’re basically asking for cloudy water, clogged equipment, and stressed fish.
The Three Main Types of Solids Filters for Your System
Settling Tanks: Simple and Effective
Settling tanks are probably the easiest solids filter you can build, and honestly, they work better than you might think. The concept is beautifully simple: water flows into a cone-shaped or cylindrical tank, slows down dramatically, and gravity does the rest. Heavier particles sink to the bottom while cleaner water exits from the top.
I built my first settling tank from a food-grade plastic barrel by cutting it at an angle to create a sloped bottom. The key is giving particles time to settle, so sizing matters. Plan for water to spend at least 15-20 minutes in the tank. For a 100-gallon-per-hour system, you’d want roughly a 30-gallon settling tank.
Position your inlet pipe to encourage gentle, swirling flow rather than turbulent splashing. I drilled my outlet near the top, opposite the inlet. The beauty is in the maintenance schedule. Once weekly, I simply open the drain valve at the bottom and let the accumulated sludge flow into my garden beds. That nutrient-rich muck becomes black gold for my tomatoes.
The settling tank won’t catch everything, especially fine particles, but it removes a solid 60-70% of waste in my experience, making downstream filtration much easier.
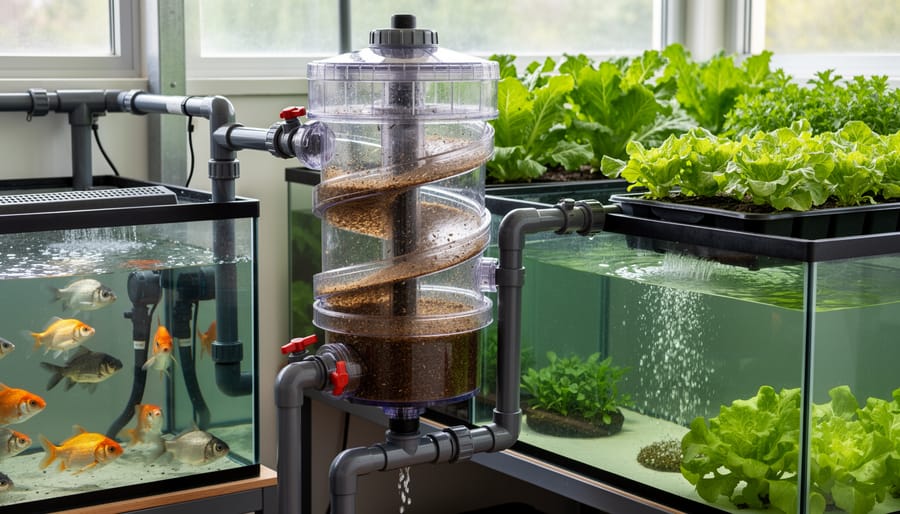
Swirl Filters: The Space-Saving Option
If you’re working with limited space or a smaller system, swirl filters might be your new best friend. These clever devices use physics to your advantage, creating a gentle whirlpool effect that separates solids from water without any moving parts or complicated mechanisms.
Here’s how they work: water enters the cylindrical tank tangentially, which means it comes in from the side rather than the top. This creates a swirling motion that slows down the water flow, allowing heavier particles to settle at the bottom in a cone-shaped collection area. The cleaner water exits from the top while solids accumulate below for easy removal.
Swirl filters shine in systems up to about 500 gallons where you have moderate fish stocking levels. They’re particularly great for tilapia or goldfish setups where waste is fairly manageable. I’ve found them less effective with heavy feeders like koi unless you’re running a really light bioload.
Building one is straightforward using a 30-55 gallon drum with a conical bottom, though purchasing pre-made units saves time if you’re not feeling adventurous. The key is getting that tangential inlet positioned correctly and ensuring your cone angle is steep enough for solids to collect properly. They require regular draining, typically every few days, but the simplicity makes maintenance a breeze.
Radial Flow Filters: For Larger Operations
As your aquaponics system grows beyond backyard hobbyist size, you might find yourself wrestling with more solids than your simple swirl filter can handle. That’s when radial flow filters enter the picture. These cylindrical workhorses can process significantly higher volumes, making them ideal for systems supporting 50+ fish or commercial setups.
Think of radial flow filters as the next evolutionary step. Water enters through a center pipe, flows outward in all directions (hence “radial”), and the circular motion encourages solids to settle around the outer edges where they’re easily drained. Compared to swirl filters, they handle greater flow rates without sacrificing efficiency, though they do require more space and initial investment.
The good news for DIY enthusiasts? You absolutely can build one. I’ve seen impressive homemade versions using large plastic drums or even repurposed water tanks. The key is getting the central inlet positioned correctly and ensuring smooth, even water distribution. You’ll need some basic plumbing skills and patience for the initial setup, but nothing beyond what you’ve likely already mastered if you’ve built an aquaponics system from scratch.
However, be honest about your needs. If you’re running a modest backyard system with a dozen goldfish, a radial flow filter is probably overkill. Save yourself the complexity and stick with simpler options. But if you’re scaling up, dealing with heavy feeding schedules, or planning a more serious operation, the upgrade makes perfect sense and will save you countless hours of maintenance headaches down the road.
Understanding the Mineralization Loop (Turning Waste Into Plant Food)
How Bacteria Break Down Fish Waste
When fish waste settles in your solids filter, it’s not just sitting there—it’s being transformed by tiny helpers working around the clock! This natural breakdown process, called mineralization, is where beneficial bacteria turn solid waste into plant-available nutrients.
There are two main types of bacterial breakdown happening in your system. Aerobic mineralization occurs when oxygen is present—these bacteria love fresh, oxygenated water and work quickly to decompose organic matter. Think of them as your speedy cleanup crew. They break down solids into simpler compounds that eventually become nitrates, which your plants absolutely love.
Anaerobic mineralization happens in oxygen-poor environments, like deep within settled solids. These bacteria work more slowly and can sometimes produce hydrogen sulfide (that rotten egg smell), which is why good water flow and oxygenation are so important in your filter design.
For bacteria to thrive and do their job effectively, they need three things: the right temperature (ideally between 18-30°C), sufficient oxygen (for aerobic bacteria), and a stable pH around 6.5-8.5. They also need time—the initial colonization of bacteria in a new filter takes about 4-6 weeks, but once established, they’ll continuously work on breaking down new waste.
The complete mineralization process typically takes 2-4 weeks, depending on conditions. During warmer months, bacteria work faster, while cooler temperatures slow things down considerably.
Connecting Your Filter to a Mineralization Tank
Now that you’ve got your solids filter working beautifully, let’s talk about creating a mineralization loop. This is where things get really exciting because instead of tossing those collected solids, you’re going to transform them into plant-available nutrients!
Here’s how to set it up. First, you’ll need a separate container, your mineralization tank. I use a simple 20-gallon plastic storage bin, but any food-safe container works great. Position this tank so gravity can help you out. Connect a drain line from your solids filter’s cleanout valve directly to the mineralization tank. This makes transferring collected solids super easy.
Inside your mineralization tank, the magic happens through aerobic decomposition. Install an air stone connected to an aquarium pump to keep oxygen levels high. This encourages beneficial bacteria to break down those fish solids into nitrates, phosphates, and other nutrients your plants crave. I like to add a handful of red wiggler worms too, they’re fantastic little helpers in speeding up the process.
Let the solids sit in your mineralization tank for about two to four weeks, keeping that air pump running continuously. You’ll notice the water becoming clearer as decomposition occurs. Once mineralization is complete, pump this nutrient-rich water back into your grow beds or directly to your plant roots. The leftover sludge at the bottom makes incredible compost for your garden. It’s such a satisfying feeling knowing nothing goes to waste!
Designing Your Solids Handling System: A Step-by-Step Approach
Calculating Your Solids Load
You don’t need a calculator or complicated equations to figure out your filtration needs! Here’s a simple approach I’ve used with great success: for every pound of fish food you feed daily, expect about 0.3 to 0.4 pounds of solid waste. So if you’re feeding 2 pounds of pellets per day, you’ll generate roughly 0.6 to 0.8 pounds of solids.
A more straightforward rule of thumb? Plan your filter capacity based on your fish tank volume. For a moderately stocked system (1 pound of fish per 5-7 gallons), your solids filter should handle at least 25-30% of your total system volume per hour. That means a 100-gallon fish tank needs a filter processing around 25-30 gallons hourly.
Here’s my favorite beginner guideline: if you have 10-20 fish in a backyard setup, start with a simple swirl filter or radial flow settler. For larger operations with 50 or more fish, consider adding a settling tank before your biofilter. Watch your filter during feeding times over the first week. If solids accumulate faster than you can easily remove them during daily maintenance, it’s time to upsize.
Placing Your Filter for Maximum Efficiency
Getting your filter placement right can make the difference between crystal-clear water and a constant headache. I learned this the hard way when I first set up my system and wondered why my beautiful DIY swirl filter wasn’t catching anything!
The golden rule is simple: place your solids filter immediately after water exits your fish tank, before it reaches your biofilter or grow beds. This captures waste at its source, preventing solids from clogging your system downstream. Think of it as the first line of defense in your water quality battle.
For gravity-fed systems, position your filter below the fish tank outlet so water flows naturally downward. This approach is energy-efficient and reliable since gravity never takes a day off. If you’re using a pump-fed setup, install the filter after the pump but keep it as close to the fish tank as possible to minimize solids breaking down during transit.
Common mistakes? Placing filters too far from the source, positioning them where they’re difficult to clean, or installing them after grow beds. I’ve also seen folks put filters too high in gravity systems, creating airlocks. Always ensure easy access for your weekly maintenance routine, and test your flow rates before adding fish.
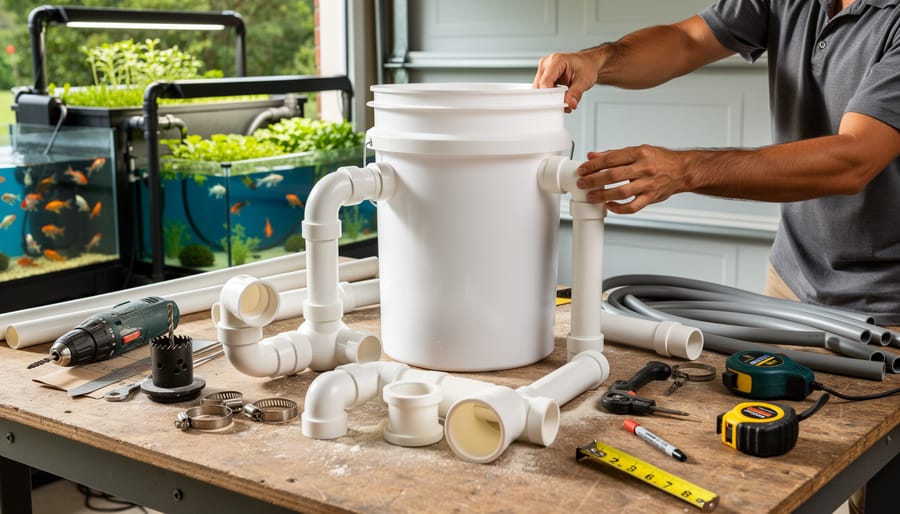
Building a Basic DIY Solids Filter
Ready to build your first solids filter? Let’s start with a simple swirl filter that works beautifully for small to medium systems. You’ll need a 5-gallon food-grade bucket with lid, a bulkhead fitting, some PVC pipe, silicone sealant, and a drill. I built my first one on a Saturday afternoon, and it’s still running strong three years later!
Here’s how to do it: Drill a hole near the top of your bucket for the inlet and another at the bottom for the outlet. Install bulkhead fittings in both holes and seal them watertight with silicone. Attach your inlet pipe so water enters tangentially along the bucket’s wall, creating a gentle swirling motion. This circular flow lets solids settle to the bottom while cleaner water exits through your outlet near the top.
Position your filter between your fish tank and grow beds. The swirling action separates heavy solids naturally, and you’ll drain accumulated waste from the bottom valve weekly. Start simple, observe how it performs, then adjust the flow rate if needed. You’ve got this!
Maintaining Your Solids Filter (The Weekly Routine That Saves Your System)
Here’s my honest confession: when I first set up my aquaponics system, I’d peek at the solids filter, think “looks fine,” and wander off to check on my plants instead. Big mistake! A proper maintenance routine transformed my system from constantly struggling to thriving beautifully.
Let’s talk about the weekly routine that’ll keep your system humming. Every week, I dedicate about 15 minutes to filter inspection. Start by looking at the water flow rate. If it’s slower than usual, your filter’s probably clogging up. Check the color of the water entering and leaving the filter. The outflow should be noticeably clearer. If it’s not, something’s not working right.
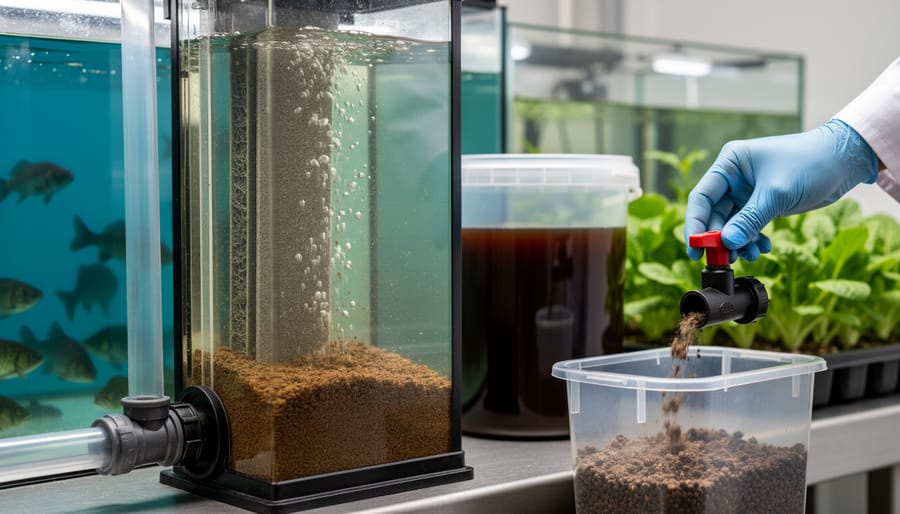
For radial flow separators and swirl filters, you’ll want to drain the collection chamber at the bottom weekly. This is where all those settled solids accumulate. Simply open the drain valve and let gravity do the work. I keep a bucket underneath to catch everything, which we’ll talk about in a moment.
Mechanical filters like sponges or filter pads need weekly rinsing. Here’s the trick: never use tap water! The chlorine will kill beneficial bacteria. Instead, rinse them in water you’ve removed from your system. Squeeze gently until the water runs relatively clear. Replace pads every month or when they start falling apart.
Screen filters need a quick brush-down weekly to prevent buildup. A soft-bristled brush works perfectly for this job.
Now, here’s the exciting part. Those collected solids are gardening gold! They’re packed with nutrients perfect for your outdoor gardens or compost pile. I spread mine around my tomato plants, and they absolutely love it. Just don’t put it directly back into your aquaponics system without proper composting first.
Keep notes about what you observe during maintenance. Unusual colors, smells, or excessive buildup can indicate issues with fish feeding or water quality testing parameters that need attention.
Troubleshooting Common Solids Filter Problems
Even the best-designed solids filter will occasionally throw you a curveball. Don’t worry—most problems are straightforward to fix once you know what you’re looking for! Let’s walk through the most common issues and get your system back on track.
Clogging is probably the number one complaint I hear from fellow aquaponics enthusiasts. If water flow slows to a trickle or backs up completely, you’ve likely got a blockage. The solution? Regular cleaning is your best friend. For mechanical filters like radial flow separators or drum filters, establish a daily inspection routine. Swirl filters need their settled solids removed every few days, and filter socks should be rinsed or replaced weekly. If you’re dealing with constant clogging, your fish might be overfed—reduce portions slightly and see if that helps. Another trick is adding a pre-filter screen to catch the largest chunks before they reach your main filter.
Insufficient solids removal shows up as cloudy water or visible particles floating in your system. This usually means your filter is either undersized for your fish load or the water velocity is too high, not giving solids enough time to settle. Try reducing pump flow slightly, or consider adding a second stage of filtration. Sometimes the fix is as simple as adjusting the inlet angle on a swirl filter to create better circulation patterns.
Odor problems signal that solids are sitting too long before removal. Decaying fish waste creates that unmistakable ammonia smell nobody wants in their backyard! Empty your solids collection chamber more frequently—daily if needed during warm weather when decomposition speeds up. Make sure your filter has adequate water flow to prevent stagnant zones where waste can accumulate.
System imbalances like unexplained ammonia spikes or pH swings often trace back to poor solids management. When waste breaks down inside your system instead of being filtered out, it releases nutrients unpredictably and consumes oxygen. The fix involves both better filtration and potentially increasing your mineralization capacity. Remember, those collected solids are valuable nutrients waiting to be unlocked—don’t just toss them! Use them in your mineralization loop to feed your plants while keeping your water quality pristine.
Good solids filtration isn’t just a nice addition to your aquaponics system—it’s the foundation that everything else depends on. Think of it as the unsung hero working behind the scenes, quietly keeping your water clean, your fish healthy, and your plants thriving. When you get this part right, the rest of your system practically takes care of itself.
The beautiful thing about starting your aquaponics journey is that you don’t need to invest in expensive equipment right away. A simple swirl filter or settling tank can work wonders for smaller systems, and you can always upgrade as your setup grows. I’ve seen plenty of successful systems that started with nothing more than a repurposed barrel and some creative thinking. Start where you are, use what you have, and improve as you learn.
Remember, every bit of solid waste you remove efficiently is one less problem downstream. Your mineralization process works better, your beneficial bacteria stay happy, and your plants get the nutrients they need in the right form. It’s all connected, and when that connection flows smoothly, you’ll experience the genuine satisfaction of watching a well-balanced ecosystem at work.
So take that first step with confidence. Set up your solids filter, observe how it performs, make adjustments as needed, and enjoy the rewarding journey of creating your own thriving aquaponics system. You’ve got this!