
How Water Flows Through Your Aquaponics System (And Why It Matters)
Sketch your aquaponic system on paper before you start building, marking every pump, pipe, and grow bed with arrows showing exactly where water enters and exits. This simple visual map becomes your troubleshooting companion when flow problems arise—I learned this after spending three frustrating hours trying to figure out why my fish tank was draining too slowly, only to realize I’d forgotten to account for a clogged standpipe.
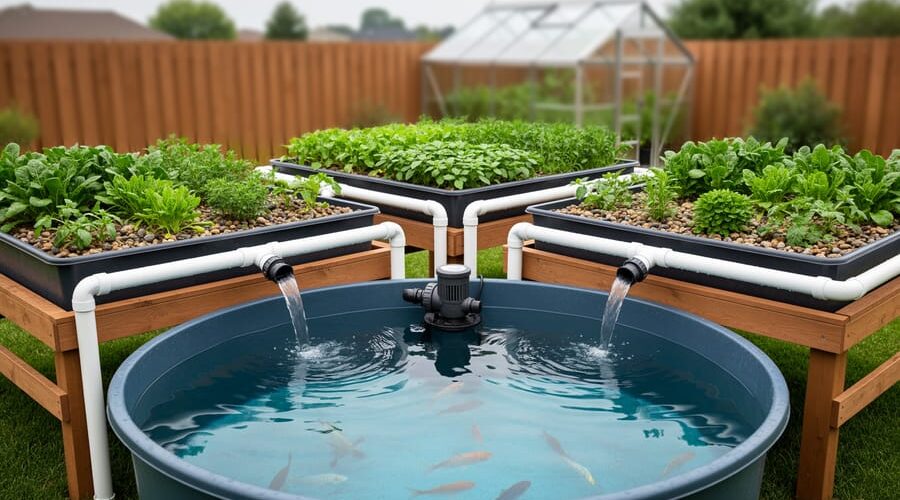
Understanding how water circulates through your system transforms you from someone following instructions to someone who can actually fix problems and make improvements. The beauty of aquaponics lies in its elegant loop: your pump pushes nutrient-rich water from the fish tank up to the grow beds, gravity pulls it through your plants’ roots where beneficial bacteria convert fish waste into plant food, then the cleaned water flows back down to refresh your fish. When you can visualize this cycle on paper, suddenly decisions about pipe diameter, pump placement, and overflow protection make perfect sense.
Most flow issues in DIY system setup stem from mismatched flow rates—your pump pushes water faster than your drains can handle, or your grow beds flood because the return pipe is too narrow. A proper diagram helps you spot these mismatches before water spills across your garage floor. Think of your system diagram as a conversation between components, where each element needs to work in harmony with the others.
The Basic Aquaponics Loop: Understanding Your System’s Circulatory System
Fish Tank to Filter: Where It All Begins
Everything starts right here in your fish tank, where your finned friends are swimming around doing what fish do best—eating, swimming, and yes, creating waste! This might sound unpleasant, but in aquaponics, that fish waste is liquid gold for your plants.
As your fish digest their food, they release ammonia through their gills and waste products into the water. This nutrient-rich water gradually accumulates in the tank, making it essential to keep things moving. Think of your fish tank as the heart of your system, constantly pumping this valuable resource to where it’s needed most.
The water exits your fish tank through a carefully positioned outlet, usually located near the top or middle of the tank to avoid disturbing bottom sediment. Many DIY builders use a simple overflow pipe or a pump placed at the appropriate depth. The key here is maintaining consistent water level while ensuring enough flow to process all that beneficial waste. I learned early on that positioning matters—placing your outlet too low can stir up debris, while too high might not remove enough water volume to keep your fish healthy and happy.
Through the Grow Beds: Where Magic Happens
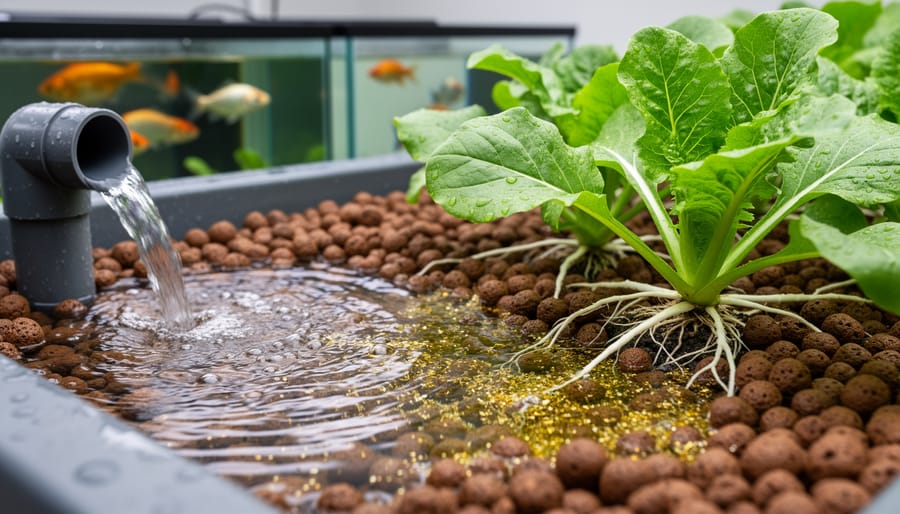
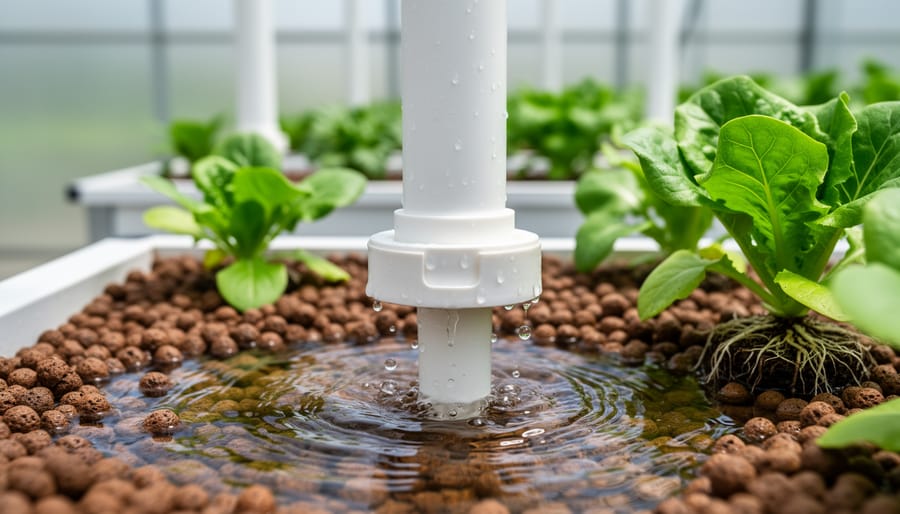
This is where the real transformation happens! As water flows up through your grow beds filled with expanded clay, gravel, or other media, your plants get busy extracting all those dissolved nutrients from the fish water. Think of the grow bed as a giant filter that your plants happily feed from.
But here’s the secret ingredient most people miss: the beneficial bacteria living in your grow media. These microscopic helpers convert ammonia from fish waste into nitrites, then into nitrates that your plants absolutely love. Without them, your system simply won’t work.
The flow rate matters here. Too fast, and nutrients zip past your plant roots without being absorbed. Too slow, and you risk creating stagnant zones where nasty bacteria might take hold. Aim for a flow that cycles your system volume about once per hour.
I’ve found that watching how water enters and exits my grow beds tells me everything about system health. Uneven flow patterns? Time to check for clogged media or root tangles. The magic truly happens when water, plants, bacteria, and fish all work together in perfect harmony.
Back to the Fish: Completing the Circle
After all that hard work by your plants and beneficial bacteria, the water makes its final journey back home to the fish tank. This is where the circle truly completes itself, and honestly, it’s my favorite part to watch. The cleaned, oxygenated water flows back to your fish, creating a continuous loop that keeps everything alive and thriving.
This return flow is essential because it maintains consistent water quality for your fish. Without completing this circle, you’d need to constantly add fresh water and dispose of contaminated water, which defeats the whole purpose of aquaponics. The continuous loop also helps maintain stable water temperature and oxygen levels throughout the system.
Think of it like a heartbeat for your setup. Each cycle through the system refreshes the environment, removes waste, and delivers nutrients exactly where they’re needed. When I first set up my system, watching this perpetual flow gave me such satisfaction, knowing that nature was doing most of the work while I just kept things running smoothly.
Reading an Aquaponic System Diagram: Your Visual Blueprint
Key Components You’ll See on Every Diagram
When you first look at an aquaponic system diagram, you might feel a bit overwhelmed by all the lines and shapes. But here’s the good news: once you understand the basic building blocks, reading these diagrams becomes second nature! Let me walk you through the key components you’ll spot on just about every aquaponic diagram.
The fish tank is usually represented as a large rectangle or oval, often positioned at the bottom or side of the diagram. This is where your fish live and produce the nutrient-rich waste that feeds your plants. You’ll typically see it labeled clearly, sometimes with water level indicators shown as horizontal lines.
Grow beds appear as rectangular boxes, usually positioned above or beside the fish tank. These containers hold your plants and the growing media where beneficial bacteria work their magic. On diagrams, you might see small circles or dots inside representing plants or growing medium.
Pumps show up as small circles or squares with arrows, indicating they’re moving water from one place to another. The arrows are crucial because they show you the direction of water flow throughout your system.
Pipes and tubing appear as lines connecting different components. Solid lines usually mean water is flowing through, while dashed lines might indicate optional connections or overflow routes. Arrows along these lines tell you which direction the water travels.
Bell siphons or drain systems are often shown as small cylinders or tubes inside grow beds. These clever devices regulate water levels automatically, and diagrams usually include little notes explaining their flood-and-drain cycles.
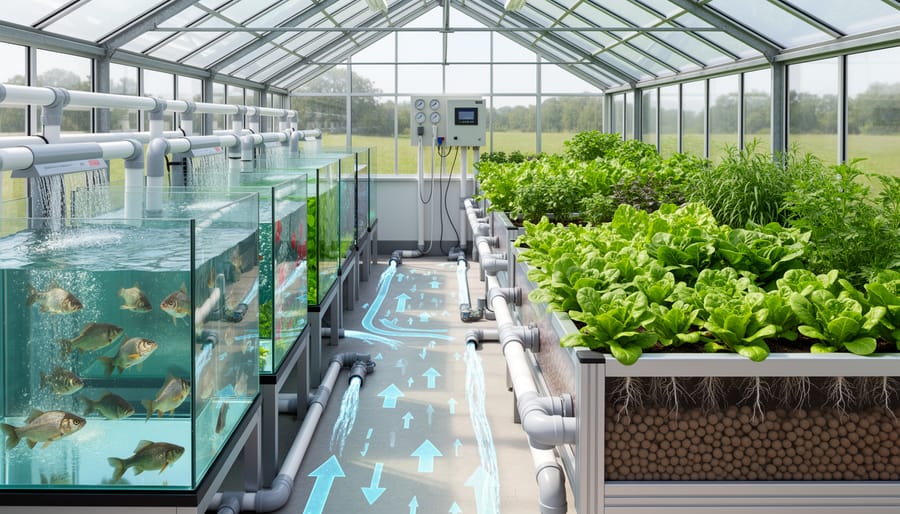
Following the Flow: Arrows and Water Movement
Think of your aquaponic system diagram as a treasure map, where the arrows show you exactly where your water travels. These simple lines tell an incredibly important story about how your system functions.
Start by finding your pump, which is usually shown at the lowest point. Follow the arrows upward to see how water gets pushed to your grow beds or fish tank. The direction of each arrow matters tremendously. When I first set up my system, I accidentally misread a diagram and had water flowing backward. What a mess that was!
Pay special attention to elevation changes. Water naturally wants to flow downhill, so any upward movement needs a pump. Look for sections where arrows point upward without a pump symbol nearby. That’s your first red flag for potential problems. Gravity-fed sections show arrows flowing downward and typically don’t need mechanical help, which saves energy and reduces maintenance headaches.
Notice where arrows become thicker or thinner. This indicates flow volume changes. Wider arrows mean more water is moving through that section, while narrow arrows suggest restricted flow. When multiple pipes merge into one, you’ll see arrows combining, which tells you that section handles increased volume.
Understanding these visual cues helps you spot bottlenecks before they become real problems in your actual system.
Different System Types at a Glance
Let me walk you through the three main aquaponic system types you’ll see in diagrams. Media-based systems use gravel or clay pebbles where water floods and drains in cycles, creating a rhythm that’s easy to visualize and manage. The NFT (Nutrient Film Technique) shows a thin stream of water flowing continuously through channels, perfect if you’re tight on space. Then there’s Deep Water Culture (DWC), where plant roots float directly in oxygenated water, shown in diagrams with air lines and rafts. Each has distinct flow arrows and patterns that tell you exactly how water circulates from fish tank to plants and back again, helping you spot potential problem areas before you build.
Flow Rate Fundamentals: Getting Your Water Moving Just Right
The Goldilocks Zone: Not Too Fast, Not Too Slow
Finding the sweet spot for water flow in your aquaponic system is like getting your morning coffee just right. Too fast, and you’ll run into problems. Too slow, and you’ll face different but equally frustrating issues.
When water flows too quickly through your grow beds, plants literally can’t drink fast enough. I once cranked up my pump thinking more flow meant healthier plants, only to watch my lettuce develop yellow, nutrient-deficient leaves. The water was racing past the roots before they could absorb what they needed. Plus, fast flow can wash away your beneficial bacteria colonies and erode your growing media over time.
On the flip side, sluggish water creates its own headaches. A friend’s system with barely-there flow turned into a science experiment gone wrong. Stagnant pockets developed algae blooms, her fish tank grew cloudy from poor filtration, and worst of all, anaerobic zones formed in her grow beds. That rotten egg smell? That’s hydrogen sulfide from bacteria thriving without oxygen, and it’s toxic to both plants and fish.
The goal is steady, consistent flow that gives roots time to absorb nutrients while keeping everything oxygenated and fresh.
Simple Math for Your System Size
Let me share some surprisingly simple calculations that took me years to discover when I first started tinkering with aquaponics. Once you understand these basic formulas, sizing your system becomes much less intimidating.
The golden rule I always start with is the 1:1 ratio between your fish tank and grow bed volumes. If you have a 50-gallon fish tank, aim for about 50 gallons of grow bed space. This keeps everything balanced and gives your beneficial bacteria enough room to convert fish waste efficiently.
For flow rates, here’s the magic number: cycle your grow bed volume once per hour. So if your grow bed holds 30 gallons, you want your pump moving roughly 30 gallons per hour. I’ve found this sweet spot keeps plants happy without overwhelming your system. When I ran my pump too fast in my first setup, I actually starved my plants because water moved through before they could absorb nutrients.
Here’s another handy calculation: divide your fish tank volume by two to get your minimum grow bed size. A 100-gallon tank needs at least 50 gallons of grow bed, though more is always better for filtration.
For stocking density, stick with one pound of fish per five to ten gallons of water when you’re starting out. I learned this the hard way after overcrowding my first tank and dealing with stressed fish and cloudy water for weeks.
These simple ratios have saved me countless headaches and will give your system a solid foundation for success.
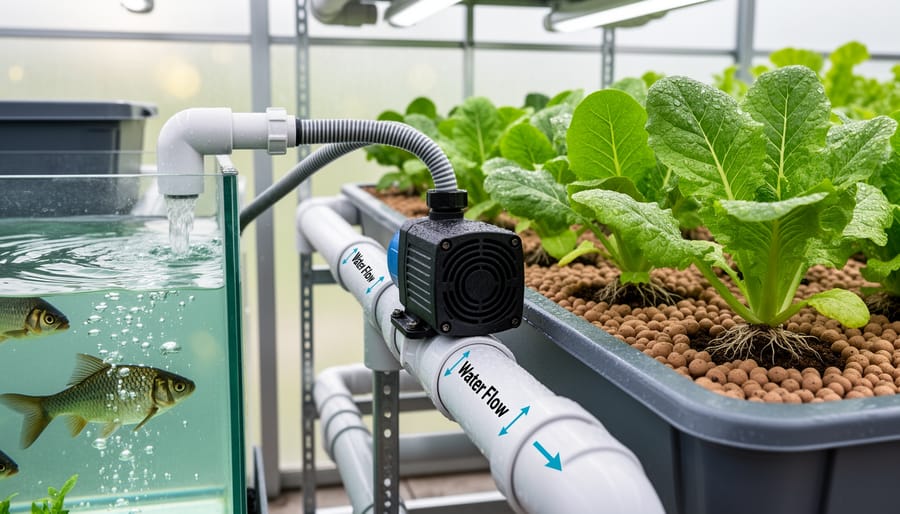
Choosing the Right Pump for Your Setup
Getting the right pump for your aquaponic system can feel overwhelming at first, but I promise it’s simpler than it seems! Think of your pump as the heart of your system, and just like our hearts, it needs to match the body’s demands.
Start by calculating your system’s total water volume. A good rule of thumb is choosing a pump that cycles the entire volume at least once per hour. For most backyard setups, this means looking at pumps rated between 200-800 gallons per hour (GPH). I learned this the hard way when my first system had a pump that was too weak, and my poor plants weren’t getting enough nutrients!
Here’s what matters most for pump selection: consider your vertical lift (how high water needs to travel), the length of your plumbing, and any twists or turns in your pipes. Each of these factors reduces your pump’s efficiency. Always choose a pump rated 20-30 percent higher than your calculated needs to account for these losses.
Energy efficiency matters too, especially for systems running 24/7. Look for pumps with adjustable flow rates so you can fine-tune performance as your system matures.
Optimizing Water Distribution: Making Every Drop Count
Elevation and Gravity: Your Free Helpers
Here’s one of my favorite discoveries: gravity is the hardest worker in your aquaponics system, and it never takes a day off! When you position your grow beds above your fish tank, you’re letting physics do the heavy lifting instead of your pump working overtime.
Think of your system like a waterfall. Place your fish tank at ground level, your grow beds elevated above it, and watch gravity pull the water downward naturally. This simple arrangement can cut your pump’s workload in half, saving electricity and extending equipment life. I learned this the hard way after my first system had everything at the same height, and my poor pump was constantly straining.
The sweet spot? Position grow beds 30-50 cm above your fish tank. This height gives you excellent drainage without requiring a massive pump. Your pump only needs to lift water up once, then gravity handles the return journey through your biofilter and back to the fish.
A quick tip: before you finalize your layout, check your water flow patterns and keep track with regular water testing. Slight adjustments in height can make remarkable differences in system efficiency and fish health.
Bell Siphons and Timed Floods: Creating the Perfect Rhythm
If you’ve ever watched your plants sitting in stagnant water and wondered if there’s a better way, flood-and-drain cycles might be your answer. This rhythm-based approach gives your plants the best of both worlds: regular drinks of nutrient-rich water followed by periods where roots get essential oxygen.
The magic happens through a simple device called a bell siphon. Picture this: water slowly fills your grow bed until it reaches a trigger point, then whoosh—the siphon activates and drains everything back to your fish tank. It’s like an automatic flush system that works entirely on water physics, no electricity required once the pump fills the bed.
Here’s why this cycling matters so much. When water floods the grow bed, plant roots absorb nutrients and beneficial bacteria break down fish waste. During the drain phase, oxygen rushes into the spaces between your grow media, feeding both roots and the aerobic bacteria that keep your system healthy. Without these drain periods, roots can suffocate and bacteria populations suffer.
I learned this the hard way with my first system—I kept water constantly flowing, and my tomatoes looked miserable despite perfect fish health. Once I added a bell siphon creating 15-minute flood-and-drain cycles, everything transformed within days.
Most systems work beautifully with cycles ranging from 10 to 20 minutes. Your diagram should clearly show the bell siphon position and water level indicators to help you set up this perfect rhythm.
Avoiding Dead Zones and Hot Spots
Dead zones happen when water flow slows to a crawl, typically in corners or behind obstructions where pipes don’t reach. These stagnant pockets become oxygen-depleted and can harbor harmful bacteria. I learned this the hard way when fish avoided one corner of my tank entirely! To fix dead zones, adjust your outlet pipes to create gentle circulation throughout the entire tank, or add air stones in problem spots.
Hot spots are the opposite issue, where water rushes too fast, stressing fish and creating turbulence. These usually occur right at pipe outlets or in narrow channels. Fish will constantly swim away from these areas, wasting energy. The solution is surprisingly simple: use diffusers or redirect flow against tank walls to spread the current, or add a valve to reduce flow speed. Walk around your system and watch how water moves. Drop a few food pellets to trace the current. Anywhere pellets accumulate signals a dead zone, while spots where they shoot past instantly indicate hot spots.
Troubleshooting Flow Problems: When Things Don’t Flow Smoothly
Weak Flow and Clogged Lines
Nothing stops water flow faster than clogged pipes! I learned this the hard way when my first system slowed to a trickle, and I discovered a nasty buildup of root debris and biofilm blocking my return line.
Start by checking your pump intake for visible debris like leaves or fish waste. Next, inspect your pipes for reduced flow by feeling the water pressure at various points. If you notice slow drainage in your grow beds, the problem might be in your bell siphon or drain fittings rather than the main lines.
For cleaning, disconnect sections of pipe and flush them with a hose. Stubborn biofilm buildup responds well to a vinegar solution, but rinse thoroughly before reconnecting. Check your grow media too – clay pebbles can accumulate fine particles that restrict drainage over time. Simply lifting and rinsing sections during routine maintenance helps prevent this.
Prevention is your best friend here. Install simple mesh screens or foam filters at strategic points, especially before your pump. I clean mine weekly during my regular system checks, which takes just minutes. Schedule quarterly deep cleanings where you flush all lines and inspect connections. This routine keeps water flowing smoothly and prevents the frustrating slowdowns that can stress both plants and fish.
Uneven Water Levels and Overflow Issues
Nothing’s more frustrating than walking out to check your system and finding water everywhere, right? I’ve been there, standing in puddles wondering what went wrong!
Uneven water levels usually point to a clog or mismatched flow rates. Start by checking your bell siphon or timer settings. If one grow bed floods while another stays dry, your water distribution might be uneven at the source. A simple manifold with adjustable valves lets you balance the flow to each bed perfectly.
Overflow issues often mean your drain can’t keep up with your pump output. Here’s my golden rule: your drain should always handle 20% more than your pump delivers. If water’s backing up, either slow down your pump with a valve or upgrade your drain pipe size. I learned this the hard way after my basement flooded during my first winter indoors!
Check that standpipes are at the correct height and nothing’s blocking your drain lines. Fish waste and plant roots love to create surprise dams. A quick weekly inspection of all drain points saves you from weekend disasters. Keep a diagram handy showing your pipe sizes and flow rates, it makes troubleshooting so much easier when problems pop up.
Pump Problems and Power Interruptions
Pump failures happen to everyone, and I learned this the hard way during a weekend trip when my pump died and my fish were gasping for air by the time I returned. Now I always keep a backup plan ready. First, invest in a spare pump that matches your system’s flow rate and keep it accessible. Label it clearly so family members know where it is during emergencies.
For power outages, consider a battery backup system or small generator that can run your pump for several hours. If you’re caught without power, immediately increase surface agitation by gently stirring the water to add oxygen. Your fish can survive longer without filtration than without oxygen, so focus on aeration first.
Create an emergency checklist and tape it near your system. Include steps like reducing feeding, checking water temperature, and monitoring fish behavior. If an outage extends beyond a few hours, temporarily reduce fish density by moving some to containers with battery-powered air stones. Prevention is key, so regularly inspect pump connections, clean impellers monthly, and test your backup systems quarterly to ensure they work when needed most.
Here’s the thing I’ve learned after years of tinkering with water systems: understanding how water flows through your aquaponics setup is the single most important skill you can develop. What once seemed like a confusing tangle of pipes and pumps suddenly makes perfect sense when you take the time to sketch out a simple diagram.
I remember my first aquaponic system. I was overwhelmed by all the variables until I grabbed a piece of paper and drew out exactly where the water was going. That simple act changed everything. Suddenly, I could see where flow rates needed adjusting, where I might lose pressure, and why my plants on one side were thriving while others struggled.
My advice? Start simple. Draw your system on paper or use basic design software. Mark your pump location, measure your vertical lifts, and calculate those flow rates we talked about earlier. Don’t worry about making it perfect on the first try. Think of your diagram as a living document that evolves as you learn what works.
Here’s what really matters: even tiny adjustments to your flow rates can create surprisingly big improvements in plant growth and fish health. Moving from 50 gallons per hour to 75 might be exactly what your system needs to thrive.
Trust the process, experiment with confidence, and remember that every successful aquaponic gardener started exactly where you are now. Your diagram is more than just lines on paper; it’s your roadmap to a thriving, balanced system that will reward your efforts for years to come.