
Why Coastal Quail Need Your Waterside Garden (And How to Help Them Nest)
Position your quail nesting box 12-18 inches above ground near dense shrubs or tall grasses where these ground-dwelling birds feel naturally secure. Mount it on a sturdy post or fence rail with the entrance facing away from prevailing winds, and angle the floor slightly forward to prevent water accumulation during rain.
Design the box with dimensions of 12 inches wide, 12 inches deep, and 10 inches tall – spacious enough for a covey of 6-8 quail to roost comfortably. Cut a 3-inch entrance hole positioned low on the front panel, since quail prefer ground-level access rather than perching high like songbirds.
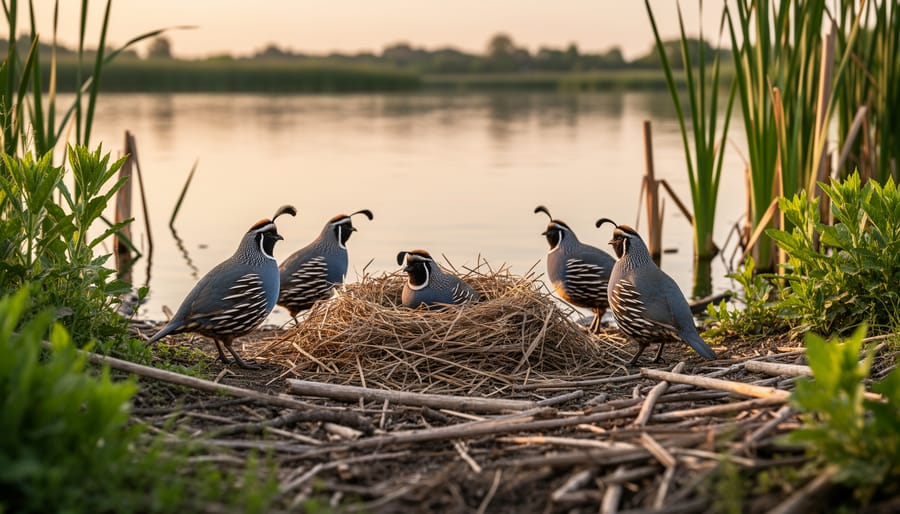
Line the bottom with 2-3 inches of pine shavings mixed with dried grass clippings to create soft, moisture-wicking bedding material. Add a small handful of straw in one corner to give hens nesting material they can arrange themselves, mimicking the natural scrapes they create in the wild.
If you’ve noticed quail visiting your water garden at dawn or dusk for drinking, you’re witnessing a beautiful connection between your pond ecosystem and local wildlife. These charming ground birds depend on accessible water sources, especially during dry seasons. By building nesting boxes near your existing water features, you’re creating a complete habitat that supports their entire lifecycle – from raising chicks to daily hydration needs. The same patience and attention to detail you’ve developed maintaining your pond translates perfectly to supporting these delightful birds, and you’ll be rewarded with their distinctive calls echoing across your garden each morning.
The Surprising Link Between Your Water Garden and Coastal Quail
What Makes Coastal Quail Different
If you’ve spotted quail near your pond or water features, you’re likely observing coastal varieties that have distinctly different needs from their inland cousins. Coastal quail, like California Quail in seaside areas, have adapted to higher humidity levels and benefit from consistent moisture in their environment – something that naturally occurs when you create a quail habitat near water.
These birds prefer nesting sites with dense, low-growing vegetation that thrives in coastal conditions. Think coastal sage scrub, native grasses, and shrubs that can handle salt air and morning dew. Unlike inland quail that seek drier, more exposed nesting spots, coastal varieties look for areas where ground cover stays slightly moist but not waterlogged.
When designing nesting boxes for coastal quail, you’ll want to account for increased humidity by ensuring proper ventilation and using materials that won’t rot quickly. The boxes should be positioned near native plantings rather than in completely open areas, mimicking the sheltered spots these birds naturally choose. Understanding these preferences helps you create a welcoming space that feels like home to your coastal feathered friends.
Why Water Gardens Attract Nesting Birds
If you’ve spent time near your pond, you’ve probably noticed quail visiting throughout the day. There’s a good reason these charming ground birds are drawn to water garden areas. Ponds create a mini-ecosystem that offers everything quail need for successful nesting.
First, water features naturally attract insects—a crucial protein source for growing quail chicks. Mosquitoes, beetles, and other bugs that thrive near water provide the perfect high-energy food for baby birds during their first critical weeks. The moist soil around ponds also supports abundant earthworms and grubs that adult quail forage for daily.
Beyond food, the native vegetation around ponds offers ideal cover. Dense grasses, shrubs, and ground-hugging plants create protective screening that helps quail feel secure from predators like hawks and cats. This natural camouflage is essential, since quail are ground-nesters who rely on concealment for survival.
The microclimate near water also matters. Pond areas maintain more consistent humidity levels, preventing eggs from drying out during hot weather. This moisture, combined with the lush plant growth and reliable food sources, makes your water garden the perfect location for a quail nesting box.
Designing a Quail Nesting Box That Actually Works
Essential Size and Shape Requirements
Getting the dimensions right makes all the difference between a nesting box that quail will love and one they’ll ignore. I learned this the hard way when my first attempt sat empty all season because I made the entrance hole too large!
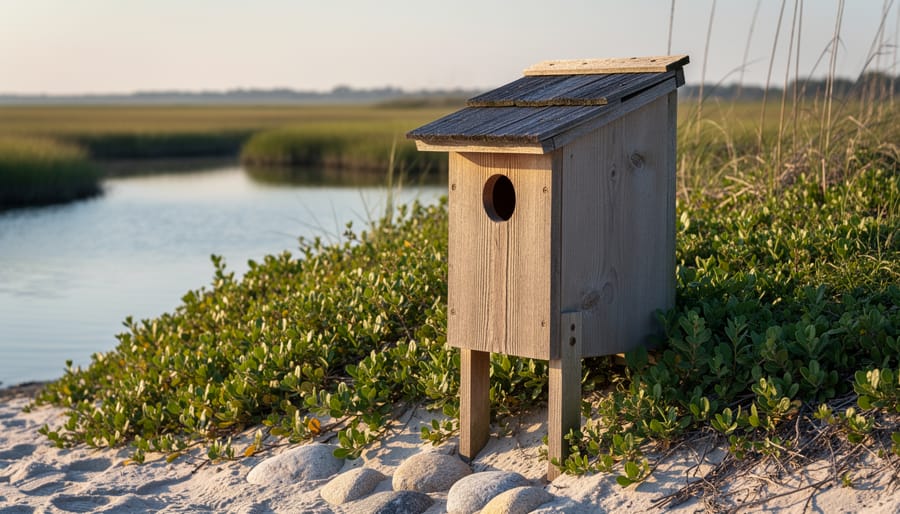
For coastal quail species like California quail or Gambel’s quail, your entrance hole should measure 3 to 4 inches in diameter. This size keeps larger predators out while letting your quail slip in comfortably. I position mine about 2 inches from the floor of the box, which gives the birds a nice little landing spot inside.
The interior floor space needs to be at least 10 inches by 10 inches, with a height of 8 to 10 inches. Think of it like a cozy studio apartment for birds. They need enough room to turn around and arrange nesting material without feeling cramped. I’ve found that 12 by 12 inches works even better if you have the materials on hand.
Ventilation is crucial, especially in coastal areas where humidity can be high. Drill four to six quarter-inch holes near the top of the side walls, just below where the roof meets the walls. This creates airflow without causing drafts at nest level. Also, drill three or four small drainage holes in the floor to prevent water from pooling if rain sneaks in.
Position your box 3 to 4 feet off the ground, angled slightly forward so rain runs off naturally. This height mimics where quail feel safest while remaining accessible for your seasonal cleaning.
Choosing the Right Materials for Waterside Conditions
When you’re building a quail nesting box near water features, choosing the right materials makes all the difference between a box that lasts one season and one that serves your feathered friends for years to come. I learned this the hard way when my first attempt near my backyard pond warped and fell apart after just one rainy spring!
For waterside conditions, cedar and redwood are your best friends. These naturally rot-resistant woods handle moisture beautifully without needing chemical treatments that could harm the birds. Cedar is usually the more budget-friendly option, and you can often find it at local lumberyards for reasonable prices. If you’re watching your budget closely, exterior-grade plywood works too, but make sure it’s rated for outdoor use and seal it with a non-toxic, water-based sealant.
Here’s something important: avoid pressure-treated lumber. While it resists moisture wonderfully, the chemicals used in treatment can be harmful to quail and other wildlife. It’s simply not worth the risk when safer alternatives exist.
For the roof, consider using recycled plastic lumber or composite materials. These handle constant humidity without breaking down, and they’re often made from recycled materials, which is a nice bonus. Metal roofing scraps also work great and you might find them inexpensively at building supply stores.
When fastening everything together, choose galvanized or stainless steel screws rather than nails. They won’t rust in the damp environment, and they hold better when wood expands and contracts with moisture changes. A little extra spent on quality hardware now saves you from rebuild headaches later.
Step-by-Step Construction Guide
Ready to build your quail nesting box? Let’s dive in! I remember my first attempt at building nesting boxes near my pond – I was nervous about getting it right, but it turned out easier than I expected. You’ve got this!
Start by cutting your materials. You’ll need a 12×12 inch piece for the floor, two 12×10 inch pieces for the sides, a 14×12 inch piece for the back, and a 10×12 inch front panel. Don’t worry about perfection – quail aren’t picky about a few rough edges!
Begin assembly by attaching the back piece to the floor using wood screws or nails, creating an L-shape. This forms your foundation. Next, attach both side panels, making sure they’re flush with the floor edges. I always double-check alignment before securing everything permanently – it saves frustration later.
For the front panel, cut a 3-inch circular entrance hole about 4 inches from the bottom. Sand the edges smooth to prevent any sharp spots. Attach this panel to complete your box structure.
The roof is crucial for keeping your feathered friends dry. Cut a 14×14 inch piece and attach it at a slight angle to allow rainwater runoff. This is especially important if your nesting box is near your pond where humidity might be higher.
For finishing touches, drill three small drainage holes in the floor and add ventilation holes near the top of the side panels. Apply a non-toxic, water-based wood sealer to the exterior only – never the interior. Add a 2-inch layer of pine shavings inside for cozy bedding, and your quail palace is ready for occupancy!
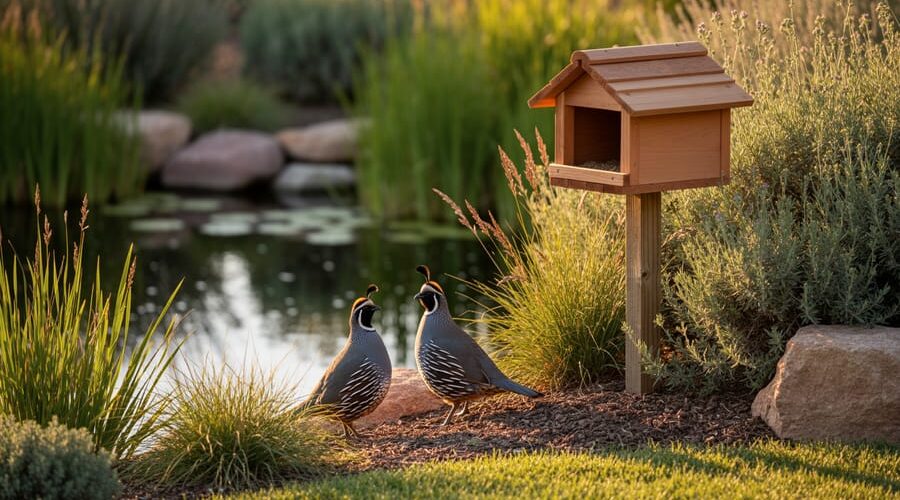
Where to Place Your Nesting Box Near Your Pond
Finding the Perfect Spot
Location is everything when it comes to quail nesting success! Think of it like finding the perfect spot for a garden bench – you want comfort, safety, and easy access to essentials.
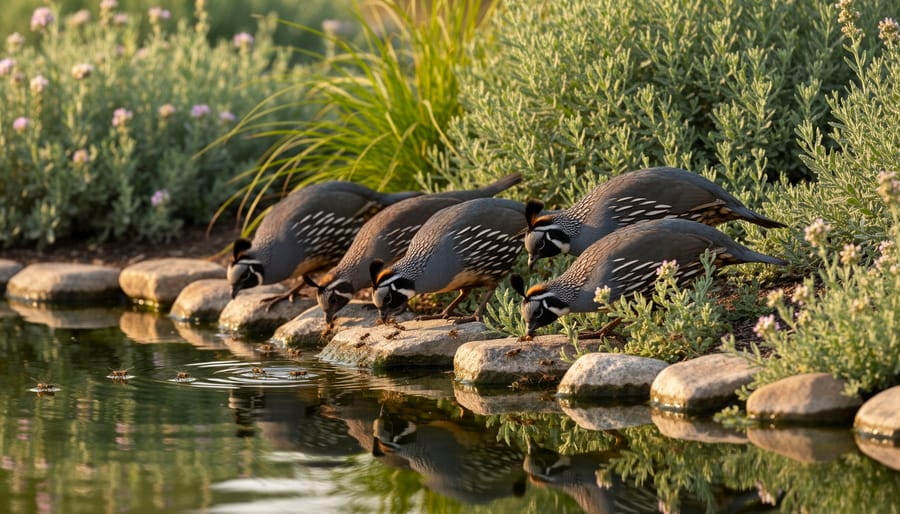
Start by placing your nesting box within 50 feet of a water source. If you have a pond or water feature in your yard, you’re already ahead of the game! Quail need to drink regularly, especially during nesting season, and they prefer not to travel far from their nest. I’ve noticed that when boxes are positioned near my pond, quail families make adorable little paths through the grass on their daily water runs.
Ground cover is crucial for these shy birds. Position your box near shrubs, tall grasses, or native plantings – about 3 to 5 feet away works beautifully. This gives quail a safe corridor to dash in and out without feeling exposed to hawks or other predators overhead. Dense vegetation acts like a protective hallway leading right to their front door.
Consider sun exposure carefully. Morning sun with afternoon shade is ideal. Too much direct sunlight can overheat eggs, while constant shade might keep things too damp and chilly. East-facing placement usually hits that sweet spot.
Wind protection matters too. Place your box on the downwind side of bushes or structures, avoiding open areas where gusty conditions could chill the nest. Finally, elevate the box 6 to 12 inches off the ground using stones or blocks. This simple trick deters ground predators like snakes and provides drainage during heavy rains.
Creating Safe Pathways and Cover
Think of quail as nature’s most cautious dinner guests – they’ll only visit your nesting box if they feel completely secure along the journey there. These ground-dwelling birds need continuous cover from your pond area to their nesting site, and creating these protective pathways is easier than you might think.
Start by observing the natural movement patterns around your pond. Quail prefer traveling along edges rather than crossing open spaces, so work with what you already have. If you’ve established plants around your water feature as part of your wildlife pond design, you’re already halfway there. Look for gaps in coverage where quail might feel exposed.
Native grasses are your best friends here. Plant clumps of kangaroo grass or wallaby grass between your pond and the nesting box location. These grow densely at ground level, creating tunnels of safety that quail love. Space them about a meter apart – close enough to provide continuous cover but not so dense that quail can’t navigate through.
Add low-growing shrubs like native daisies or ground covers along the pathway edges. I’ve noticed quail particularly favor routes with overhanging branches from small shrubs, which provide both visual cover and protection from aerial predators.
Remember, you’re creating a corridor, not a maze. Keep pathways roughly one to two meters wide, allowing quail families to move comfortably together while maintaining that crucial sense of security.
Supporting Nesting Success Throughout the Season
Maintenance Schedule That Respects Nesting Cycles
Timing is everything when it comes to maintaining quail nesting boxes. The golden rule? Never disturb an active nest. During breeding season, which typically runs from April through September, observe from a distance first. If you spot quail coming and going frequently, or hear chicks chirping, hold off on any maintenance work.
The best time for thorough cleaning is late fall through winter when nesting has concluded. This window gives you time to remove old bedding, check for damage, and refresh materials before the next breeding cycle begins. I learned this the hard way one spring when I enthusiastically cleaned boxes in early March, only to realize I’d disrupted early nesters who’d already claimed their spots.
For basic checks during active season, keep it quick and minimal. Stand back about ten feet and look for obvious issues like displaced roofing or predator damage. If repairs are absolutely necessary near an occupied box, work during midday when adults are typically away foraging, and complete the job in under fifteen minutes.
When cleaning, remove all old nesting materials and replace with fresh pine shavings or straw. Inspect hardware cloth for rust or tears, tighten loose screws, and ensure drainage holes remain clear. These simple steps ensure your boxes stay welcoming and functional year after year.
Adding Nesting Materials and Food Sources
Quail are resourceful birds, but you can help them feel right at home by providing easy access to natural nesting materials near your boxes. Place small piles of dried grass, straw, or soft leaves within a few meters of the boxes. I’ve found that leaving some untrimmed grasses around my pond edges gives quail exactly what they need while creating a naturalistic look.
For food sources, consider planting native grasses and seed-bearing plants around your pond perimeter. Quail love native millet, clover, and various wildflowers that drop seeds. Create small feeding areas with shallow dishes of clean water near ground level, but away from deep pond edges for safety.
Around my own water garden, I’ve established small patches of native vegetation between ornamental plantings. These zones provide insects, seeds, and cover while blending beautifully with the landscape. Plant low-growing shrubs like native saltbush or lomandra near nesting boxes to offer shelter and nesting materials naturally.
Remember to keep a pesticide-free zone around your quail habitat. These ground-dwelling birds forage constantly, so maintaining chemical-free areas protects both the birds and your pond ecosystem.
Common Mistakes That Keep Quail Away
I’ve learned a lot about why quail sometimes ignore perfectly good nesting boxes, and trust me, I’ve made most of these mistakes myself! Let me share what I’ve discovered so you can avoid the same frustrations.
The most common culprit is placement. If you’ve positioned your nesting box in an open area without nearby cover, quail won’t feel safe approaching it. These ground-dwelling birds need escape routes and protective vegetation within a few feet of their nesting site. I once placed a box right in the middle of my lawn thinking it looked charming, only to realize the quail avoided it completely. Moving it near my pond’s edge where native grasses and shrubs provided natural cover made all the difference.
Predator protection often gets overlooked too. If your box sits directly on the ground without any elevation or protective barriers, quail sense it’s vulnerable. A simple platform raised just six inches with hardware cloth underneath can prevent snakes and rodents from raiding nests.
Another mistake I see frequently involves chemical use around water features. If you’re treating your pond with algaecides or pesticides, quail will detect these substances and avoid the area entirely. They need clean water sources and chemical-free zones for foraging insects to feed their chicks.
Timing your maintenance incorrectly can also disrupt nesting. Cleaning out boxes during breeding season, which typically runs from spring through early summer, will chase away prospective parents. Save your thorough cleanings for late fall or winter when nesting activity has ceased.
Finally, patience matters. Sometimes quail need a full season to discover and trust a new nesting box. Give them time to adjust to this addition near your water garden.
Your water garden isn’t just a beautiful addition to your property—it’s a vital ecosystem that supports local wildlife in ways you might never have imagined. By adding a simple quail nesting box near your pond, you’re taking a meaningful step toward protecting these charming coastal birds while enhancing the natural balance around your water feature.
The connection between your pond and quail habitat is stronger than you might think. Your water garden already provides drinking water and attracts insects that quail feed on. Adding a nesting box completes the circle, offering safe shelter where these birds can raise their young. This is practical conservation that any pond lover can achieve in a single weekend.
You don’t need to be an expert woodworker or wildlife biologist to make a difference. Start with one basic nesting box using the plans we’ve shared. Place it near your pond where you’ve spotted quail, and let nature take its course. By applying these wildlife conservation principles, you’re transforming your backyard into a sanctuary that benefits both you and the birds that call it home.