
Perfect Kestrel Nesting Boxes: Protect These Coastal Hunters in Your Garden
Transform your backyard into a thriving wildlife haven by building a kestrel nesting box, a critical conservation tool that helps protect these magnificent birds of prey. American Kestrels face declining populations due to habitat loss, making DIY nesting boxes essential for their survival. These compact raptors, nature’s own pest controllers, need specific dimensions and placement requirements to successfully raise their young. By following proven nesting box designs, you’ll create a safe haven measuring 9x9x12 inches internally, with a 3-inch entrance hole placed 9 inches above the floor. Mount your box 10-30 feet high on a pole or tree, facing east or southeast to protect from harsh weather, and ensure proper drainage holes prevent moisture buildup. Whether you’re a novice woodworker or experienced craftsperson, these detailed plans will guide you through creating a durable, weather-resistant home that attracts these beautiful falcons to your property.
Why Install Kestrel Boxes Near Water Gardens?

Natural Pest Management Benefits
Kestrels are nature’s perfect solution for natural pest control, especially around water features and ponds. These small but mighty raptors are incredibly efficient at managing populations of mice, voles, and large insects that can otherwise become problematic near water gardens. A single kestrel family can consume up to 1,000 rodents during their nesting season, making them invaluable allies in protecting your pond ecosystem.
Beyond rodent control, kestrels help maintain the delicate balance of insect populations, targeting grasshoppers, crickets, and other potentially destructive insects that might damage your water garden plants. They’re particularly effective at controlling dragonfly populations, which, while beautiful, can become overwhelming in pond environments.
By installing a kestrel nesting box near your pond, you’re not just providing a home for these beautiful birds – you’re investing in a sustainable, chemical-free pest management system that works year after year. This natural approach helps maintain the health of your pond while avoiding the negative impacts of pesticides on water quality and beneficial insects.
Coastal Habitat Conservation
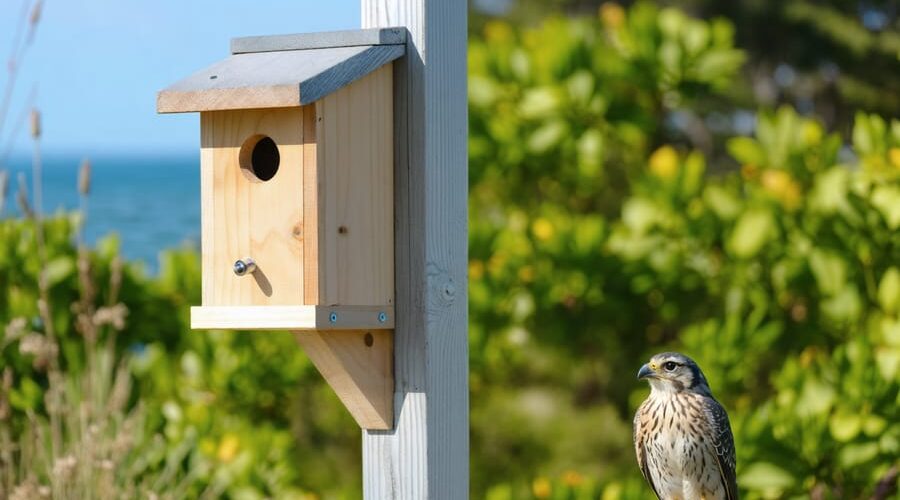
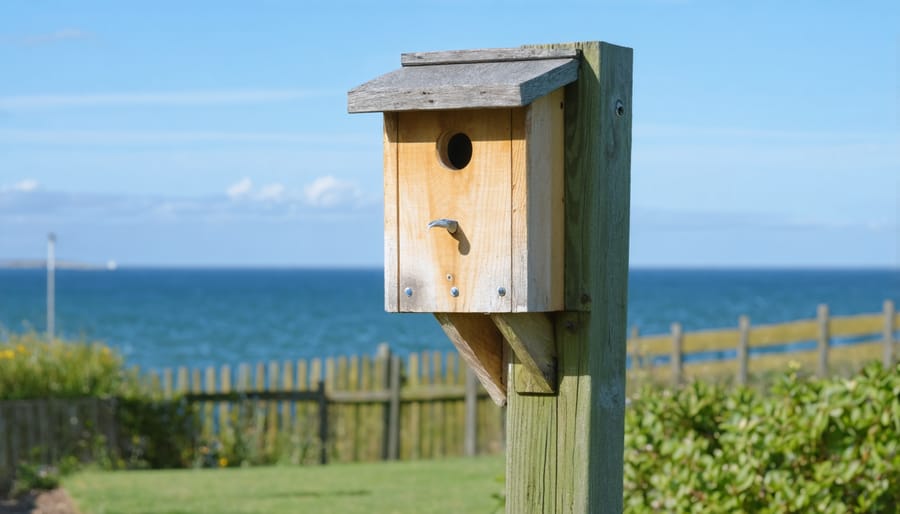
Coastal areas present unique challenges and opportunities for kestrel conservation. These beautiful raptors face habitat loss as coastal development continues to reduce natural nesting sites. By installing nesting boxes in coastal regions, you’re providing crucial support for kestrel populations while helping maintain the delicate balance of coastal ecosystems. The boxes offer safe havens above flood levels and protection from harsh marine winds. When placing boxes in coastal locations, consider mounting them on poles at least 10-15 feet high, facing away from prevailing ocean winds. The extra height helps protect the boxes from salt spray and storm surges while giving kestrels a commanding view of their hunting grounds. Remember to use marine-grade hardware and weather-resistant wood to ensure your nesting box withstands the corrosive coastal environment for years to come.
Essential Design Features
Materials and Measurements
To build a kestrel nesting box, you’ll need the following materials:
– One 1×12-inch board (actual width 11¼ inches) x 8 feet long
– Exterior grade screws (1⅝ inches)
– Galvanized hinges (2)
– Galvanized latch
– Exterior grade wood glue
– Drill with ⅜-inch bit for drainage holes
– Small gravel or wood chips for bedding
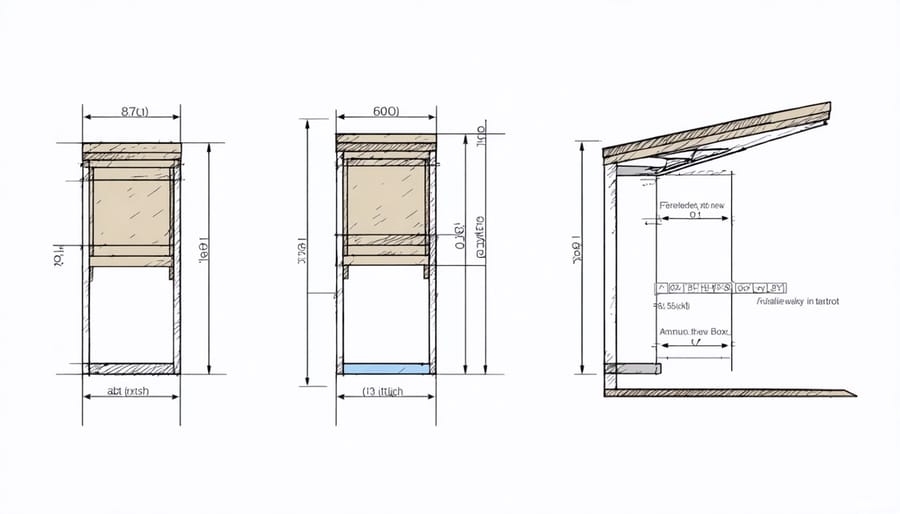
Box Dimensions:
– Front panel: 16 inches x 11¼ inches
– Back panel: 22 inches x 11¼ inches
– Side panels (2): 16 inches x 10 inches (cut at an angle for roof slope)
– Bottom panel: 10 inches x 9¼ inches
– Roof panel: 14 inches x 11¼ inches
– Entrance hole: 3 inches in diameter, centered 4 inches from top
When integrating your nesting box into your water garden design, ensure all wood is untreated cedar or exterior-grade pine to withstand moisture. The box’s internal floor space measures 9¼ x 10 inches, providing adequate room for a kestrel family while keeping predators out. Add at least four ¼-inch drainage holes in the bottom panel to prevent water accumulation. Remember to slightly recess the bottom panel ¼ inch up from the base to enhance drainage.
Drainage and Ventilation
Proper drainage and ventilation are crucial for kestrel nesting boxes, especially in coastal areas where moisture and salt spray can create challenging conditions. To ensure your box remains a safe haven for these remarkable birds, incorporate several key drainage features into your design.
Start by drilling at least six ¼-inch drainage holes in the bottom of the box. Space these holes evenly across the floor to prevent water pooling. In coastal environments, consider adding an extra row of drainage holes to combat increased moisture levels.
Ventilation is equally important for maintaining a healthy nesting environment. Cut or drill four ½-inch ventilation holes near the top of each side panel, approximately 1 inch below the roof. These holes allow fresh air circulation while preventing direct drafts on the nest.
For added protection in coastal areas, angle the roof with a 15-degree slope and extend it 2-3 inches beyond the box’s front and sides. This overhang helps shield the entrance hole and ventilation openings from driving rain and salt spray.
Consider adding small grooves or shallow channels on the interior floor, directing any moisture toward the drainage holes. In particularly wet coastal regions, you might also want to apply a thin layer of natural wood shavings to help absorb excess moisture without compromising the box’s safety.
Remember to check and clean drainage holes annually to prevent clogging from nesting materials or debris.
Step-by-Step Construction Guide
Let’s build a kestrel nesting box that will provide a safe haven for these magnificent birds. You’ll need the following materials: one 1×12-inch board (6 feet long), exterior-grade screws, a drill with bits, and basic woodworking tools.
Start by cutting your board into the following pieces:
– Front panel: 16 inches × 11¼ inches
– Back panel: 22 inches × 11¼ inches
– Side panels (2): 16 inches × 11¼ inches
– Bottom panel: 9¼ inches × 11¼ inches
– Roof: 14 inches × 11¼ inches
Begin assembly by marking the entrance hole on the front panel. Measure down 4 inches from the top and center a 3-inch circular hole. Cut this opening using a hole saw attachment or jigsaw. Sand the edges smooth to prevent injury to the birds.
Next, drill several ¼-inch drainage holes in the bottom panel. Space them about 2 inches apart to ensure proper water drainage. Also, drill several small ventilation holes near the top of both side panels.
Create the box frame by attaching the side panels to the back panel using exterior screws. Pre-drill your holes to prevent the wood from splitting. Position the bottom panel inside the frame, about ½ inch up from the bottom edge for drainage.
Attach the front panel to the side panels, but first add a small strip of wood about 3 inches below the entrance hole to serve as a landing perch. The front panel should be screwed in place but hinged at the top for easy cleaning access.
Install the roof with a 2-inch overhang at the front and ½ inch on the sides. Create a weather-tight seal by adding a strip of rubber roofing material or metal flashing over the top.
Add a pivot screw or hook-and-eye latch at the bottom of the front panel to keep it secure but allow access for annual cleaning. Finally, drill mounting holes in the back panel for installation.
Before mounting, add a 2-inch layer of wood shavings in the bottom of the box. Don’t use sawdust or treated wood chips, as these can harm the birds.
Remember to roughen the interior of the front panel below the entrance hole. This creates a textured surface that helps fledglings climb out when they’re ready to leave the nest. You can do this by scoring the wood with a saw or adding thin strips of wood.
The completed box should be mounted 10-20 feet high on a pole or tree, facing east or southeast to catch morning sun while providing afternoon shade. Ensure the box is tilted slightly forward to prevent rain from entering the hole.
Installation and Placement Tips
Height and Direction
Mount your kestrel nesting box between 10 and 20 feet high for optimal results. Trees, poles, or buildings work well as mounting locations, but ensure the box is secure and won’t sway in strong winds. Face the entrance hole between east and southeast to protect the nest from harsh afternoon sun and prevailing winds. This orientation also helps keep rain from blowing directly into the box.
In coastal areas, consider mounting the box slightly higher and in a more sheltered location to account for stronger winds. Leave at least 30 feet of open space in front of the box, as kestrels prefer clear flight paths to their nest. Avoid placing boxes near dense brush or forest edges where predators might lurk.
Remember to install a predator guard below the box to prevent raccoons and snakes from accessing the nest. This extra protection significantly increases the chances of successful nesting.
Safe Distance from Water
When placing kestrel nesting boxes near water features, maintaining a safe distance is crucial for both the birds and your pond ecosystem. For optimal wildlife zone management, position boxes at least 30-50 feet away from ponds or water gardens. This distance allows kestrels to hunt effectively while preventing excessive disturbance to pond life. Choose locations that offer clear flight paths and good visibility of the surrounding area, ideally mounting boxes on poles or trees at the outer edges of your water feature’s landscape. This placement ensures kestrels can safely access their nests without creating conflicts with other wildlife that may frequent your pond area.
Providing kestrel nesting boxes is more than just a weekend DIY project – it’s a meaningful contribution to wildlife conservation. By creating and maintaining these essential habitats, you’re helping to protect these remarkable birds of prey and ensure their continued presence in our environment. Remember that successful nesting boxes require regular maintenance, including annual cleaning before the breeding season and periodic checks for damage or wear.
Your efforts in building and installing a proper nesting box can make a real difference in supporting local kestrel populations, especially in areas where natural nesting sites are scarce. The satisfaction of seeing a pair of kestrels choose your box and successfully raise their young is truly rewarding. By following the proper dimensions, using appropriate materials, and maintaining the box regularly, you’re providing these beautiful birds with a safe haven for generations to come.
As you maintain your nesting box, remember that each successful brood represents hope for the species’ future. Keep monitoring the box’s condition, respect the birds during nesting season, and take pride in knowing you’re part of a larger conservation effort to protect these magnificent aerial hunters.