
Why Your Soil Type Makes or Breaks Your Pond (Before You Start Digging)
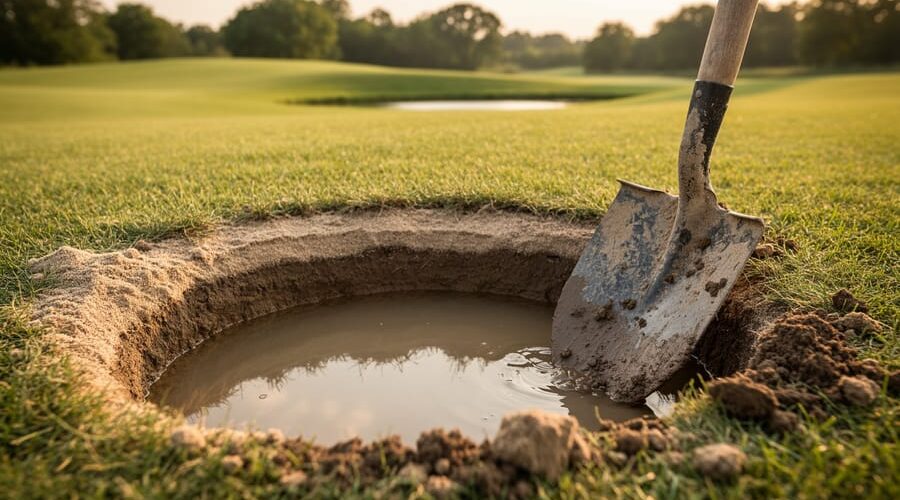
Before you break ground on your dream pond, check your soil’s drainage capability – it’s the single factor that determines whether your pond will hold water naturally or require expensive liners. Hydrologic soil groups classify how quickly water moves through soil, ranging from sandy Group A soils that drain rapidly (making pond-building challenging) to clay-rich Group D soils that hold water beautifully. Understanding your property’s classification saves thousands of dollars in corrections and prevents the heartbreak of a pond that won’t stay full.
Grab a shovel and dig a test hole about two feet deep in your proposed pond area. Fill it with water and time how long it takes to drain. If water disappears within hours, you’re likely dealing with Group A or B soils that need amendments or synthetic liners. If water remains for 24 hours or more, congratulations – your Group C or D soils are naturally suited for pond construction. This simple test reveals more about your backyard pond design requirements than any expensive consultation.
Contact your local Natural Resources Conservation Service office for free soil survey maps of your property. These detailed maps identify hydrologic soil groups across your land, helping you choose the best pond location before you invest time and money. The right spot can mean the difference between a thriving water feature and a constant maintenance headache.
What Hydrologic Soil Groups Actually Mean (In Plain English)
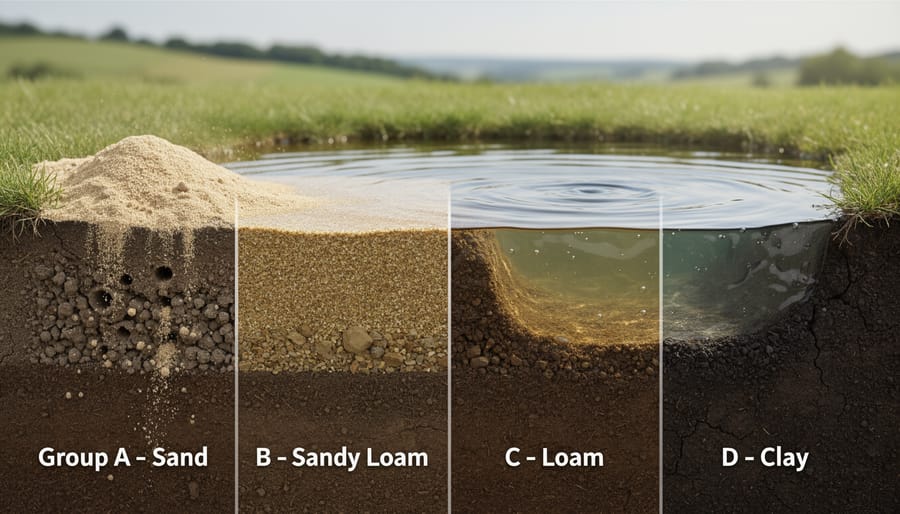
The Four Types: From Super Thirsty to Water-Tight
Think of soil types like different kinds of sponges. Some soak up water instantly, while others let it sit on top like a puddle on a sidewalk. That’s essentially what hydrologic soil groups tell us, and for pond builders, it’s make-or-break information.
Group A soils are the super thirsty ones. Packed with sand and gravel, they drain water faster than you can say “where’d my pond go?” Water moves through these soils at over 6 inches per hour. I learned this the hard way when I tried building a small pond in my sandy backyard. The water level dropped noticeably every single day. For pond building, Group A means you’ll absolutely need a liner or you’ll be constantly refilling. Think of it like trying to fill a colander.
Group B soils have moderate drainage, moving water at about 2 to 6 inches per hour. These soils contain a mix of sand and loam, giving you a fighting chance. While still not ideal for unlined ponds, they’re more forgiving than Group A. You might get away with a compacted clay liner if you’re willing to put in the work.
Group C soils drain slowly at 0.6 to 2 inches per hour. These contain more silt and clay, which is better news for pond holders. Water sticks around longer, though you’ll still want some water-holding help for permanent ponds.
Group D soils are the goldmine for pond builders. Heavy clay content means water drains at less than 0.6 inches per hour. These soils naturally hold water like a charm. If you’ve got Group D soil, you might not even need a liner for certain pond types.
How to Figure Out Your Soil Group Without a Lab Coat
The Simple Squeeze Test
Want to get a quick sense of your soil’s drainage potential? Let me walk you through this simple test I’ve used countless times before breaking ground on a new pond project.
Start by grabbing a handful of soil from about 6-8 inches below the surface. Add just enough water to make it moist, like a wrung-out sponge, not muddy. Now comes the fun part: squeeze it firmly in your palm and watch what happens when you open your hand.
Sandy soil (Group A) will barely hold together and crumbles immediately. It feels gritty, like you’re holding beach sand. This drains fast, sometimes too fast for natural ponds.
Loamy soil (Groups B and C) forms a ball that holds its shape but breaks apart with light pressure. It feels smooth with some grittiness. This is your Goldilocks zone for most pond projects.
Clay soil (Group D) forms a tight, ribbon-like ball that’s slick and sticky. You can actually roll it into a snake shape between your palms. While challenging for drainage, clay creates naturally watertight pond bottoms.
The squeeze test won’t replace professional analysis, but it gives you that initial “aha” moment about what you’re working with. I always do this test in several spots around my planned pond site since soil composition can vary surprisingly across just a few feet.
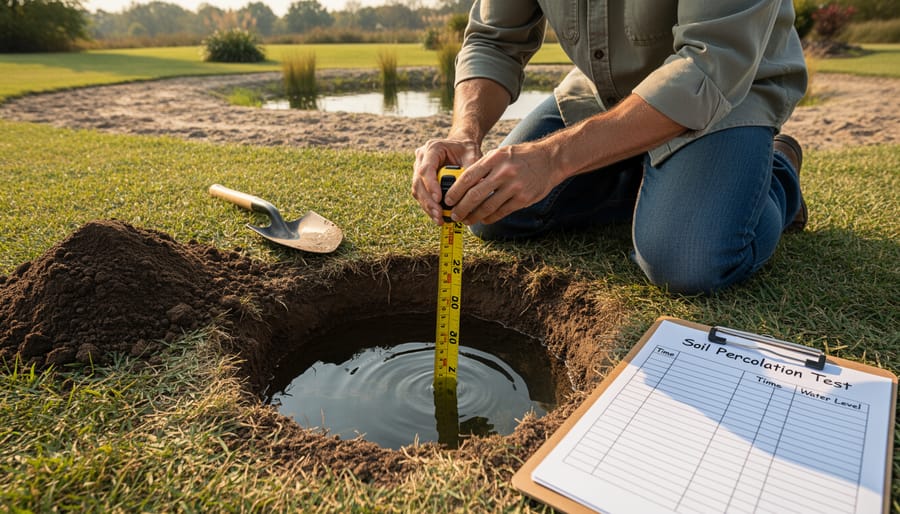
The Percolation Test (Perc Test Made Easy)
Ready to roll up your sleeves and find out what your soil can handle? The percolation test is surprisingly simple and kind of satisfying to watch. Here’s how to do it without needing fancy equipment.
First, dig a test hole about 12 inches deep and 4-6 inches wide. I like to dig mine near where the pond will actually go, since soil can vary quite a bit even across a small yard. Fill the hole with water and let it soak in completely. This pre-soaking step is important because it mimics what happens when your pond is full, giving you a more accurate reading.
Once that first fill drains away, fill the hole again with water, measuring exactly 6 inches from the bottom. Now grab a timer and watch how fast the water level drops. Measure the drop every 30 minutes for about 4 hours, or until it’s gone.
Here’s what your results mean: If water drains in under 10 minutes, you’ve got sandy, fast-draining soil, likely Group A. Between 10-60 minutes suggests loamy soil, probably Group B or C. If you’re still watching water after several hours, you’re dealing with clay-heavy Group D soil, which holds water beautifully for ponds.
I remember doing my first perc test and feeling like a real soil scientist. The water sat there for three hours before budging, and I knew right away my clay soil would make pond-building easier. Your results will guide everything from liner needs to drainage planning.
Reading Your County Soil Survey Maps
Finding your property’s hydrologic soil group is easier than you might think, and it won’t cost you a penny. The USDA’s Web Soil Survey is a fantastic free tool that maps soil characteristics across the entire United States. Simply visit the Web Soil Survey website and type in your address or use the interactive map to zoom into your property. Once you’ve outlined your area of interest using the drawing tools, navigate to the Soil Data Explorer tab and look for Soil Properties and Qualities, then select Hydrologic Soil Group. The system will generate a color-coded map showing whether you have A, B, C, or D soils on your land. I remember my first time using this tool while planning my koi pond, feeling like I’d unlocked a treasure map. The interface might seem a bit overwhelming initially, but take your time clicking through the tabs. You can even print detailed reports showing the percentage of each soil group on your property, which is incredibly helpful when deciding where exactly to dig your pond.
What Your Soil Type Means for Your Pond Plans
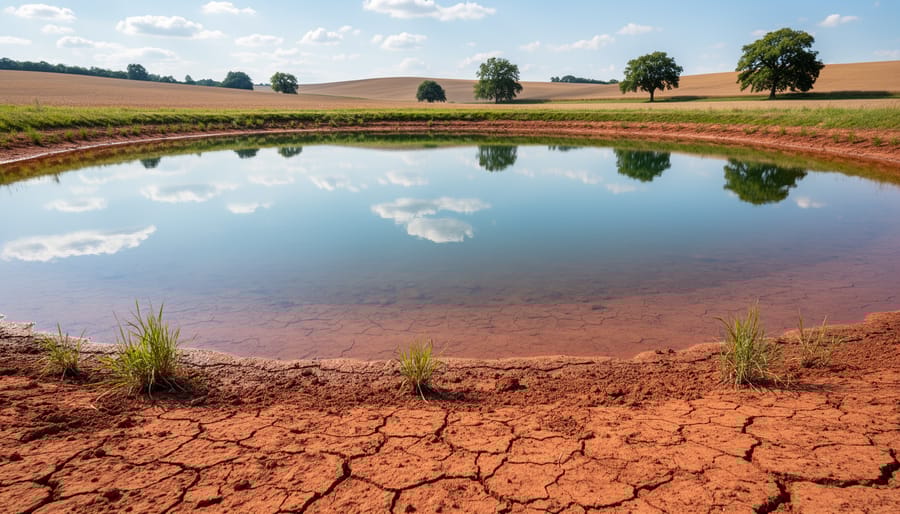
The Dream Scenario: Group C and D Soils
If you’re lucky enough to have Group C or D soils on your property, you’ve hit the pond-building jackpot! These clay-heavy soils are nature’s perfect pond liner, and they’ll save you significant time, effort, and money.
Group C soils have moderate clay content and slower water infiltration rates, while Group D soils are the champions with high clay content and very slow drainage. Both types naturally resist water seepage, meaning your pond will hold water beautifully with minimal intervention. When I built my first pond on clay soil, I was amazed at how quickly it filled and maintained its water level without any synthetic liner.
What can you expect? With Group C soils, you might need light compaction of the pond bottom and sides to maximize the natural sealing effect. Simply walking over the wet clay or using a hand tamper usually does the trick. Group D soils often require even less work. The clay particles are so fine and tightly packed that they create an almost impermeable barrier on their own.
The minimal maintenance needed is refreshing. You won’t be chasing mysterious leaks or patching liner tears. Just ensure you remove any large rocks or debris before filling, and let the clay work its magic.
The Challenge: Working with Group A and B Soils
Here’s the thing about Group A and B soils—they’re wonderful for drainage but terrible at holding water. If you’ve got sandy, gravelly, or well-draining soil on your property, you’ll need to get creative to keep your pond from draining away like a bathtub.
I learned this the hard way with my first pond attempt. The water disappeared within days, leaving me puzzled and frustrated. Turns out, those beautiful sandy soils that made digging so easy were working against me.
The good news? You absolutely can build a pond in Group A or B soils. You’ll just need to add a barrier. The most reliable solution is installing a pond liner—either flexible rubber liners or rigid preformed options. These create a waterproof seal regardless of what’s happening beneath them.
If you’re working on a larger scale and liners aren’t practical, consider bentonite clay. This natural material expands when wet, creating a seal. You’ll mix it thoroughly with your existing soil and compact it well. Think of it as giving your pond a clay jacket.
Compaction is critical with any pond construction methods in well-draining soils. You can’t just dig and fill. Each layer needs proper tamping to minimize seepage through the soil structure.
The investment in these extra steps pays off. Your pond will hold water reliably, and you’ll avoid the heartbreak of watching your water feature become a muddy depression. Sandy soils aren’t a dealbreaker—they’re just asking for a little extra attention.
Mixed Soil Situations
Here’s the thing about real-world pond building: Mother Nature rarely gives us perfectly uniform soil across an entire property! If your soil testing reveals different hydrologic groups in various spots around your planned pond area, don’t panic. You’re actually in good company.
The smartest approach is to design around your most restrictive soil type. Think of it like planning for the weakest link in a chain. If one corner of your pond sits in sandy Group A soil while another section has clay-heavy Group D, you’ll want to treat the entire pond as if it’s all Group D. This means planning for slower water infiltration and potentially using a pond liner throughout.
I learned this lesson the hard way when I ignored a patch of sandy soil in my first pond project. Water drained right through that section, creating an uneven water line that looked terrible and stressed my plants.
Another practical strategy is adjusting your pond’s footprint to favor the better soil areas. Sometimes shifting your design just ten feet can mean the difference between needing extensive liner work or working with naturally water-retentive soil. Sketch multiple layouts and test each potential location before committing to your final design.
Matching Your Pond Design to Your Soil Reality
Natural vs. Lined Ponds: Making the Right Choice
Your soil group is essentially your pond-building roadmap, telling you whether you can skip the liner aisle or need to budget for one from the start.
If you’re blessed with Group D clay-rich soils, congratulations! You’re in the natural pond sweet spot. These soils hold water beautifully, making them perfect candidates for building a natural pond without additional materials. You’ll save hundreds to thousands of dollars by letting the earth do the work. Just compact your pond base well, and nature handles the rest.
Group C soils sit in the maybe zone. You might get away with a natural approach if you add a thick clay layer to your pond bottom. This middle-ground solution costs less than full liners but requires extra excavation and clay importation. Budget around $2-4 per square foot for clay materials.
Groups A and B? Time to embrace pond liners. These sandy, gravelly soils drain too quickly for natural water retention. While liners add upfront costs ($0.50-2.00 per square foot for basic options, more for premium materials), they’re your guarantee against a disappointing mud puddle. Think of it as insurance for your dream pond.
Here’s my practical advice: test first, decide second. A simple percolation test saves you from expensive do-overs. I’ve seen too many enthusiastic pond builders skip this step, only to watch their water disappear underground within days. Your soil type isn’t just technical information; it’s your budget blueprint.
Adjusting Pond Depth and Size
Once you understand your soil’s drainage characteristics, you can make smarter decisions about your pond’s dimensions. Think of it like choosing the right container for water—some materials need more help than others to keep things balanced.
If your soil test revealed sandy, fast-draining conditions (Group A soils), you’ll want to think deeper rather than wider. Sandy soils lose water quickly, so a deeper pond with a smaller surface area reduces evaporation losses. I learned this the hard way with my first pond attempt—I built a shallow, sprawling pond in sandy soil and spent half my summer refilling it! Aim for at least 18-24 inches deep, or deeper if you’re keeping fish. The extra depth also helps maintain stable water temperatures, which your aquatic plants and fish will appreciate.
On the flip side, if you’re blessed with clay-heavy soil (Group C or D), you’ve got more design freedom. Clay holds water beautifully, so you can go shallower and wider without worrying about constant water loss. A broader, shallower pond creates more planting opportunities around the edges and reflects more sky—always a stunning effect! You might build a pond just 12-15 inches deep for water plants, though fish still prefer deeper zones.
For those in-between soils (Group B), splitting the difference works well. Consider a pond with varied depths—shallow planting shelves around the edges and a deeper central zone. This accommodates different plants while managing your soil’s moderate drainage rate effectively.
Real Stories: Lessons from Fellow Pond Builders
Let me share some real-world stories that show just how much soil type matters when building a pond.
My friend Karen learned this lesson the hard way. She fell in love with a property in Georgia and immediately started planning her dream koi pond. The soil looked perfect, dark and rich, and dug beautifully. She spent three weekends excavating a gorgeous 12-foot by 16-foot pond. When she filled it with water, everything seemed wonderful for about two days. Then the water level started dropping. And dropping. Within a week, her pond was half empty. Turns out her beautiful soil was Group A, sandy and super-draining. She ended up spending twice her original budget on a heavy-duty liner she hadn’t planned for. If she’d done a simple percolation test first, she could have budgeted correctly from the start.
On the flip side, Tom in Ohio did his homework before breaking ground. He tested his soil and discovered he had Group D clay, the water-holder’s dream. He built his 20-foot pond with minimal liner work, just sealing the bottom with compacted clay. Five years later, it still holds water beautifully with almost no seasonal refilling needed beyond evaporation. His secret? He spent one afternoon doing jar tests and talking to his county extension office before he ever picked up a shovel.
Then there’s Linda’s middle-ground story. Her property had Group C soil, decent but not perfect. Instead of fighting it, she designed accordingly. She used a liner but saved money by choosing a lighter grade since the soil provided backup support. She also added a small bog garden on one end that naturally handles overflow during heavy rains. Her pond works with the soil instead of against it.
The takeaway? Fifteen minutes of soil testing can save you months of frustration and hundreds of dollars in fixes.
Here’s the empowering truth: understanding your hydrologic soil group puts you firmly in the driver’s seat of your pond project. You’re not guessing anymore, you’re planning with confidence. I’ve seen too many enthusiastic pond builders rush into digging, only to face heartbreak when their beautiful creation refuses to hold water. But that doesn’t have to be your story.
Taking the time for proper soil assessment upfront saves you time, money, and disappointment down the road. Think of it as your insurance policy for pond success. The good news? You now have a simple, straightforward action plan to follow.
Start by testing your soil using the jar test or ribbon method we covered earlier. Next, check your local NRCS soil maps to confirm what you’re working with. Then, adjust your home pond design accordingly. Got sandy soil? Plan for a liner. Working with clay? You might build naturally. It’s that straightforward.
Remember, there’s no such thing as the wrong soil type, only the wrong approach for that soil. Every property has pond potential when you work with what you’ve got rather than against it. Your dream pond is absolutely achievable. You’ve gained the knowledge, now take that first step. Grab a shovel, collect those soil samples, and start building something beautiful that will bring you joy for years to come.