
Transform Your Backyard with Local Materials: A Natural Pond That Looks Like It’s Always Been There
Transform your backyard into a thriving ecosystem by designing a pond that seamlessly blends with the natural landscape. Begin with a detailed site analysis – map out sunlight patterns, identify natural water flow, and test soil composition to determine the ideal location and shape. Select a position that captures at least 6 hours of daily sunlight while staying clear of large tree roots and utility lines.
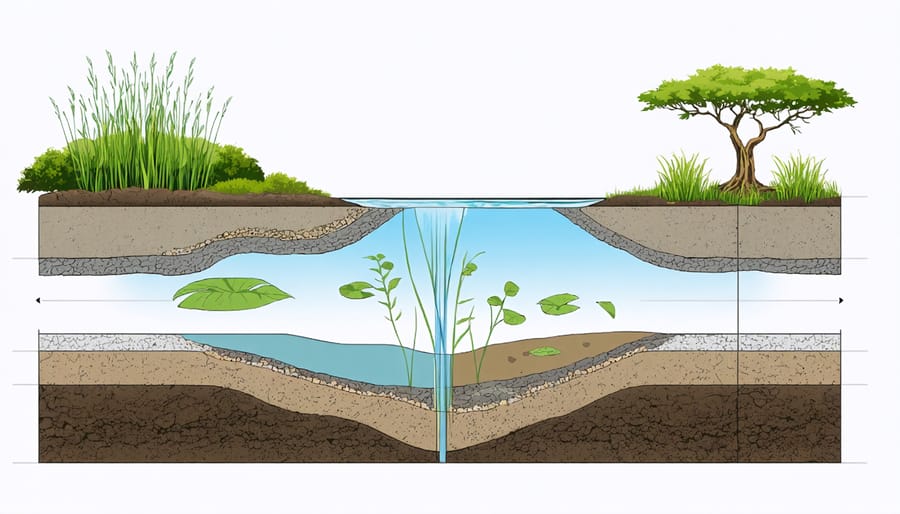
Create your pond’s blueprint by layering three distinct zones: a shallow marsh area (4-8 inches deep) for marginal plants, a middle shelf (12-24 inches) for aquatic vegetation, and a deep center (at least 30 inches) for fish survival during winter. This natural depth progression not only supports diverse wildlife but also ensures proper water circulation and temperature regulation.
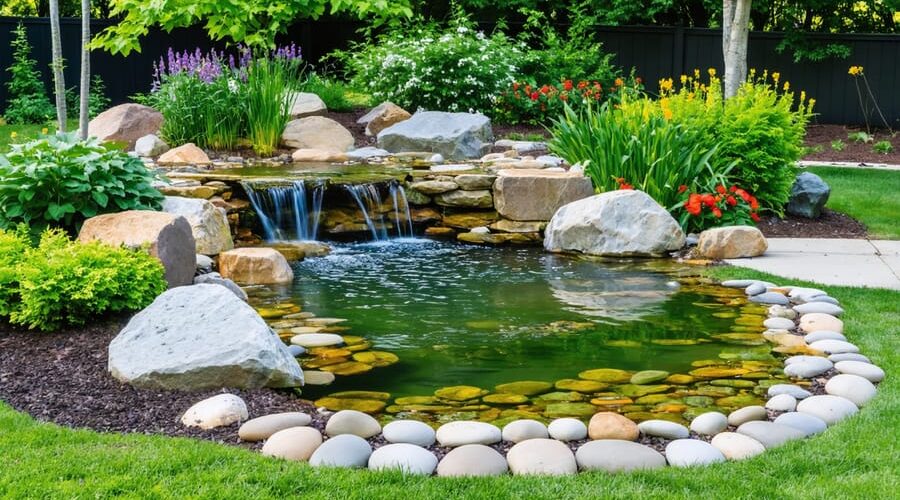
Consider the visual impact from key viewing points around your property. Strategic placement of rocks, native plants, and flowing water features draws the eye and creates a focal point that enhances your entire landscape. Incorporate a combination of flat stones for edging, rounded river rock for natural transitions, and carefully selected water plants to achieve a balance between aesthetics and functionality.
Build with purpose – choose high-quality EPDM rubber liners over cheaper alternatives, install energy-efficient pumps sized correctly for your pond’s volume, and implement proper filtration systems from the start. These foundational decisions determine long-term maintenance requirements and overall pond health, making initial investment in quality materials essential for success.
Surveying Your Local Resources
Native Stone Selection
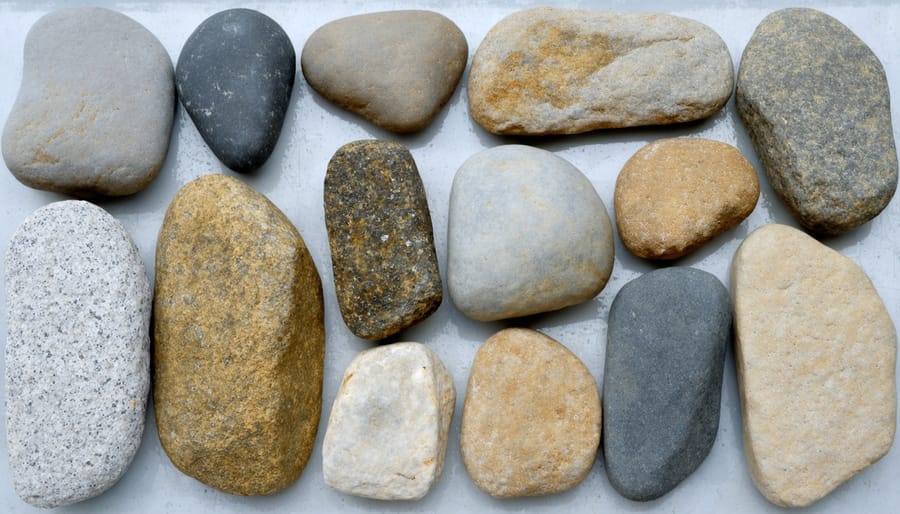
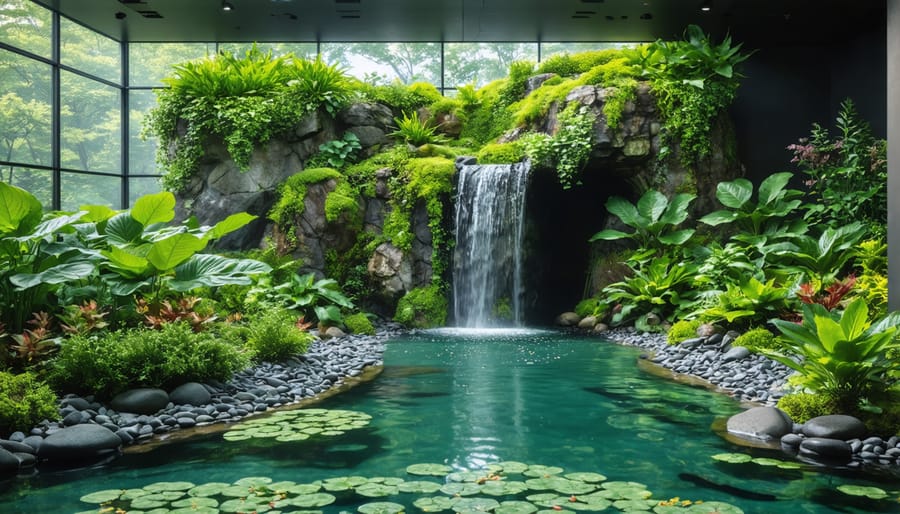
Selecting native stones for your pond adds authenticity and helps create a seamless connection with the surrounding landscape. Start by exploring local quarries, landscaping suppliers, or even your own property for suitable rocks. Look for a mix of sizes, from large boulders for focal points to smaller stones for edges and details.
When choosing stones, opt for those naturally found in your area’s geology. They’ll not only look more authentic but also weather similarly to surrounding rocks. Rounded stones typically work best for pond edges, while flat stones are perfect for creating waterfalls or cascades. Avoid rocks with sharp edges that could tear pond liners.
Before purchasing, inspect each stone carefully. Look for pieces that are dense and solid, without obvious cracks or flaking layers. Limestone and other soft rocks should be avoided as they can affect water chemistry over time. Granite, slate, and sandstone are typically excellent choices for pond construction.
Consider the practical aspects of stone placement. Larger rocks should be positioned first as anchor points, with smaller stones arranged around them. When stacking stones, ensure they’re stable and won’t shift over time. Create natural-looking arrangements by varying stone sizes and avoiding obvious patterns.
Remember to clean your selected stones thoroughly before installation. Remove any dirt or debris, but avoid using harsh chemicals that could leach into your pond water. Position stones so they appear partially submerged or weathered into place, creating the illusion they’ve always been there.
Natural Clay and Soil Analysis
Before starting your pond project, it’s essential to understand what lies beneath your feet. The success of a natural pond largely depends on the soil composition in your area. By testing soil composition, you can determine whether your site has suitable clay content for natural pond lining.
Clay soil is ideal for pond construction because it forms a natural, water-tight barrier. The best soil for ponds contains at least 20% clay content. You can perform a simple jar test at home: fill a clear jar with soil and water, shake it well, and let it settle for 24 hours. The clay particles will form a distinct layer at the top, while sand and silt settle below.
If your soil analysis reveals high clay content, you’re in luck! Natural clay lining is cost-effective and environmentally friendly. However, if your soil lacks sufficient clay, don’t worry – you can still create a natural-looking pond using imported clay or bentonite supplements.
Look for these signs of clay-rich soil:
– Soil feels sticky when wet
– Forms ribbon-like strips when rolled
– Retains shape when molded
– Has a smooth, not gritty, texture
Remember that local geology varies significantly, so what works in one area might not work in another. Consider consulting local pond builders or agricultural extension offices for region-specific advice about soil conditions.
Design Principles for Natural-Looking Ponds
Mimicking Natural Water Features
Creating a pond that mirrors nature’s own designs isn’t just about aesthetics – it’s about crafting a space that feels like it’s always been part of the landscape. Start by observing local streams, ponds, or wetlands in your area. Notice how their edges naturally curve and blend with the surrounding terrain, rather than forming perfect circles or rectangles.
When designing your pond’s edges, incorporate both gentle slopes and steeper banks. A natural-looking pond typically has varying gradients around its perimeter, with some areas gently sloping at a 1:3 ratio (perfect for marsh plants and wildlife access), while others might drop more sharply at a 1:1 ratio, mimicking natural erosion patterns.
Depth variations are equally important. Create different zones within your pond: shallow margins (4-8 inches deep) for marginal plants, mid-depth areas (12-24 inches) for aquatic plants, and deeper sections (30-36 inches) for fish and temperature stability. These varying depths create natural-looking shadows and light patterns on the water’s surface.
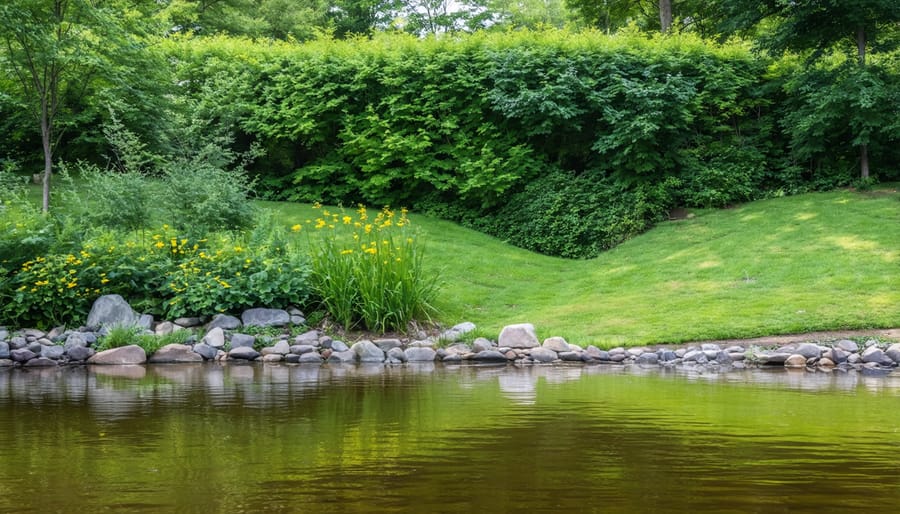
Edge treatment is crucial for achieving a natural look. Use rocks of different sizes, arranging larger ones at the bottom and gradually decreasing size as you work up the banks. Overlap them slightly and position them at various angles to avoid an artificial “lined up” appearance. Incorporate some partially submerged rocks to create natural-looking transitions between water and land.
Consider adding beach-like areas where the edge gradually transitions from dry land to shallow water. These areas not only look natural but also provide essential access points for wildlife. Plant native species around these transitions to help blend the pond into its surroundings.
Remember that nature isn’t perfect – don’t aim for complete symmetry. Irregular shapes with gentle curves and occasional jutting points will look more authentic than geometric designs. Allow some areas to be slightly “messy” with overhanging plants and scattered rocks, just as you’d find in nature.
Integrating Local Plant Life
Creating a natural-looking pond means embracing local flora to enhance its beauty and ecological value. Incorporating native pond plants around your water feature not only creates a seamless transition between the pond and its surroundings but also supports local wildlife and reduces maintenance needs.
Start by researching plants that naturally grow in wet areas in your region. Focus on three main planting zones: marginal plants for the pond edges, deep-water plants for the pond itself, and moisture-loving plants for the surrounding area. This layered approach creates depth and interest while maintaining a natural appearance.
For the pond margins, consider plants like rushes, sedges, and iris varieties that thrive in shallow water. These plants help stabilize the pond edges and provide crucial hiding spots for wildlife. Place them in groups rather than single specimens to create a more natural look.
In the surrounding area, incorporate plants that enjoy moist soil conditions but don’t need to be submerged. Ferns, hostas, and native wildflowers work well here, creating a lush backdrop that helps blend the pond into your existing landscape. Remember to leave some open areas for access and maintenance.
When selecting plants, consider their growth habits and mature sizes. Fast-growing species might need regular maintenance to prevent them from overtaking the pond, while slower-growing varieties often require less attention. Group plants with similar water and sunlight needs together for easier care.
For the best results, plant during spring or early summer, giving roots time to establish before winter. Use aquatic planting baskets for marginal plants, filling them with aquatic compost and topping with gravel to prevent soil from clouding the water. Space plants appropriately to allow for growth while maintaining a natural appearance.
Avoid introducing invasive species, which can quickly take over and harm local ecosystems. Check with local garden centers or extension offices for recommendations on suitable native species for your area.
Construction Techniques with Local Materials
Natural Edge Construction
Creating natural pond edges is essential for achieving that sought-after wild and organic look in your water feature. The key lies in using local materials and native plants to seamlessly blend your pond with the surrounding landscape.
Start by collecting stones of varying sizes from your area or a local supplier. Larger rocks work well as anchor points, while smaller ones fill gaps and create natural-looking transitions. Lay the stones in irregular patterns, avoiding straight lines or uniform spacing. Think about how stones would naturally settle in a wild pond – some partially submerged, others tilted at slight angles.
When placing vegetation, consider three distinct zones: underwater, marginal, and bank areas. In the underwater zone, use aquatic plants like water lilies and submerged oxygenators. The marginal zone, where water meets land, is perfect for marsh marigolds and rushes. On the bank, plant moisture-loving perennials that will drape over rocks and soften edges.
Create varying depths along the edge, incorporating both gentle slopes and steeper sections. This diversity not only looks more natural but also provides different habitats for wildlife. Consider adding small beach areas with pebbles or gravel, which create safe access points for birds and beneficial insects.
Layer your plantings by height, with taller species at the back and shorter ones in front. This creates depth and interest while maintaining a natural appearance. Remember to leave some areas more sparsely planted than others – nature isn’t uniformly dense.
For added authenticity, incorporate fallen logs or driftwood pieces along the edges. These provide excellent habitats for beneficial insects and add character to your pond. Just ensure any wood you use is safe for aquatic environments and won’t leach harmful substances into the water.
Bottom Substrate Solutions
Creating a natural-looking pond bottom starts with choosing the right substrate materials, and local gravels and sand are perfect for this purpose. Not only are they cost-effective, but they also help create a more authentic aquatic environment that mimics natural ponds.
Start with a base layer of coarse gravel (about 1-2 inches in diameter) spread evenly across the bottom. This creates a stable foundation and provides beneficial bacteria with plenty of surface area to colonize. Add a middle layer of medium-sized gravel (roughly 1/2 to 1 inch) to fill in the gaps and create a more uniform surface.
For the top layer, use a mixture of fine gravel and coarse sand. This combination helps anchor aquatic plants and provides a natural-looking finish. Aim for a total substrate depth of 2-3 inches in most areas, with deeper pockets of 4-6 inches in places where you plan to plant aquatic vegetation.
When sourcing materials, visit local quarries or landscape suppliers to find native stone types that match your region’s natural waterways. Avoid using limestone or other materials that might affect water chemistry. Always wash your gravel and sand thoroughly before installation to remove dust and debris that could cloud your pond water.
Create gentle slopes with your substrate from the edges toward the center of the pond. This natural gradient helps prevent gravel from sliding and provides different depth zones for various aquatic plants and wildlife. In deeper areas, you might want to add slightly larger stones to create interest and hiding spots for fish.
Remember to reserve some extra substrate materials for future maintenance or adjustments as your pond settles and matures.
Natural Filtration Systems
Creating effective natural pond filtration systems doesn’t require expensive equipment – nature provides excellent filtering materials right in your backyard! Let’s explore how to build a biological filter using readily available materials.
Start with a basic three-zone system: mechanical filtration, biological filtration, and plant filtration. For mechanical filtration, layer coarse gravel at the bottom of your filter area, followed by progressively finer grades of gravel and sand. This catches larger debris before it enters your pond.
For biological filtration, incorporate lava rock or bio-balls – these porous materials provide excellent surfaces for beneficial bacteria to colonize. These bacteria break down harmful compounds and keep your water clean. Local stone or recycled glass can work well too.
Plants play a crucial role in natural filtration. Water lilies, cattails, and rushes not only look beautiful but also absorb excess nutrients. Create planted zones using mesh baskets filled with aquatic soil and gravel. Position these strategically around your pond’s edges where water flows through them.
Consider creating a small waterfall or stream feature that incorporates these filtering materials. As water flows through different layers, it gets naturally cleaned. Position larger rocks to direct water flow and create oxygen-rich areas where beneficial bacteria thrive.
Remember to maintain proper water flow – aim for cycling your pond’s entire volume through the filter system every two hours. This keeps the water crystal clear and your pond ecosystem healthy without relying on chemical treatments.
Maintenance Considerations
A well-designed pond requires regular attention to maintain its beauty and ecological balance. Maintaining your natural pond doesn’t have to be complicated, but it does require consistent care throughout the seasons.
Regular debris removal is essential, especially during fall when leaves tend to accumulate. Install a pond net before autumn to catch falling leaves, or use a pond skimmer to remove debris before it sinks. In spring, you’ll need to clean out any dead plant material and check for winter damage to the liner or edging.
Water quality monitoring should be done monthly. Test for pH levels, ammonia, and nitrates to ensure a healthy environment for fish and plants. Add beneficial bacteria regularly to help break down organic matter and maintain crystal-clear water. During summer months, check water levels weekly and top up as needed, considering that evaporation will be higher.
Plant maintenance is another crucial aspect. Trim aquatic plants as needed, removing dead or yellowing leaves. Divide overcrowded plants every few years to prevent them from taking over the pond. Some marginal plants may need cutting back in late autumn to prepare for winter dormancy.
If you have fish, feed them appropriately according to the season and monitor their health regularly. In winter, use a pond heater or floating de-icer to maintain a small opening in the ice for gas exchange.
Equipment maintenance is vital for longevity. Clean filters monthly, and check pumps and UV clarifiers for proper operation. Replace UV bulbs annually for optimal performance. Inspect the pond liner periodically for damage or leaks, especially after severe weather events.
Keep surrounding areas well-maintained by trimming grass edges and removing invasive weeds. This not only looks better but also prevents organic matter from entering the pond system.
Incorporating local materials into your pond design not only creates a more natural and harmonious landscape but also offers significant cost savings and environmental benefits. By using native rocks, plants, and other materials from your area, you’ll create a water feature that truly belongs in its surroundings while supporting local ecosystems. The satisfaction of building a pond with materials you’ve thoughtfully sourced from your environment adds a personal touch that can’t be replicated with store-bought items alone.
Remember that every successful pond project starts with careful planning and a willingness to work with what nature provides. Whether you’re collecting stones from your property or incorporating fallen logs as natural accents, each local element brings character and authenticity to your water garden. Don’t be afraid to get creative and experiment with different combinations of materials – sometimes the most beautiful features emerge from working with what’s readily available.
Now that you have the knowledge and inspiration to create your own naturally beautiful pond, it’s time to start your journey. Take that first step today, and watch as your vision comes to life, one local material at a time.