
Watch Your Pond Banks Crumble? Here’s How to Stop Shoreline Erosion for Good
Watch for warning signs like crumbling banks, exposed tree roots, and muddy water after rain—these tell you erosion is already stealing your pond away, inch by inch. I learned this the hard way when a section of my own pond bank collapsed after a spring storm, taking ornamental grasses and several feet of shoreline with it. The good news? You can stop shoreline erosion and even reverse damage with the right combination of plants, materials, and techniques tailored to your specific situation.
The key is understanding that erosion happens when water movement, rainfall, and soil type work against unprotected banks. Waves lap away at bare soil, rain washes loose dirt into the water, and foot traffic weakens root systems that normally hold everything together. Every pond faces unique challenges based on its size, slope, soil composition, and how much wave action it experiences.
This guide walks you through everything from quick vegetation fixes you can plant this weekend to more permanent structural solutions like riprap and coir logs. Whether you’re working with a gentle slope perfect for native plants or a steep bank that needs serious reinforcement, you’ll find practical approaches that match your skill level and budget while creating a beautiful, stable shoreline that lasts for years.
Why Your Pond’s Edges Are Washing Away
The Warning Signs You Shouldn’t Ignore
Before you can tackle erosion, you need to recognize it’s happening. I learned this the hard way when I ignored subtle changes around my pond for months, only to watch a chunk of my favorite planting bed slide into the water during a heavy rain.
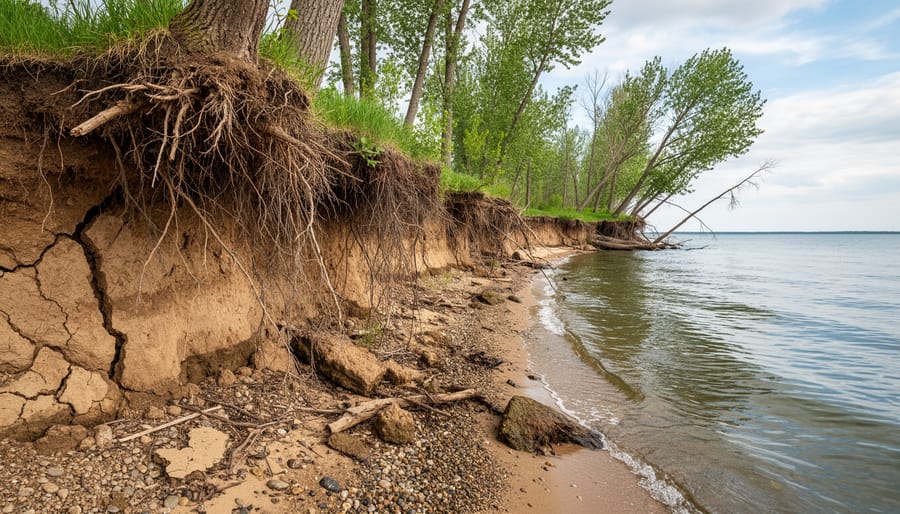
Start by checking your water clarity after rainfall. Cloudy, muddy water often signals soil washing in from your banks. Walk around your shoreline and look for exposed tree or plant roots hanging over the edge like gnarled fingers. These roots should be tucked safely underground, supporting your plants and stabilizing soil.
Watch for soil slumping, those telltale crescent-shaped cracks or chunks of bank that look ready to give way. Compare your pond’s current shape to photos from previous seasons. Is your shoreline retreating? Are certain areas becoming noticeably wider?
Take note of disappearing plantings too. If edge plants that once thrived are now listing sideways, falling in, or simply vanishing, erosion is likely undermining their root systems. A healthy pond ecosystem depends on stable banks, so catching these warning signs early makes repairs much easier and less expensive than waiting until major damage occurs.
Natural Solutions That Protect and Beautify
Strategic Plant Selection for Erosion Control
Choosing the right plants is like assembling a dream team for your shoreline – each one brings unique strengths to hold your soil in place. I learned this lesson after watching my first pond bank crumble before discovering these natural erosion fighters!
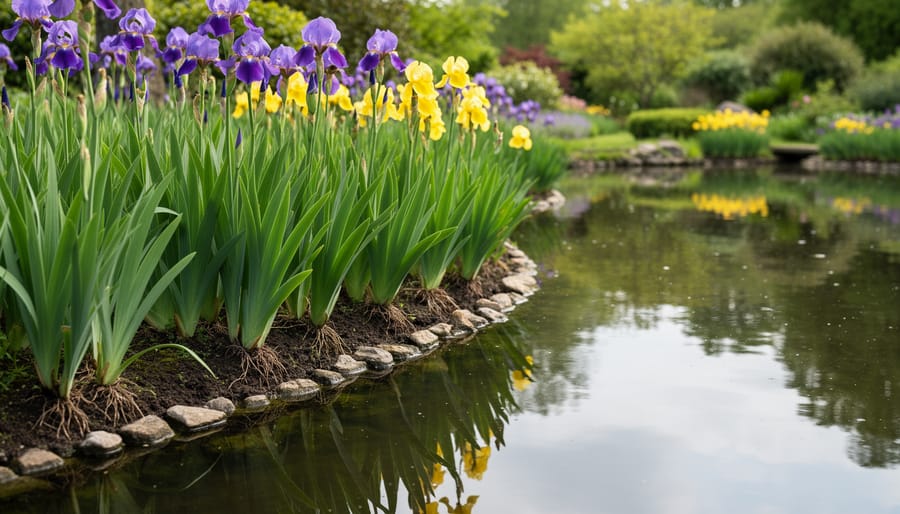
Let’s start with the superstars. Cattails are absolute champions with root systems that spread horizontally and dive deep, creating a living net that grips soil like nothing else. They thrive in water depths from waterlogged soil up to 12 inches deep. Blue flag iris adds both beauty and brawn, with thick rhizomes that knit together to form a stabilizing mat – perfect for shallower areas with 0-6 inches of water. Rushes, particularly soft rush and corkscrew rush, work wonderfully in transition zones where land meets water, tolerating everything from moist soil to 4 inches of standing water.
Sedges deserve special mention because they’re incredibly versatile. Their fibrous roots create dense mats that prevent soil washout while working alongside natural filtration systems to improve water quality. Varieties like tussock sedge handle colder climates beautifully, while others prefer warmer zones.
Here’s my planting strategy: Create three zones moving from deep to shallow water. In the deepest section (6-12 inches), plant cattails 18-24 inches apart. In the middle zone (3-6 inches), space iris 12-18 inches apart. Along the bank in moist soil, place sedges and rushes 12 inches apart.
Always plant in spring or early fall when roots establish best. Choose native species for your climate – they’ll require less maintenance and provide better habitat for local wildlife while protecting your shoreline investment.
Creating a Vegetative Buffer Zone
Creating a vegetative buffer is one of the most natural and attractive ways to protect your shoreline. I’ve found that establishing riparian buffer zones not only stops erosion but also brings incredible wildlife to your pond.
Start by assessing your slope. For gentle banks, you can plant directly, but steeper areas might need temporary erosion control fabric while plants establish. Begin soil preparation by removing any loose debris and adding a layer of organic compost to give your plants the best start.
The key is creating zones that mirror nature. At the water’s edge, place emergent plants like rushes and sedges. Their roots grow horizontally, creating an incredible network that anchors soil. Plant these about 6-12 inches apart in staggered rows rather than straight lines, which looks more natural and provides better coverage.
Moving up the bank, transition to moisture-loving perennials and native grasses. These should be spaced 12-18 inches apart. I always plant in a zigzag pattern, which helps water slow down as it flows toward the pond.
For the upper bank, choose deep-rooted shrubs and ornamental grasses. Space these 2-3 feet apart to allow for mature growth.
Water everything thoroughly after planting and maintain moisture for the first season. Within six months, you’ll notice the difference. Within a year, your living buffer will be working hard to protect your shoreline while looking absolutely beautiful.
Using Beneficial Stones and Gravel
Rock and gravel offer a beautiful, natural way to protect your shoreline while creating that peaceful, stream-like aesthetic we all love. I discovered this approach after battling erosion at my own pond, and honestly, the transformation was remarkable!
Start with the right sizing. For the underwater foundation layer, use larger stones (4-8 inches) to create a stable base. These workhorses won’t budge when water levels fluctuate. Next comes your middle layer of river rock (2-4 inches), which fills gaps and adds structural integrity. Finally, top everything with smaller pea gravel or decorative stones for that polished look.
Here’s the key to proper placement: work from the waterline upward, overlapping each layer like fish scales. This creates a protective armor that water simply slides over instead of eroding underneath. Aim for a gentle slope rather than a steep drop-off, which helps stones settle naturally and looks more organic.
The magic happens when you integrate rocks with plants. Tuck moisture-loving plants like iris or cardinal flower between larger stones near the waterline. Their roots will weave through the rock layer, essentially “gluing” everything together while softening the appearance. I like to cluster three to five plants in strategic spots rather than spacing them evenly, which creates a more natural, unplanned look.
Don’t forget to extend your rock barrier at least 12 inches above your typical high-water mark. This prevents waves from sneaking behind your protection during heavy rains or windy days.
Structural Solutions for Stubborn Erosion Problems
Fiber Rolls and Erosion Mats That Actually Work
If you need something more heavy-duty than plants alone, fiber rolls and erosion mats offer fantastic middle-ground solutions. I’ve watched these work wonders on slopes that seemed beyond hope, and the best part? They’re completely natural and eventually become part of your landscape.
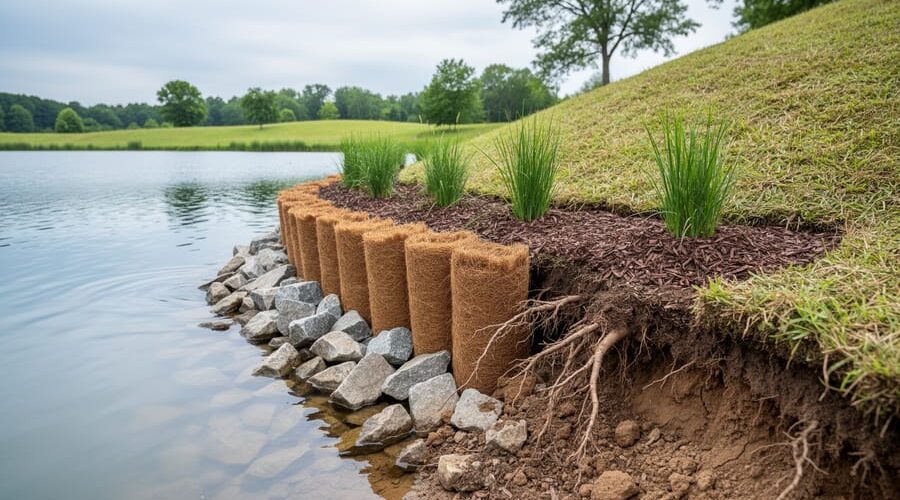
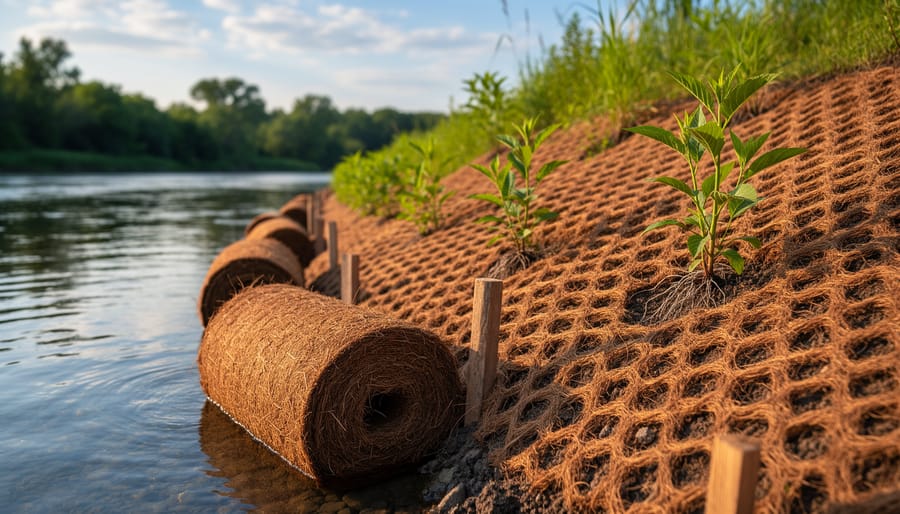
Coir logs, also called coconut fiber rolls, are your workhorses here. These cylinder-shaped rolls come in various diameters, typically 9 to 20 inches, and you stake them along your shoreline where erosion is happening. They immediately stop soil from washing away while creating perfect pockets for planting. I like positioning them at the waterline and tucking native plants right into the fiber. As the plants establish roots over the next growing season, they knit everything together naturally.
Jute matting works beautifully on gentler slopes. This open-weave fabric lies flat against the soil, holding everything in place while seeds germinate and roots spread. The installation is straightforward: prepare your slope, roll out the matting, secure it with landscape staples every foot or so, and plant right through the weave. Within six months, you’ll barely notice the mat as vegetation takes over.
The magic happens during that first year. These biodegradable materials typically last 2-4 years, which is exactly the window your plants need to establish deep, stabilizing root systems. By the time the fiber decomposes, you’ve got a living, breathing erosion control system that actually gets stronger over time. It’s nature doing what it does best, with a little helpful boost from you.
Building Gentle Retaining Solutions
Sometimes your pond banks need a little more persuasion to stay put, especially on steeper slopes where plants alone can’t quite do the job. That’s where gentle retaining solutions come in—think of them as giving your shoreline a supportive hug rather than a concrete straitjacket.
Low-profile timber edging works beautifully for gradual slopes. You’re basically creating a subtle terrace using rot-resistant lumber like cedar or black locust. Sink pressure-treated 4×4 posts about 18 inches into the ground, spacing them every 4-6 feet, then attach 2×6 planks horizontally. The key word here is low-profile—we’re talking 12-18 inches of height maximum. This gives you just enough retention to hold soil and allow plants to establish without looking fortress-like. I’ve used this approach on three different pond edges, and it blends almost invisibly once vegetation fills in.
Stacked stone walls offer that timeless, natural aesthetic pond lovers adore. For slopes under 3 feet, you can dry-stack flat stones (no mortar needed) by slightly tilting each stone backward into the slope. This creates drainage and stability. Start with your largest stones as a foundation and work upward, fitting stones together like a puzzle.
For steeper banks requiring walls over 3 feet or dealing with significant water pressure, pond-safe concrete solutions exist, but here’s my honest advice: call a professional. Structural walls require proper footings, drainage systems, and engineering knowledge. Getting it wrong means potential collapse or toxic runoff into your pond—neither worth the risk. Save your DIY energy for projects where mistakes won’t sink your whole shoreline.
Creating Terraced Banks
If you’re dealing with a steep, sloping shoreline, creating terraced banks can be a game-changer for erosion control. Think of terraces like stair steps carved into your slope—each level catches and slows down rushing water, giving it time to soak into the soil instead of washing it away.
Start by mapping out your levels. For gentle slopes, two or three terraces usually do the trick. Each terrace should be 12-18 inches wide, creating flat planting zones. Use a shovel or spade to cut horizontal shelves into the slope, working from bottom to top. The vertical face of each step should angle slightly backward, not straight up—this prevents collapse.
Pack down the soil firmly on each level, and consider edging terraces with rocks, logs, or coconut coir rolls for extra stability. I learned this the hard way when my first terrace attempt washed out after a heavy rain because I hadn’t compacted the soil enough!
Once your terraces are shaped, plant them immediately with deep-rooted ground covers or native grasses. The roots will knit the soil together, turning your terraces into permanent erosion barriers. For extra protection on the vertical faces, tuck in some erosion control fabric until plants establish.
Prevention Strategies That Save You Headaches Later
Managing Water Flow and Runoff
One of the sneakiest causes of shoreline damage is water flowing directly into your pond from downspouts, driveways, or sloped areas. That concentrated rush acts like a miniature waterfall, constantly battering the same spot and carving away your carefully planned edge.
Start by redirecting your downspouts away from the pond using extensions or underground pipes. Channel that water to planted areas or create simple swales—shallow, vegetated ditches that slow down and spread out the flow. I learned this the hard way when my neighbor’s driveway runoff carved a gully right through my favorite bog planting!
Consider installing a rain garden between your pond and any water sources. These shallow depressions planted with moisture-loving plants absorb runoff naturally, filtering it before it reaches your pond. They’re surprisingly easy to create and look beautiful too.
Inside your pond, fountain and aerator placement matters more than you’d think. Position fountains away from shorelines to prevent constant wave action against banks. Proper pond aeration is wonderful for water quality, but avoid placing aerators where their bubbling action creates waves that repeatedly wash against vulnerable edges. Center placement works best for protecting your shores while maintaining excellent oxygenation.
Maintaining Proper Pond Levels
Here’s something I learned the hard way during my first year of pond keeping: water levels that bounce up and down like a yo-yo are one of the sneakiest causes of shoreline damage. When water levels drop, your banks are left exposed and vulnerable. When they rise again, the waterline hits unprotected soil, and erosion accelerates with each cycle.
Think of it like this – constant fluctuations create a “bathtub ring” effect where the same strip of shoreline gets hammered repeatedly. The soil loosens, plants struggle to establish roots, and before you know it, chunks of your bank are sliding into the pond.
Maintaining consistent water levels is easier than you might think. Start by checking for leaks in your pond liner or along outlet structures. Install an overflow system to handle heavy rainfall without dramatic level changes. During dry spells, top up your pond regularly rather than letting it drop significantly before refilling.
If you live in an area with distinct wet and dry seasons, consider installing an automatic water leveler – a simple float valve device that maintains your target depth. It’s like cruise control for your pond! This consistency gives your erosion-control plants the stable conditions they need to thrive.
Choosing the Right Approach for Your Pond
Choosing the right erosion control method doesn’t have to feel overwhelming. Think of it like picking the right plant for a shady corner—you need to consider what you’re working with and what makes sense for your situation.
Start by honestly assessing your pond’s needs. For small ponds under 1,000 square feet with minor erosion, simple solutions like native plantings or coir logs work beautifully and won’t break the bank. I started with just coconut fiber mats on one troublesome slope, and within a season, the roots had everything locked down tight.
If you’re dealing with moderate erosion on a medium-sized pond, combination approaches deliver the best results. Try pairing riprap or live stakes along the most vulnerable areas with plants filling in gentler slopes. This gives you immediate protection while nature takes over the long-term work.
Large ponds or severe erosion situations need more robust solutions. Gabion baskets, geotextile fabrics, or professional-grade riprap become necessary investments. Don’t skimp here—fixing a failed solution costs more than doing it right initially.
Climate matters too. In regions with freeze-thaw cycles, you need erosion control that can flex and move. Plant-based solutions might struggle in harsh winters, making rock or fabric barriers smarter choices. Hot, dry climates favor drought-tolerant native plants over water-hungry species.
Consider your maintenance preferences honestly. Love getting your hands dirty and watching things grow? Plant-heavy solutions will bring you joy. Prefer set-it-and-forget-it approaches? Structural solutions like rocks and fabrics need less ongoing attention.
Budget-conscious? Phase your project. Tackle the worst erosion spots first with immediate solutions, then gradually expand. My own pond took three seasons to complete, and it turned out better than if I’d rushed everything at once.
You’ve got this! Shoreline erosion might seem overwhelming when you first notice that crumbling bank or muddy water, but here’s the truth: it’s completely solvable. The strategies we’ve covered aren’t complicated magic tricks—they’re practical solutions that countless pond owners have used successfully. The key is taking action now rather than waiting. That small section of exposed soil today can become a major washout tomorrow, costing you far more time, money, and heartache to fix.
Don’t feel like you need to tackle your entire shoreline at once. Pick one problem area—maybe that spot where you notice the most damage or where you spend the most time enjoying your pond. Start there. Plant some native grasses, add a few rocks, or try a simple coir log along just ten or fifteen feet of bank. You’ll be amazed how quickly you see results and how much confidence that first success gives you.
Remember, every stable shoreline you see around beautiful ponds started with someone taking that first step. Your pond can have that same protected, lush, healthy edge. With a little planning and effort, you’ll soon be relaxing by crystal-clear water, watching wildlife thrive along banks that stay right where they belong.