
Stop Pond Floods Before They Start: Designing Overflow Structures That Actually Work
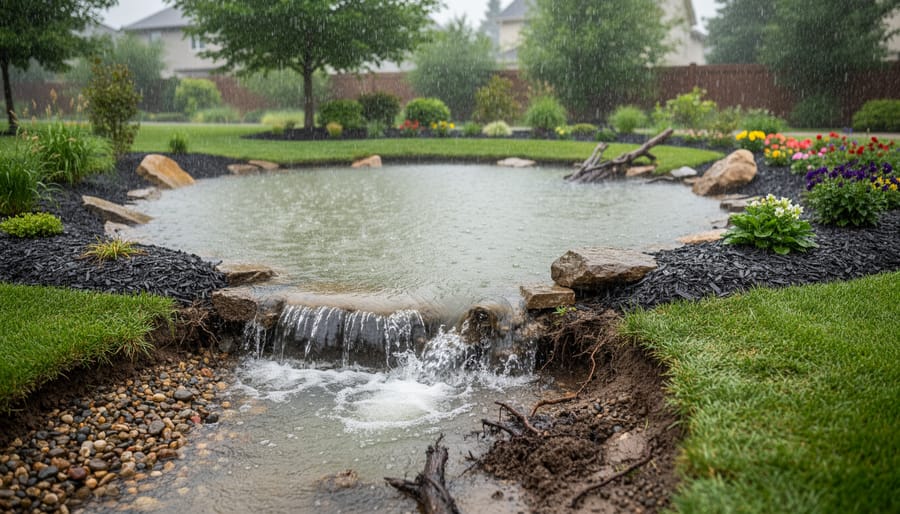
Picture this: a sudden summer storm dumps three inches of rain on your property in an hour, and your beautiful pond transforms into a raging torrent that tears through your carefully landscaped banks, washing away fish, plants, and months of hard work. This nightmare scenario happens to unprepared pond owners every year, but it’s completely preventable with the right overflow structure.
Whether you’re planning your pond construction or upgrading an existing water feature, understanding overflow structures is essential to protecting your investment. These simple yet crucial systems control excess water during heavy rainfall, directing it safely away from your pond while maintaining the water level you’ve worked so hard to establish.
Think of an overflow structure as your pond’s safety valve. Just as a pressure cooker needs a release mechanism to prevent disaster, your pond needs a controlled way to handle surplus water. Without one, rising water levels can erode banks, damage liners, flood surrounding areas, and turn your peaceful oasis into a muddy mess.
The good news? Installing an effective overflow system doesn’t require an engineering degree or a massive budget. From simple standpipes to elegant spillways, there’s a solution for every pond size, style, and skill level. The key is choosing the right design for your specific situation and understanding how to maintain it properly throughout the seasons.
Why Your Pond Needs an Overflow Structure (Even If You Think It Doesn’t)
I learned this lesson the hard way during what locals still call “the big storm of 2019.” I’d been enjoying my backyard pond for three years without any drainage issues, so when my neighbor mentioned adding an overflow pipe, I brushed it off. Then came that torrential downpour—nearly 150mm in just six hours. By morning, my beautiful pond had transformed into a muddy disaster zone. The overflow had carved its own path straight through my wife’s prize flower bed, and we lost half our koi population when they literally washed over the edge into the lawn.
Here’s what most pond owners don’t realize: it’s not the average rainfall that gets you. Your pond can handle those gentle showers just fine. The problem strikes during those unexpected heavy downpours that seem to happen more frequently these days. Without a proper overflow structure, that excess water has to go somewhere, and nature doesn’t care about your carefully planned landscape design.
When water overtops an uncontrolled pond edge, it creates channels through erosion. These channels deepen with each storm, eventually destabilizing your pond liner or banks. Fish can escape or get stranded in shallow overflow areas where they’re vulnerable to predators and temperature stress. Your aquatic plants get uprooted, and sediment washes in, clouding the water for weeks.
Think of an overflow structure as insurance for your pond investment. Just like implementing broader climate resilience strategies for your water feature, a well-designed overflow protects everything you’ve worked to create. It controls where excess water exits, maintains consistent water levels, and prevents the erosion that can turn a weekend project into a costly renovation. Trust me, installing one proactively is far easier than repairing storm damage.
Understanding the Three Main Types of Pond Overflow Structures
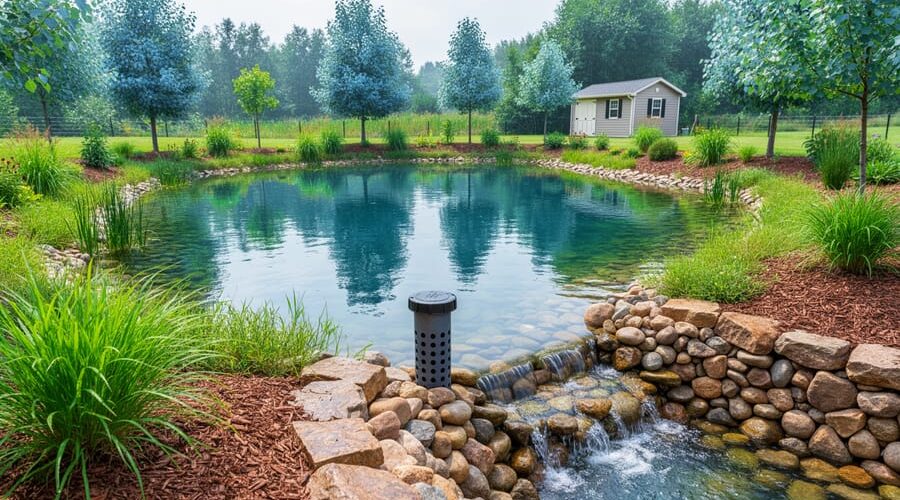
Pipe Spillways: The Underground Solution
If you’re working with a smaller backyard pond, pipe spillways might be your perfect underground solution. Think of them as a secret escape route for excess water—a buried pipe that quietly channels overflow away from your pond before it becomes a problem.
Here’s how they work: you install a pipe at your desired maximum water level, and when heavy rains push the water above that point, it simply flows through the pipe to a designated drainage area. It’s beautifully simple and keeps your pond looking natural since there’s no visible concrete structure interrupting the view.
I installed one on my quarter-acre pond five years ago, and it’s been wonderfully low-maintenance. The key is getting the pipe diameter right—typically 4 to 6 inches works well for most backyard ponds, though larger ponds need bigger pipes. You’ll want to position the inlet slightly below your desired water level and ensure the pipe slopes downward at least 1 percent to keep water flowing smoothly.
Pipe spillways work best for ponds holding less than half an acre of water and where you have a good spot downhill for the water to exit. They’re affordable, discreet, and perfect when you want function without compromising your pond’s natural beauty.
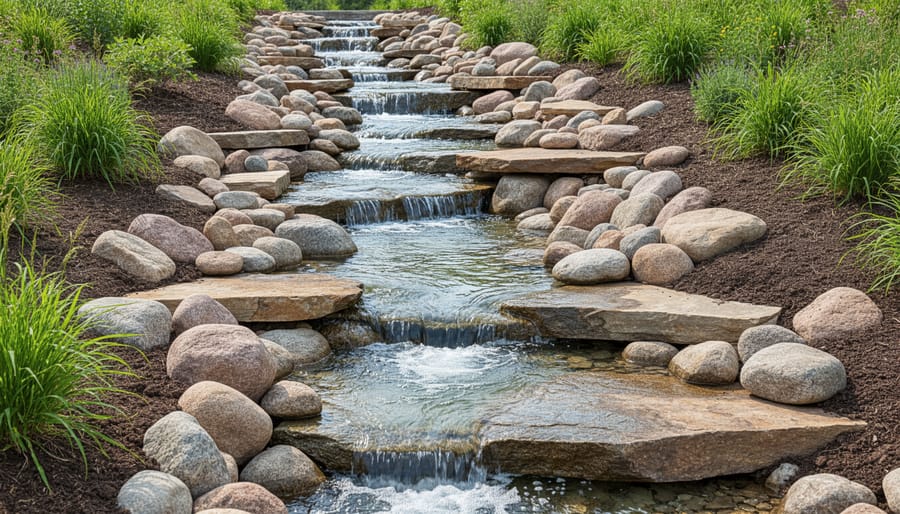
Surface Spillways: The Natural Approach
Surface spillways are my favorite overflow solution because they work with nature rather than against it. Think of them as gentle streams that activate only when your pond needs them—beautiful and functional!
These open channels guide excess water along a carefully shaped pathway, mimicking how water naturally flows across landscapes. Unlike pipes hidden underground, surface spillways become a design feature. I’ve seen gorgeous examples lined with river rock that look like natural creek beds, adding charm to the property even when dry.
The key to success is proper grading. Your spillway channel needs a gradual slope—typically 2-4%—to move water efficiently without causing erosion. Line the channel with erosion-resistant materials like stone, concrete pavers, or heavy-duty geotextile fabric topped with rock. Width matters too; a spillway that’s too narrow will overflow its own banks during heavy storms, defeating the purpose.
Surface spillways work wonderfully for ponds with nearby low-lying areas where water can be safely directed. They’re perfect if you want overflow management that doubles as a landscape feature. The beauty is watching them transform from decorative dry creek beds into flowing streams during rainstorms—it’s like having two water features in one! Just ensure the discharge area can handle the volume without creating erosion problems downstream.
Emergency Spillways: Your Backup Plan
Think of your emergency spillway as your pond’s insurance policy—you hope you’ll never need it, but you’ll be incredibly grateful it’s there when a major storm hits. While your primary overflow handles everyday water management, the emergency spillway kicks in during those heavy downpours that exceed normal capacity.
I learned this lesson the hard way during an unexpected spring deluge. My pond’s main spillway couldn’t keep up, and water started creeping toward the dam’s edge. Thankfully, I’d installed an emergency spillway that activated just in time, directing the excess flow safely away from the structure.
Position your emergency spillway at least six inches higher than your primary outlet, but lower than the top of your dam or berm. This creates a graduated response system. Place it at the opposite end from your main spillway when possible, which helps distribute erosion pressure and provides redundancy if one pathway becomes blocked by debris.
The beauty of emergency spillways is their simplicity—they’re essentially wide, shallow channels that only engage during extreme events. Line yours with erosion-resistant materials like riprap or reinforced turf to handle intense flow. Size it generously; better too wide than discovering it’s inadequate during a crisis when modification isn’t an option.
Calculating the Right Size for Your Pond’s Overflow
Getting the sizing right for your pond overflow is honestly easier than you might think. I remember stressing over complicated engineering formulas when I built my first pond, only to discover that a few simple calculations and common-sense rules got me exactly where I needed to be.
Let’s start with the basics. Your overflow needs to handle whatever water comes into your pond during heavy rain. That means considering three main factors: your pond’s surface area, your watershed area (the land that drains into your pond), and how hard it rains in your region.
Here’s a simple approach that works beautifully for most backyard ponds. First, calculate your pond’s surface area in square feet. For a rectangular pond, just multiply length times width. For irregular shapes, break it down into smaller sections and add them up. Next, identify your watershed area—this is any ground that slopes toward your pond. In many backyard situations, this might just be your pond itself, but if you’re at the bottom of a slope, you’ll need to account for that drainage too.
Now for the practical part. A good rule of thumb is to size your overflow to handle at least 1 inch of rain per hour over your combined pond and watershed area. So if your pond is 200 square feet and your watershed adds another 300 square feet, you’re working with 500 total square feet. One inch of rain on 500 square feet equals roughly 260 gallons per hour that needs somewhere to go.
Check your local rainfall records to see typical storm intensities. Most areas experience 1-2 inches per hour during heavy storms, but some regions see much more. I always recommend designing for your area’s worst-case scenario from the past decade—better safe than soggy.
For overflow pipe sizing, a 3-inch diameter pipe handles about 100 gallons per minute, while a 4-inch pipe manages around 200 gallons per minute. These numbers give you a starting point, though your actual flow depends on pipe length and slope.
Remember, incorporating proper rain pond design principles from the beginning saves headaches later. When in doubt, go slightly bigger—an overflow that’s a bit oversized won’t cause problems, but one that’s too small definitely will.
Key Design Elements That Make Overflow Structures Flood-Resilient
Setting the Right Overflow Height
Getting the overflow height just right is one of those details that can make or break your pond’s performance during heavy rains. Think of it like Goldilocks—you don’t want it too high or too low, but just right!
Here’s the sweet spot: position your overflow structure about 1-2 inches below your desired pond water level. This creates what’s called freeboard, which is essentially a safety buffer zone between your normal water level and the top edge of your pond. During a typical rainstorm, your pond can rise into this space without spilling over the sides and potentially eroding your carefully landscaped edges.
I learned this lesson the hard way when my first pond’s overflow sat too high. After one good thunderstorm, water rushed over the liner edge instead of through the overflow, washing away my favorite plantings and exposing the liner. Not pretty!
For most backyard ponds, maintaining 2-4 inches of total freeboard works wonderfully. If you live in an area prone to sudden downpours, lean toward the higher end of that range. The overflow lip itself should be level—use a carpenter’s level during installation to ensure water flows evenly across the entire structure rather than channeling through one spot, which could cause erosion issues downstream.
Erosion Protection and Stabilization
Once your overflow structure is in place, protecting it from erosion is crucial for long-term success. Water flowing through your spillway carries tremendous force, and without proper stabilization, it can quickly wash away soil and undermine your entire pond structure.
Rock is your best friend here. Riprap, which is just a fancy term for angular stones placed along the overflow channel, works beautifully to dissipate water energy. Start at the outlet and extend the rock lining at least three to four feet downstream. I learned this the hard way when my first overflow created a gully within weeks because I skimped on the rock coverage. Size matters too—stones should be baseball to grapefruit sized, heavy enough that flowing water won’t budge them.
For a more natural look, combine rocks with vegetation. Deep-rooted plants like sedges, rushes, and native grasses anchor soil while adding beauty. Plant them between and around your rocks once the structure is stable. This living reinforcement becomes stronger over time as roots intertwine and spread.
Geotextile fabric underneath your rocks prevents soil migration while allowing water to drain. Simply lay the fabric in your overflow channel before placing stones. It’s an affordable insurance policy that takes minutes to install.
Consider adding a splash pad where water exits your overflow—a flat area lined with rocks where fast-moving water can slow down and spread out. This simple addition, combined with thoughtful drainage pond design, prevents downstream erosion and creates a lovely natural feature.
Debris Management Features
Your overflow structure works hard during storms, but it can’t do its job if it’s clogged with leaves, twigs, and garden debris. Let me share some practical ways to keep water flowing freely while protecting your fish friends.
The simplest solution is a trash rack—essentially a grid of bars or heavy-duty mesh installed at your spillway entrance. I learned this lesson the hard way when autumn leaves completely blocked my first overflow system! Now I use stainless steel or powder-coated aluminum bars spaced about 2-3 inches apart. This spacing is the sweet spot: wide enough to prevent small debris from accumulating, yet narrow enough to catch larger branches that could cause real blockages.
For smaller ponds, consider angled screens instead of vertical ones. When positioned at a 45-degree angle, debris tends to slide off rather than building up against the screen. This self-cleaning design has saved me countless trips outside during storms to clear blockages manually.
Here’s an important tip: make your trash rack larger than your overflow opening. If your spillway is 12 inches wide, install an 18-inch rack. This spreads out the water flow, reducing the chance of suction that could trap fish against the screen. Always use materials with smooth edges—no sharp wire mesh that could injure curious koi or goldfish.
Remember to position debris guards where you can easily reach them for periodic cleaning. During heavy leaf-fall seasons, you’ll want to check them weekly. A simple garden rake works perfectly for quick debris removal.
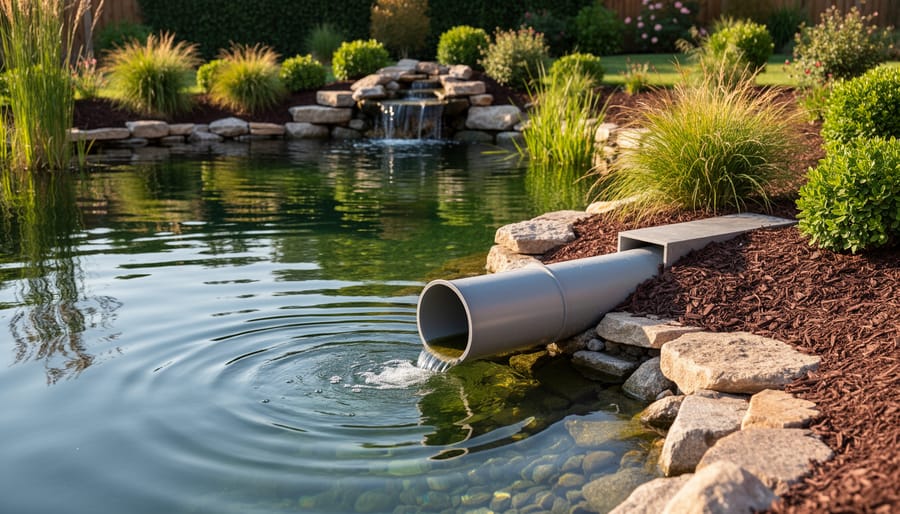
Step-by-Step: Installing a Basic Pipe Spillway for a Backyard Pond
Installing a pipe spillway is one of the most reliable ways to protect your backyard pond from overflow damage. I’ve installed dozens of these over the years, and they’re surprisingly straightforward once you understand the basic principles. Let me walk you through the process.
Materials you’ll need: PVC pipe (typically 3-4 inches in diameter, depending on your pond size), a right-angle elbow fitting, PVC primer and cement, gravel or small stones, landscape fabric, and a rubber pond liner patch if you’re retrofitting an existing pond. For tools, gather a shovel, level, handsaw or PVC cutter, measuring tape, and a marker.
Start by determining your spillway location. Choose the lowest point along your pond’s perimeter where you want overflow water to drain. This should direct water away from structures and into a safe drainage area like a rain garden or dry creek bed.
Measure and cut your vertical pipe to extend from just below your desired water level to about 6 inches above the pond bottom. This vertical section acts as your overflow threshold. The water level will naturally settle at the top of this pipe. Cut your horizontal pipe long enough to extend through your pond berm and discharge water at least 2-3 feet beyond the pond edge.
Now for assembly. Connect the vertical and horizontal pipes using the elbow fitting, applying PVC primer followed by cement to each joint. Work quickly as PVC cement sets fast. Let the assembly cure for at least 30 minutes.
If you’re installing during pond construction, position the assembly before adding liner, running the horizontal pipe through the berm. For existing ponds, you’ll need to carefully cut the liner and use patch material to create a watertight seal around the pipe.
Dig a trench for your horizontal pipe, sloping it gently away from the pond for proper drainage. The pipe should sit on firm, level ground to prevent settling. Backfill around the pipe with soil, tamping firmly.
Surround the vertical pipe base with gravel wrapped in landscape fabric. This prevents debris from clogging the system while allowing water flow.
Common troubleshooting: If water drains too slowly, check for blockages in the vertical pipe. If the water level sits too high or low, you’ll need to adjust the vertical pipe height. Remember, the top of this pipe sets your permanent water level, so measure twice and cut once.
Common Overflow Design Mistakes (And How to Avoid Them)
I’ve learned about overflow disasters the hard way, and trust me, you don’t want to repeat these mistakes! Let me share some real-world blunders I’ve witnessed and how you can sidestep them completely.
The most common mistake? Undersized pipes that act like straws when you need fire hoses. I once visited a neighbor’s pond after a spring storm, and their tiny 2-inch overflow pipe couldn’t keep up with the deluge. Water cascaded over the berm instead, carving deep erosion channels. The fix is simple: calculate your maximum expected inflow during heavy rain and size your pipe accordingly. For most backyard ponds, think 4 to 6 inches minimum, depending on your watershed area.
Placement problems run a close second. I’ve seen overflow pipes installed at the wrong elevation, either too high (defeating their purpose) or too low (draining the pond during normal conditions). Always position your overflow at exactly the water level you want to maintain during heavy rain, not at your everyday water line. Mark it clearly before installation, and double-check with a level.
Another mistake is forgetting about debris protection. Leaves, twigs, and pond plants love to clog overflow openings right when you need them most. Install a simple mesh screen or cage around the intake, and check it seasonally. I clean mine every fall before the leaves drop and again in spring.
Finally, many people skimp on the discharge area. Water exits the overflow pipe with surprising force and volume, creating muddy erosion zones if it dumps directly onto bare soil. Always direct overflow water onto rocks, gravel, or established grass areas that can handle the flow without washing away. Creating a small splash pad with river rocks works beautifully and looks intentional too.
Maintaining Your Overflow Structure Through the Seasons
Your overflow structure works hard all year, but each season brings its own challenges. Let me walk you through what I’ve learned about keeping these systems running smoothly through spring showers, summer heat, autumn leaves, and winter freezes.
Spring is all about debris clearing. After winter, you’ll find branches, dead plant material, and sediment clogging your overflow area. I spend a sunny April morning cleaning mine out, using a garden rake to remove larger debris and a trowel for stubborn mud buildup. Check that water flows freely through your pipes or over your spillway. This is also the perfect time to inspect for any frost damage or shifting that might have occurred during winter.
Summer maintenance focuses on vegetation management. Fast-growing plants can quickly overtake your overflow structure, blocking water flow when you need it most during sudden storms. I trim back any grass, cattails, or water plants monthly around my spillway area. It’s tempting to let those pretty irises grow wild, but trust me, you’ll regret it during a downpour. Also check for erosion around the structure, as summer storms can wash away soil.
Fall requires vigilant leaf control. I learned this the hard way when oak leaves completely blocked my overflow pipe one November. Install leaf netting if your pond sits near trees, and check weekly during peak leaf-drop season. Clear leaves immediately before they mat together and create blockages.
Winter means freeze protection. In cold climates, ensure your pipes won’t freeze solid by adding insulation or keeping slight water movement. Remove ice dams that could redirect overflow water incorrectly. A little attention each season prevents major headaches when storms arrive.
There’s something truly satisfying about knowing your pond can weather any storm that comes its way. When you’ve taken the time to install a proper overflow structure, you’re not just adding a functional component—you’re giving yourself genuine peace of mind. No more racing outside during heavy rains, wondering if your beautiful water feature will turn into a disaster zone.
Take a moment this week to walk around your pond and really look at how it handles water. Does excess rainfall have a clear, controlled path to exit? Are you confident your current setup can manage an unexpected deluge? If you’re feeling uncertain, that’s okay—recognizing the need for improvement is the first step toward protecting what you’ve built.
The beautiful thing about overflow structures is that they’re completely achievable, whether you’re starting fresh or upgrading an existing pond. You don’t need to be an engineer or spend a fortune. With some basic planning, the right materials, and a weekend of work, you can create a system that’ll protect your pond investment for years to come. Your fish, plants, and that peaceful backyard oasis you’ve created deserve that security—and so do you.