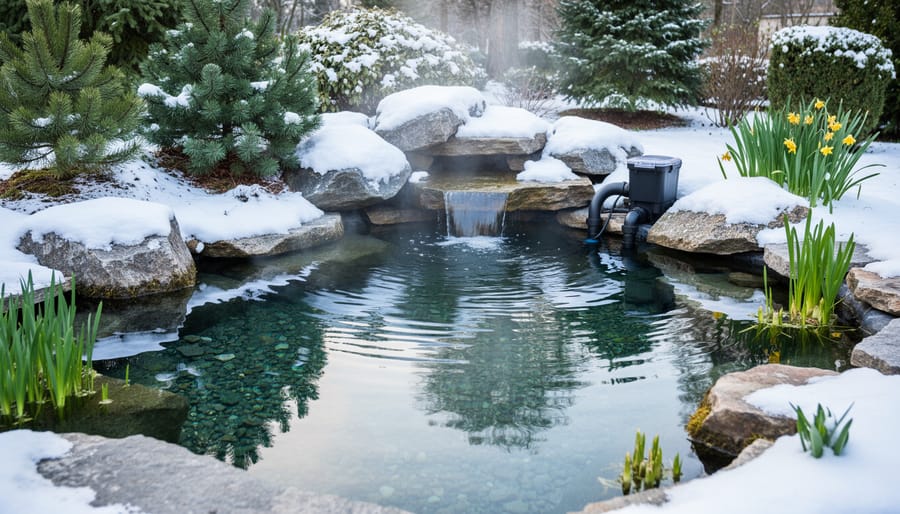
Keep Your Water Garden Running All Winter (Without Frozen Pipes)
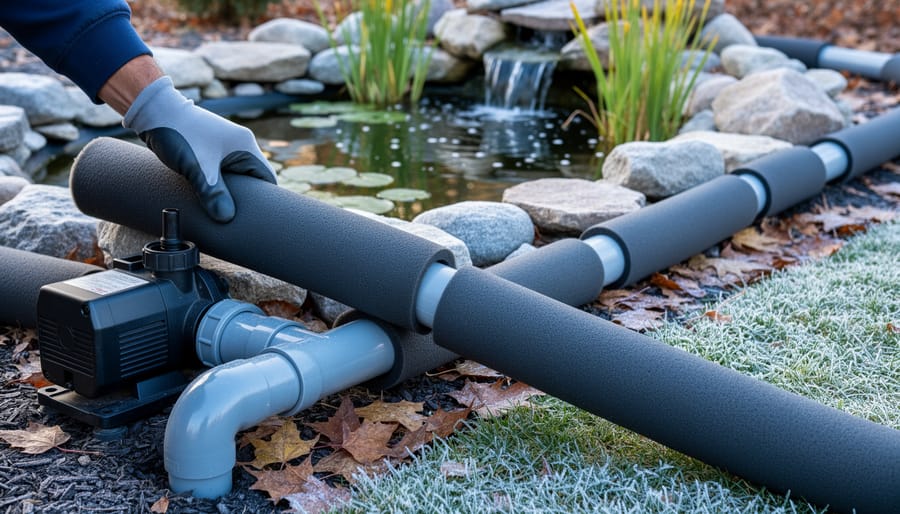
Wrap exposed pipes with foam insulation sleeves designed for outdoor use, securing them with UV-resistant zip ties or weatherproof tape to prevent gaps where cold air can penetrate. For pipes running along pond edges or through garden beds, choose closed-cell foam tubes with a minimum R-value of 3.0 that resist moisture absorption and won’t deteriorate when exposed to splashing water or soil contact.
Apply heat tape underneath your insulation layer for pipes in extremely cold climates, wrapping it in a spiral pattern and covering it completely with insulation to trap the warmth against the pipe surface. This dual-layer approach works particularly well for vulnerable areas like above-ground pump connections and filter plumbing that can’t be buried below the frost line.
Bury pipes at least 12 inches deep where possible, or create insulated protective boxes around exposed pipe sections using rigid foam board and waterproof sealant. Winter-proofing your water features requires attention to these connection points where pipes emerge from the ground or enter pump housings, as these transitions are the most susceptible to freeze damage that can crack fittings and cause spring leaks.
Why Your Water Garden Pipes Need Protection
Picture this: it’s a beautiful winter morning, you head outside with your coffee, and discover your beloved pond pump has cracked wide open like a dropped egg. I’ve seen this heartbreak happen too many times, and it’s completely preventable once you understand what’s really going on.
When water freezes, it does something unique in nature—it expands by about 9%. That might not sound dramatic, but in the confined space of a pipe, pump, or filter, it’s like trying to fit into jeans two sizes too small. The pressure builds and builds until something gives way. And what gives is usually your equipment, cracking from the inside out.
Your outdoor water garden plumbing faces challenges that indoor household pipes don’t. While your kitchen pipes are tucked safely behind insulated walls, your pond pipes are exposed to wind, direct temperature swings, and often sit partially submerged or above ground where cold hits hardest. They’re also typically made from thinner materials than household plumbing, making them even more vulnerable.
Pumps are especially at risk because water gets trapped in their chambers and impellers. I learned this the hard way my first winter as a pond owner—a $200 pump destroyed because I thought “it’s submersible, it’ll be fine.” Filters with their multiple chambers and valves create dozens of spots where water can freeze and expand. Waterfall features are particularly tricky since water often remains in tubing and spillways even after you think you’ve drained everything.
Protecting against extreme weather isn’t just good practice—it’s essential insurance for your water garden investment. The good news? With proper insulation and winterization, you can avoid these expensive disasters entirely.
Understanding Insulation Types for Outdoor Pipes
Foam Pipe Sleeves (The DIY Favorite)
If you’re looking for the easiest, most budget-friendly way to protect your pond plumbing, foam pipe sleeves are your new best friend. These simple tubes split lengthwise so they slip right over your exposed pipes without any disassembly required. I remember the first time I used them on my filter return lines, and I couldn’t believe how straightforward the process was. No tools, no mess, just wrap and secure.
Foam sleeves typically cost between $5-15 for a six-foot length, making them incredibly affordable for most water garden setups. They’re particularly effective for pipes in somewhat sheltered locations, like those running along fences or under deck areas. The closed-cell foam provides decent insulation down to about 20°F, which works great for moderate winter climates.
Installation couldn’t be simpler. Just wrap the sleeve around your pipe, seal the seam with duct tape or zip ties, and you’re done. For extra protection at joints and elbows, I always add a bit of extra tape to seal any gaps where cold air might sneak in.
These sleeves work beautifully for flexible tubing running to waterfalls or UV clarifiers. They’re less ideal for extreme cold regions or completely exposed pipes, where you’ll want something more robust. But for quick, easy protection that won’t break the bank, foam sleeves are hard to beat.
Fiberglass Wrap Insulation
Fiberglass wrap insulation offers excellent flexibility for those tricky pipe configurations around your pond setup. I’ve found it particularly handy when dealing with elbows, T-joints, and irregular shapes where rigid foam just won’t cooperate. These wraps typically come in rolls or pre-cut sections that you can easily mold around any pipe diameter.
One thing to know upfront: fiberglass can be itchy! Always wear long sleeves, gloves, and a dust mask when handling it. Trust me on this—I learned the hard way during my first winter prep. The tiny glass fibers can irritate your skin and lungs, but once it’s installed and covered with a protective vapor barrier or aluminum foil tape, it’s completely safe.
The beauty of fiberglass wrap is its durability. When properly secured with weather-resistant tape or UV-protective jacketing, it holds up wonderfully season after season. It’s especially preferable when you’re working with existing installations where removing pipes isn’t practical. Just wrap, secure, and you’re done. For maximum effectiveness, overlap each layer by about fifty percent as you spiral it around the pipe, creating that cozy blanket your plumbing needs to survive freezing temperatures.
Heat Tape and Cables (For Extra Cold Climates)
When you’re dealing with truly brutal winters—I’m talking those weeks when temperatures plunge well below freezing—sometimes insulation alone just can’t cut it. That’s where heat tape and cables become your water feature’s best friend.
Think of heat tape as an electric blanket for your pipes. It wraps around the pipe before you add insulation, generating gentle warmth to prevent freezing. The insulation then traps that heat close to the pipe, making the system incredibly efficient. Most heat tapes designed for outdoor use are self-regulating, meaning they automatically adjust their heat output based on temperature. This is brilliant because they use more power when it’s coldest and less when it’s milder, saving you money on electricity.
Installation is straightforward: spiral the tape around your pipe (never overlapping unless the manufacturer specifically says it’s okay), secure it with heat-resistant tape, then wrap your insulation over everything. Always use a ground fault circuit interrupter (GFCI) outlet for safety—this protects against electrical shorts, especially important around water.
A word of caution: check your product regularly and never use damaged heat tape. Most systems draw between 5-12 watts per foot, so calculate your power needs before installation. For most backyard water features, this modest electricity cost beats dealing with burst pipes any day!
Step-by-Step: Insulating Your Water Garden Pipes
What You’ll Need (And What You Already Have)
Good news—you probably already have some of these supplies in your garage! Here’s what you’ll need:
Must-haves include pipe insulation sleeves (foam or rubber work great), waterproof tape or zip ties to secure them, and a utility knife for cutting to size. For budget-conscious gardeners, pool noodles make fantastic pipe insulators—seriously! Just slice them lengthwise and wrap around your pipes.
Optional but helpful items include heat tape for extreme climates, weatherproof tape for extra moisture protection, and insulation specifically rated for below-freezing temps. If you’re protecting underground pipes, consider adding sand or mulch around them for natural insulation.
Pro tip from my own pond: I raided my kids’ old pool toys one winter and discovered those foam floaties worked perfectly on my filter return line. Sometimes the best solutions are hiding in plain sight!
Preparing Your Pipes for Insulation
Before you start wrapping those pipes, a little prep work goes a long way! First, give your pipes a good once-over. Look for any cracks, corrosion, or existing leaks—trust me, I learned the hard way that insulation won’t fix damage that’s already there. It’s much easier to address problems now than to discover them when everything’s frozen solid.
Next, clean off any dirt, algae, or pond gunk that’s accumulated on the pipe surfaces. A damp cloth works perfectly for this. Here’s the important part: make sure everything is completely dry before you start insulating. Trapped moisture under insulation can actually cause more problems, including mold and accelerated corrosion.
If you’re working with flexible tubing, straighten out any kinks or bends where possible. This makes wrapping easier and ensures better coverage. Take a few minutes for this preparation—your future self will thank you when those pipes stay cozy and functional all winter long!
Installing Foam Sleeves Like a Pro
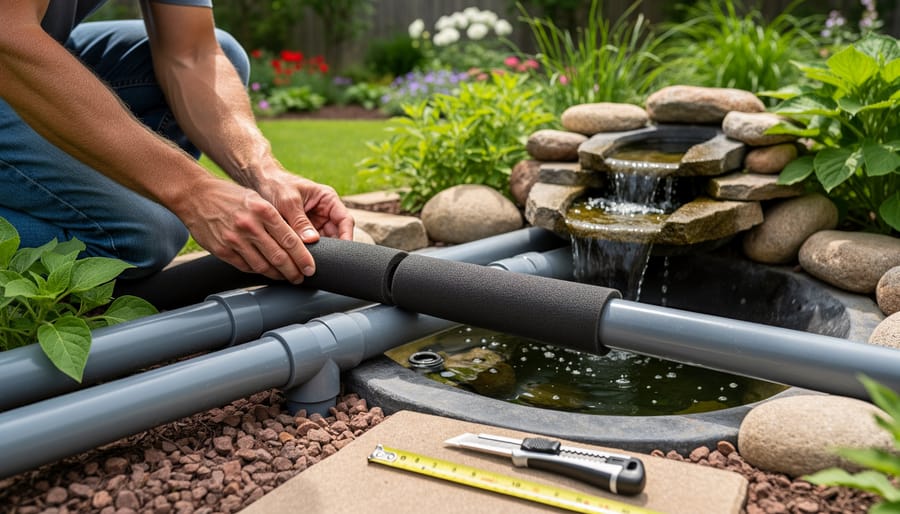
Ready to tackle those foam sleeves? Let’s walk through this together, step by step. First, measure your pipe runs carefully and cut your foam sleeves to length using a sharp utility knife. You’ll want clean, straight cuts for the best seal.
Start at one end of your pipe and simply slip the sleeve over it. Most foam sleeves come with a pre-cut slit, making this super easy. If yours doesn’t have one, carefully cut a lengthwise slit yourself. Press the foam closed around the pipe and secure it with waterproof tape every 12 to 18 inches. I like to use UV-resistant tape since outdoor conditions can be tough on materials.
Here’s where it gets a bit trickier. For elbows and joints, cut your sleeve at a 45-degree angle where pipes meet. Butt the angled pieces together snugly and wrap generously with tape. Don’t skimp here – gaps are where cold sneaks in! For T-joints, cut small sections to cover the exposed areas and tape everything thoroughly.
At connections where you might need future access, use extra tape instead of adhesive. Your future self will thank you when spring maintenance rolls around. Finally, give everything a good visual inspection, checking for any exposed pipe sections that could spell trouble when temperatures drop.
Weatherproofing Your Insulation
Once your insulation is snugly in place, you need to shield it from the elements or it won’t last through the season. Think of it like giving your pipes a weatherproof jacket over their cozy sweater!
Start by wrapping your insulated pipes with UV-resistant tape or specialized insulation wrap. Regular duct tape breaks down quickly outdoors, so invest in proper outdoor-rated tape. I learned this the hard way when my first attempt crumbled away after just one month of sun exposure. Wrap in a spiral pattern, overlapping each turn by about half the tape width to ensure no gaps.
For extra protection, especially in areas with curious critters, consider adding a layer of PVC pipe split lengthwise or flexible corrugated tubing over your insulation. Squirrels and mice love using exposed foam as nesting material, and birds sometimes peck at it too.
Pay special attention to sealing the ends and any joints where moisture could sneak in. Water is insulation’s worst enemy, turning your protective barrier into a frozen mess. A small cap of waterproof tape at each end works wonderfully.
This final weatherproofing step truly makes the difference between insulation that lasts one winter versus several seasons.
Special Considerations for Water Garden Systems
Protecting Above-Ground vs. Buried Lines
When it comes to protecting your water garden plumbing, above-ground and buried pipes need totally different game plans. Let me share what I’ve learned through plenty of trial and error!
For exposed pipes running above ground or along your pond’s edge, insulation is your best friend. Wrap them generously with foam pipe insulation sleeves, then add a weatherproof outer layer like heat tape or additional foam. I always tell people to think of it like bundling up in layers for winter – your pipes need that same protection. Don’t forget to insulate those sneaky spots like elbows and joints where cold air loves to attack.
Underground pipes have a natural advantage: the earth itself provides insulation. The key is getting them deep enough. In most climates, burying pipes 18 to 24 inches down puts them below the frost line, though you’ll want to check your local frost depth requirements. I’ve seen folks in milder areas get away with 12 inches, while northern gardeners sometimes need to go 36 inches or deeper. When trenching, slope your pipes slightly for drainage and consider adding a layer of sand for cushioning. Even buried lines benefit from foam insulation in extremely cold zones, giving you that extra peace of mind.
Don’t Forget Your Pump and Filter Housing
Here’s something I learned the hard way one chilly November: those pipes aren’t the only things that need protection! Your pump and filter housing are just as vulnerable to Jack Frost’s mischief. I once thought my beautifully insulated pipes were enough, only to discover my filter housing had cracked like an egg during a cold snap.
Think of your pump and filter as the heart and lungs of your pond system. They need love too! Start by wrapping your filter housing with foam pipe insulation, securing it with waterproof tape. For oddly-shaped equipment, get creative with spray foam insulation in a can, building up layers around curves and corners. Just remember to leave access points for maintenance.
Pump housings benefit from a double-layer approach. First, wrap them in bubble wrap or foam sheets, then construct a simple wooden box around them. Fill any gaps with straw or crumpled newspaper for extra warmth. This creates a cozy little shelter that traps heat from the pump’s motor.
For above-ground installations, consider building a small insulated enclosure. It doesn’t need to be fancy – even a styrofoam cooler with a hinged lid works beautifully! The goal is creating a protected microclimate that keeps your equipment happy through winter’s worst tantrums.
Common Mistakes (And How to Avoid Them)
Let me share some lessons I’ve learned the hard way, so you don’t have to! One of the biggest mistakes I made early on was leaving gaps between insulation sections. I thought a small half-inch gap wouldn’t matter, but that’s exactly where ice formed during a cold snap. Think of it like leaving a window cracked open in winter—even tiny exposed areas create vulnerabilities. The fix is simple: overlap your insulation sleeves by at least two inches at joints and connections.
Another common pitfall is trapping moisture inside the insulation. I once wrapped my pipes beautifully, but forgot that condensation can form underneath. When water gets trapped against cold pipes, it actually speeds up freezing! Always ensure your insulation has a waterproof outer layer, and consider adding a vapor barrier if you’re using foam insulation. Check that any seams face downward so water runs off rather than pooling.
Here’s one that got me during my first winter: inadequately securing the insulation. I used a few zip ties, thinking they’d hold, but winter winds had other ideas. Come spring, half my insulation was hanging loose or completely gone. Now I use zip ties every six to eight inches, plus waterproof tape at all seams. It might seem excessive, but it’s worth the extra few minutes to know everything stays put through ice storms and heavy snow.
Seasonal Maintenance Tips
Each fall, make it a habit to inspect your pipe insulation as part of your general autumn preparation. Walk through your system and look for any signs of wear like cracks, compression, or moisture damage. I learned this lesson after finding my foam insulation had compressed significantly in one spot, leaving a vulnerable section exposed. Catching it early saved me from a burst pipe that winter!
Replace any insulation that shows deterioration, feels damp, or no longer fits snugly around pipes. Most quality insulation lasts several years, but UV exposure and weather can accelerate breakdown. If you’re using removable insulation sleeves or wraps, clean and dry them thoroughly before storing in a shed or garage. Label your storage bin so you remember where everything lives come next season.
Keep a simple maintenance log noting when you installed insulation and any replacements made. This helps you track what works best in your specific climate and reminds you which areas need extra attention.
You’ve taken the time to learn about insulating your outdoor water pipes, and that’s a wonderful investment in your pond’s future. Proper insulation isn’t just about preventing frozen pipes—it’s about giving yourself true peace of mind when winter arrives. You’ll sleep easier knowing your equipment is protected and your pond ecosystem is safe from temperature-related disasters. Remember, spending a few hours on insulation now saves you from costly repairs, stressed fish, and the headache of dealing with burst pipes in freezing weather. Your year-round water garden deserves this protection. So grab those materials, follow the steps we’ve covered, and give your system the shield it needs. Here’s to enjoying your beautiful water garden through every season, knowing you’ve done right by your investment and your aquatic friends!