
Smart Dry Pond Design: Beautiful Flood Control That Works Year-Round
Transform your property’s water management with a strategically designed dry pond that combines elegant landscaping with practical stormwater control. A well-planned dry pond system not only prevents flooding and erosion but also creates an attractive landscape feature that enhances property value through sustainable landscaping practices.
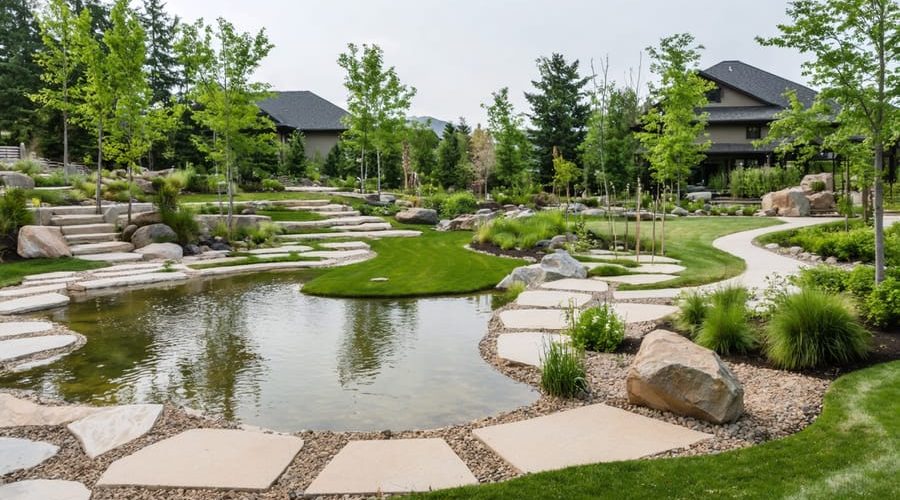
These engineered depressions work silently during dry weather, springing into action during storms to capture, filter, and gradually release excess water. By incorporating native plants along the basin’s slopes and designing gentle gradients, dry ponds seamlessly blend into existing landscapes while providing crucial environmental benefits like groundwater recharge and pollutant removal.
Modern dry pond designs go beyond basic drainage, incorporating elements like terraced edges, decorative rock formations, and drought-resistant vegetation to create multi-functional spaces that serve both practical and aesthetic purposes. Whether managing runoff from a residential development or creating an eco-friendly solution for a commercial property, proper dry pond design represents the future of sustainable stormwater management.
Understanding Dry Pond Basics
How Dry Ponds Work
Dry ponds, also known as detention basins, work by temporarily collecting and holding stormwater runoff during heavy rainfall events. Think of them as nature’s pause button for water flow! These clever systems act like a buffer between rain events and your property’s drainage system, preventing flooding and erosion.
When it rains, water flows into the pond through inlet pipes or surface runoff. The pond gradually fills up, but unlike traditional ponds, it’s designed to empty completely within 24-72 hours through a controlled outlet structure. This slow release allows sediments to settle and creates natural water filtration systems that help clean the water before it enters local waterways.
The basin’s sloped sides and carefully engineered bottom ensure proper drainage and prevent standing water. During dry periods, the pond area can serve multiple purposes – from a wildflower meadow to a recreational space. The key to their success lies in the balance between storage capacity and drainage rate, working with your property’s natural topography to manage water flow effectively and sustainably.
Benefits for Your Property
A well-designed dry pond brings multiple benefits to your property, making it a smart investment for both practical and aesthetic reasons. During heavy rainfall, these basins effectively manage stormwater runoff, preventing flooding in your yard and protecting your home’s foundation from water damage. The gentle slopes and natural contours of a dry pond help slow down water flow, allowing it to gradually seep into the ground.
When not collecting water, your dry pond can serve as an attractive landscape feature. You can enhance its appearance with native grasses, wildflowers, and carefully selected plants that thrive in both wet and dry conditions. This creates a beautiful, low-maintenance green space that adds visual interest to your yard throughout the year.
From an environmental perspective, dry ponds help filter pollutants from runoff water before it enters the groundwater system. They also provide a habitat for local wildlife, including birds and beneficial insects. Additionally, these features can increase your property value by demonstrating thoughtful landscape design and environmental stewardship, making them an excellent addition to any home.
Planning Your Dry Pond
Site Selection and Assessment
Choosing the perfect location for your dry pond is crucial for both functionality and aesthetics. Start by identifying the natural low points in your landscape where water naturally collects during rainfall. These areas often make ideal locations for dry ponds, as they’ll work with existing water management techniques rather than against them.
Before breaking ground, conduct a simple soil test by digging a hole about 2 feet deep and filling it with water. If the water drains within 24-48 hours, you’ve got suitable soil conditions. Clay-heavy soils might need additional preparation, while sandy soils typically offer excellent drainage.
Consider the surrounding landscape and ensure your dry pond is at least 10 feet away from building foundations. Look up for overhead power lines and down for underground utilities – always call your local utility company before digging. The size of your dry pond should be proportional to the drainage area it serves, typically about 1-2% of the total catchment area.
Factor in sun exposure and shade patterns, as these will affect both plant growth and evaporation rates. Think about viewing angles from your home and outdoor living spaces – a well-placed dry pond can become a beautiful focal point even when it’s not holding water.
Don’t forget to check local regulations and permits required for drainage projects. Some areas have specific requirements about water retention and runoff management that might affect your design choices. Taking time to assess these factors carefully will help ensure your dry pond functions effectively while enhancing your landscape’s appeal.

Size and Depth Calculations
Calculating the right size and depth for your dry pond starts with understanding your property’s drainage needs. To determine the appropriate dimensions, first measure your lot’s total drainage area – this includes your roof, driveway, and any other surfaces that direct water to the pond. A good rule of thumb is that for every 1,000 square feet of drainage area, you’ll need about 100 cubic feet of storage volume.
The pond’s depth typically ranges from 18 to 48 inches, depending on your local rainfall patterns and soil conditions. For most residential applications, a 24-inch depth works well, providing enough capacity without creating safety concerns. Remember to include a gradual slope of about 3:1 (three feet horizontal for every one foot vertical) for easier maintenance and safer access.
To calculate your pond’s volume, use this simple formula: Length x Width x Average Depth = Cubic Feet of Storage. For example, a 20′ x 30′ pond with an average depth of 2 feet would provide 1,200 cubic feet of storage capacity.
Don’t forget to factor in your area’s maximum storm events. Check with your local extension office for rainfall data and requirements. You’ll want your pond to handle at least a 10-year storm event, though some areas may require planning for 25-year or even 100-year storms.
Include a 6-inch freeboard (extra height above the maximum water level) to prevent overflow during extreme events. Also, consider incorporating a small forebay – a deeper section near the inlet – to trap sediment and make maintenance easier.
Design Elements for Success
Inlet and Outlet Structures
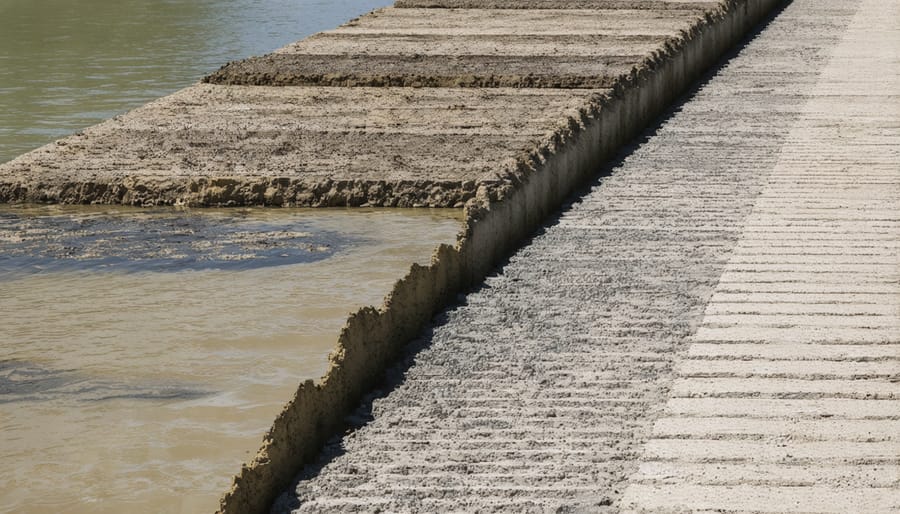
The heart of any dry pond system lies in its inlet and outlet structures, which control how water enters and exits the basin. The inlet structure typically includes a pipe or channel that directs stormwater into the pond, often accompanied by a forebay – a small pool that catches sediment before it enters the main basin. To prevent erosion, consider installing energy dissipaters like riprap or concrete splash pads where water enters the pond.
Your outlet structure needs careful planning to ensure proper drainage. A common design includes a primary outlet pipe at the bottom of the pond and an emergency spillway for overflow during major storms. The main outlet should be sized according to your local rainfall patterns and drainage requirements. Many homeowners opt for eco-friendly materials like natural stone around these structures to blend them with the landscape.
Don’t forget to include trash racks or debris screens at both inlet and outlet points to prevent clogging. A well-designed maintenance access point near these structures makes regular cleaning much easier. For added safety and functionality, consider installing a concrete headwall around your outlet pipe – this prevents erosion and creates a cleaner look while protecting the structural integrity of your drainage system.
Slope and Contouring
Proper grading and contouring are essential elements of an effective dry pond design that prevent erosion and ensure proper water flow. The ideal slope for the sides of your dry pond should be between 3:1 and 4:1 (horizontal to vertical ratio), which means for every 3-4 feet of horizontal distance, there should be 1 foot of vertical drop. This gradual slope not only prevents soil erosion but also makes maintenance easier and safer.
When contouring the basin, create a gentle slope that directs water toward the deepest point or outlet structure. The bottom of the pond should have a slight grade of about 2% to prevent water from pooling and becoming stagnant. Consider incorporating terraces or steps in larger designs to help slow water flow and reduce erosion during heavy rainfall.
To prevent soil erosion, establish vegetation on the slopes as soon as possible after construction. Native grasses and groundcover plants work best as they have deep root systems that help stabilize the soil. In areas where water flow is concentrated, such as inlet and outlet points, use riprap or erosion control matting to provide additional protection.
Remember to account for the natural contours of your property when planning the pond’s shape. Working with existing terrain rather than against it will result in a more natural-looking and cost-effective design.
Plant Selection and Placement
Choosing the right plants for your dry pond is crucial for both functionality and visual appeal. The key is to select vegetation that can thrive in varying moisture conditions, as the pond will alternate between wet and dry periods. For optimal results, divide your dry pond into three distinct planting zones.
In the basin area, which experiences the most frequent flooding, opt for moisture-loving plants that can withstand periodic submersion. Rushes, sedges, and suitable native plants like marsh marigolds work wonderfully here. These plants help filter water and prevent soil erosion during wet periods.
For the side slopes, choose plants with strong root systems that can stabilize the soil. Consider ornamental grasses, day lilies, or black-eyed susans. These plants should be drought-tolerant yet able to handle occasional moisture.
Around the pond’s upper edges, where conditions are typically drier, incorporate drought-resistant perennials and low-growing shrubs. Lavender, yarrow, and native grasses are excellent choices that require minimal maintenance while providing year-round interest.
Remember to space your plants appropriately, allowing room for growth. Group plants with similar water needs together, and avoid invasive species that might take over your carefully planned design. With thoughtful plant selection and placement, your dry pond can become a vibrant, low-maintenance landscape feature.
Maintenance and Long-term Care
Regular Maintenance Tasks
To keep your dry pond functioning properly, establish a regular maintenance schedule with these essential tasks. Inspect the basin monthly and after significant rainfall events, removing any accumulated debris, leaves, or sediment that could block water flow. Pay special attention to the inlet and outlet structures, keeping them clear of obstacles.
Trim vegetation around the pond’s perimeter every 3-4 months, or as needed during growing seasons. This prevents overgrowth from impeding water flow and maintains the pond’s aesthetic appeal. If you’ve incorporated ornamental grasses or native plants, schedule routine pruning to keep them healthy and manageable.
Check the pond’s structural elements quarterly. Look for signs of erosion along the slopes, cracks in concrete components, or damage to riprap. Address any issues promptly to prevent more serious problems from developing. During these inspections, examine the emergency spillway to ensure it remains clear and functional.
Test soil percolation annually to confirm the pond is draining effectively. If you notice standing water lasting longer than designed, the soil may need aeration or rehabilitation. Consider keeping a maintenance log to track inspections and any repairs made.
For optimal performance, schedule a thorough cleaning every 2-3 years, removing accumulated sediment and reassessing the pond’s overall condition. This deeper maintenance helps extend your dry pond’s lifespan and ensures it continues serving its intended purpose effectively.
Troubleshooting Common Issues
Even well-designed dry ponds can encounter issues, but most are easily fixable with the right approach. If you notice standing water lasting longer than 48 hours after rainfall, first check your soil percolation rate by digging a small test hole. Poor drainage often indicates compacted soil, which can be improved by adding organic matter or installing additional drainage layers.
Erosion along the pond’s slopes is another common challenge. Combat this by reinforcing problem areas with erosion control blankets or adding more vegetation. Native plants with strong root systems work best for stabilizing slopes and preventing soil washout.
Weed growth can become problematic, especially in newly established dry ponds. Regular maintenance and proper mulching around planned vegetation can help control unwanted plant growth. Consider installing landscape fabric beneath your mulch layer for extra protection.
If your dry pond isn’t directing water properly, examine the grading. Over time, settling soil can create low spots that disrupt flow patterns. These areas may need additional fill material to restore proper drainage angles. Also, check your inlet and outlet structures regularly for blockages from debris or sediment buildup.
Mosquito concerns can arise if water stands too long. Ensure your pond has proper slope and drainage to eliminate standing water within the recommended timeframe. Adding mosquito-eating fish to permanent pools, if part of your design, can provide natural control.
Remember that seasonal adjustments may be needed as weather patterns change throughout the year.
Creating a dry pond is more than just managing stormwater – it’s about contributing to a sustainable and beautiful landscape. By incorporating proper drainage, native plants, and thoughtful design elements, you can transform a functional necessity into an attractive focal point of your property. Remember to carefully consider your site’s specific needs, work with natural contours, and maintain your dry pond regularly for optimal performance. Whether you’re tackling this project yourself or working with professionals, the principles we’ve discussed will help you create an eco-friendly solution that enhances your property’s value while protecting our water resources. Take the first step today toward implementing these sustainable design practices – your yard and local ecosystem will thank you!