
Rain Gardens That Actually Survive Your Climate (And Look Beautiful Doing It)
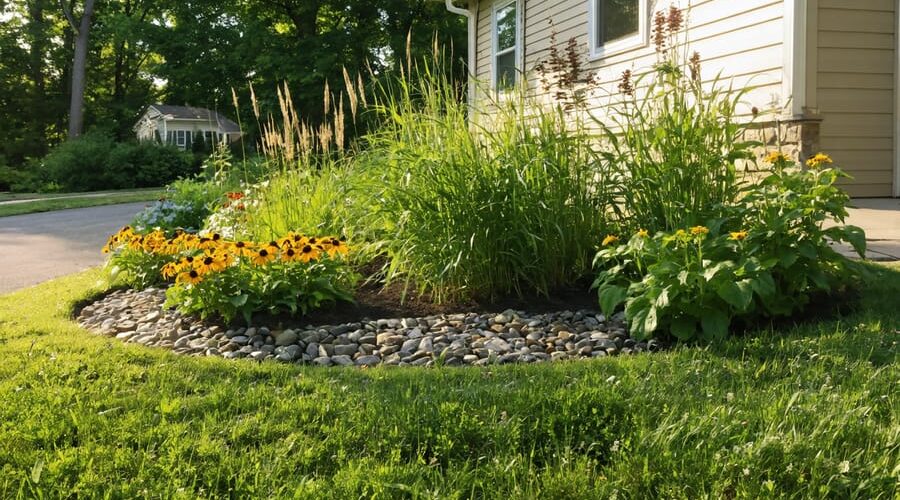
Transform your waterlogged lawn into a thriving rain garden that captures runoff before it floods your foundation or overwhelms storm drains. Position your garden in natural low spots at least 10 feet from your house, where water already pools after heavy storms. Test drainage by digging an 8-inch hole and filling it with water—it should empty within 24 hours for ideal rain garden performance.
Design your basin with a gentle 4-6 inch depression that spreads across 100-300 square feet, allowing water to pool temporarily before soaking into enriched soil. Layer your planting bed with a custom mix of 50% sand, 30% topsoil, and 20% compost to create the perfect balance between drainage and plant nutrition. This engineered soil filters pollutants while supporting root systems that drink up excess moisture.
Select native plants with deep root structures like switchgrass, black-eyed Susans, and cardinal flowers that thrive in both saturated and dry conditions. These resilient species handle the boom-and-bust cycle of climate extremes beautifully, requiring minimal maintenance once established. Position taller specimens in the center where water pools deepest, graduating to shorter, drought-tolerant varieties along the edges.
Rain gardens aren’t just functional—they’re stunning focal points that attract butterflies, birds, and admiring neighbors. You’ll handle stormwater runoff from 30% more rainfall than conventional landscaping while creating habitat and adding serious curb appeal to your property.
What Makes a Rain Garden Climate-Resilient
The Difference Between Rain Gardens and Regular Water Gardens
When I first heard about rain gardens, I thought they were just fancy names for water gardens or decorative ponds. But here’s the key difference: rain gardens are specifically designed to capture and filter stormwater runoff, while ornamental water gardens are meant to hold water permanently.
Think of it this way. A regular water garden or pond is like a bathtub that stays full all the time, creating a habitat for fish, water lilies, and aquatic plants. A rain garden, on the other hand, works more like a shallow bowl that temporarily catches rainwater from your roof, driveway, or lawn, then slowly releases it into the ground over 24 to 48 hours.
Rain gardens don’t have liners like ponds do. Instead, they feature specially prepared soil that filters pollutants and allows water to percolate naturally. While bog gardens might seem similar since they handle moisture, they’re designed for permanently wet conditions rather than the wet-dry cycles of rain gardens.
The beauty? Rain gardens can be just as stunning as any ornamental feature, filled with gorgeous native plants that thrive in both wet and dry conditions.
Why Traditional Designs Are Failing in Today’s Weather
Remember when a typical rain garden just needed to handle spring showers and the occasional summer thunderstorm? Those days are behind us. Traditional rain garden designs were created for predictable rainfall patterns, but climate change has completely rewritten the rules.
Picture this: Your neighbor installed a beautiful rain garden five years ago following a standard design. Last month, it turned into a muddy swamp after three inches of rain fell in two hours. Two weeks later, during an unexpected dry spell, the plants were completely withered. Sound familiar?
Here’s the problem. Older designs assumed moderate, regular rainfall with decent drainage between storms. They weren’t built to absorb the intense flash floods we’re seeing more often, where water rushes in faster than soil can handle it. The shallow basins overflow, sending runoff right back onto your lawn or driveway.
Then there’s the flip side. Extended droughts leave these gardens bone-dry for weeks, killing plants that were chosen for “moist conditions” rather than resilience. These unpredictable weather patterns demand gardens that can handle feast-or-famine water conditions.
The good news? Modern climate-resilient designs solve these challenges beautifully, and they’re not complicated to build.
Choosing the Perfect Spot for Your Rain Garden
Reading Your Yard’s Water Flow
The best way to understand your yard’s drainage is surprisingly simple: grab an umbrella and watch it rain! I know it sounds too easy, but this technique has saved me countless hours of guesswork over the years. During a moderate to heavy rainfall, take a walk around your property and observe where water naturally flows, pools, and disappears.
Look for those telltale signs that water is causing problems. Do you see streams forming along pathways or driveways? Are there spots where water sits for hours or even days after rain? These puddles are your prime candidates for rain garden locations. Pay attention to where downspouts discharge and trace the water’s journey across your lawn. You might notice channels forming in mulched beds or erosion gullies cutting through grass.
I always recommend taking photos or videos during these rain walks. When the sun comes back out, it’s easy to forget exactly where those trouble spots were! Mark problem areas with small flags or stakes so you can find them later when you’re ready to plan.
Another helpful trick is checking your yard the morning after a storm. You’ll often see debris lines, damp patches, or compressed grass that reveal water’s path. If you have basement moisture issues or notice water flowing toward your foundation, these are priority areas that desperately need attention. Understanding these natural drainage patterns helps you work with your landscape rather than against it.
Safety Distances and What to Avoid
Let’s talk about keeping your rain garden in the sweet spot—where it does its job beautifully without causing problems elsewhere in your yard. Think of these as the friendly neighbor rules of rain garden placement.
First up: your house foundation. Keep your rain garden at least 10 feet away from any building. This isn’t about being paranoid—it’s just smart. You want water flowing away from your foundation, not toward it. I learned this one the hard way when I got a little too enthusiastic about placing a garden bed too close to my garage. The 10-foot rule gives you a comfortable buffer zone.
If you have a septic system, give it even more breathing room—at least 25 feet of clearance. Septic drain fields and rain gardens both handle water, but they really don’t like sharing space. Same goes for wells, which need that distance to stay clean and happy.
Before you dig anywhere, make that free call to 811 or your local utility locating service. They’ll mark underground lines for electricity, gas, water, and cable. It usually takes just a few days, and it beats the alternative of hitting something important with your shovel. Trust me, explaining that to your neighbors when their internet goes down is no fun.
Finally, respect those big established trees. Their root zones extend way beyond what you see above ground—often as wide as the branch canopy. Placing a rain garden right on top of major roots stresses the tree and makes digging miserable. Work around them, not through them.
Designing Your Rain Garden Basin
Getting the Depth and Size Right
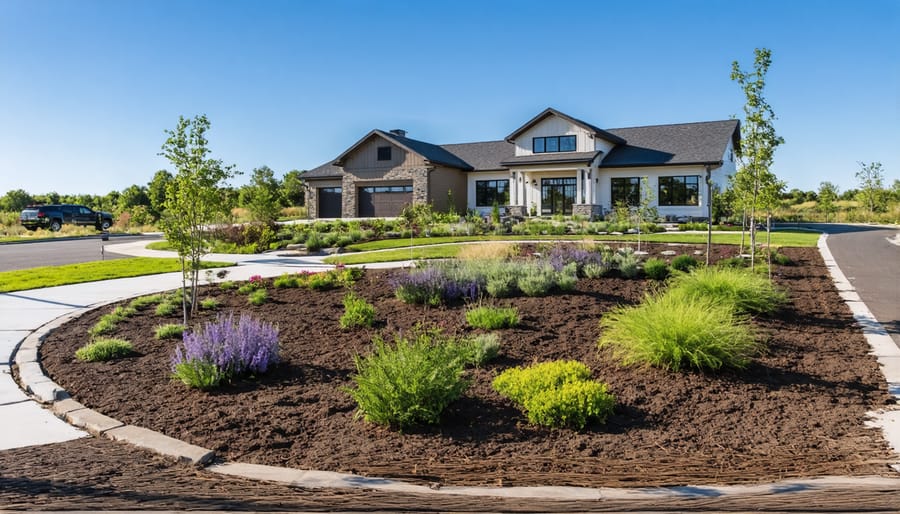
Getting your rain garden’s dimensions right doesn’t require complicated engineering formulas. Here’s a simple approach that works beautifully for most residential situations: your rain garden should have a surface area equal to about 20-30% of the roof or paved area draining into it. So if you’re collecting runoff from a 400 square foot section of roof, aim for a garden that’s roughly 80-120 square feet.
Now let’s talk depth, which is where many first-timers get tripped up. The magic range for most residential rain gardens is 4-8 inches deep, and here’s why this works so well. At 4-6 inches, you create enough volume to catch a decent rainfall without making your garden look like a crater in your yard. The plants establish easily at this depth, and you won’t accidentally create a mosquito breeding ground since water typically drains within 12-24 hours.
I learned this lesson the hard way when I dug my first rain garden a whopping 14 inches deep. It looked fantastic when dry, but after heavy rains, it resembled a swimming pool and took days to drain. Not ideal.
Go deeper (8-10 inches) only if you’re dealing with clay soil that drains slowly or if you’re capturing runoff from a particularly large area. Sandy soil? Stick to the shallower end since water infiltrates quickly. Remember, you’re creating a temporary holding basin, not a permanent pond, so resist the urge to excavate too enthusiastically.
Creating Overflow Solutions for Extreme Storms
Here’s the thing about rain gardens: they’re wonderful until Mother Nature throws a tantrum! Even the best-designed garden needs a backup plan for those rare but intense hundred-year storms.
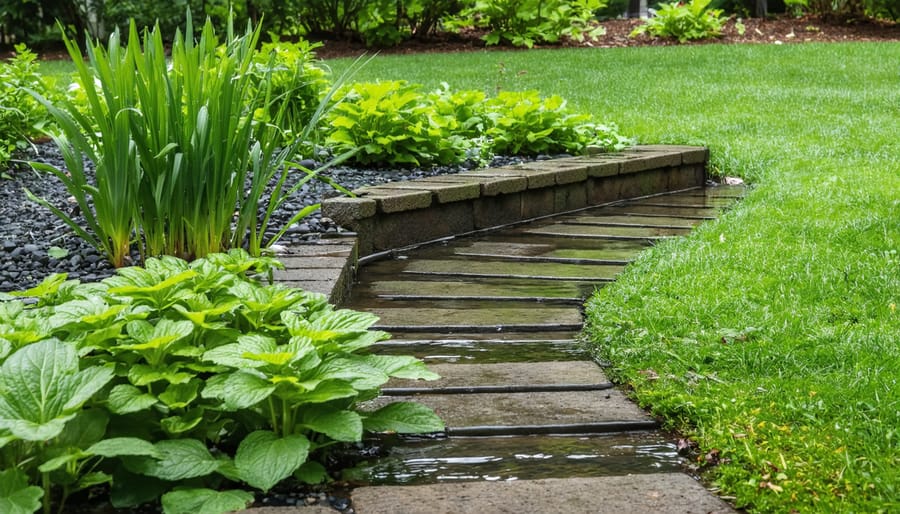
Think of your overflow system as an emergency exit for water. Start by identifying the lowest point along your rain garden’s edge, positioned away from your house and any structures. This becomes your primary spillway. Create a shallow channel, about 6-8 inches wide, lined with river rock or flat stones to prevent erosion. The channel should slope gently downward, guiding excess water toward a safe outlet like a street drain, wooded area, or lower section of your yard.
I learned this lesson the hard way during an unexpected deluge that sent water creeping toward my basement. Now I always create two overflow routes, just in case one gets blocked by leaves or debris.
Make your spillway obvious by keeping it clear of mulch and plants. Some folks add decorative stepping stones that double as overflow markers. The goal is simple: when your rain garden fills beyond capacity, water follows your predetermined path rather than finding its own route toward your foundation. Test your system with a hose before planting to ensure water flows exactly where you want it during emergencies.
Layering Your Soil Mix for Fast Drainage
The secret to a successful rain garden lies in creating soil that drinks up water quickly while still nourishing your plants. I learned this the hard way when my first attempt turned into a muddy puddle that stuck around for days!
Your ideal mix should be 50-60% sand, 20-30% compost, and 20-30% existing native soil. This combination allows water to infiltrate within the crucial 24-48 hour window, preventing mosquito breeding while keeping roots happy. Think of sand as your drainage superhero, compost as the nutrient provider, and native soil as the adapter that helps plants transition smoothly.
When sourcing sand, ask for coarse construction sand rather than fine play sand, which can actually compact and slow drainage. Mix everything thoroughly before placing it in your garden basin. For existing clay-heavy soil, bump up the sand ratio to 60% and consider adding a 2-inch layer of shredded hardwood mulch on top to prevent erosion during heavy rains. Test your drainage by digging a small hole, filling it with water, and timing how long it takes to disappear. You’re aiming for that sweet spot where water vanishes within two days but doesn’t rush through instantly.
Selecting Plants That Thrive in Feast or Famine
Zone-Specific Plant Recommendations
Think of your rain garden as having three distinct neighborhoods, each with its own living conditions. The plants in each zone need to handle dramatically different moisture levels throughout the year.
The center zone is where water pools deepest and lingers longest. Here, you’ll want true water-lovers like Blue Flag Iris, which puts on a gorgeous purple show in late spring, and Cardinal Flower with its brilliant red blooms lighting up July and August. Joe Pye Weed is another fantastic choice, towering up to six feet with dusty pink flowers in late summer. I’ve watched these plants thrive even when submerged for days after heavy storms, then handle dry spells without complaint.
Your middle zone experiences moderate moisture, making it perfect for versatile performers. Swamp Milkweed blooms pink in June and July while attracting monarchs, and Black-Eyed Susans bring cheerful yellow from July through September. Native sedges provide year-round texture and handle the wet-to-dry transitions beautifully. These are the workhorses of your rain garden.
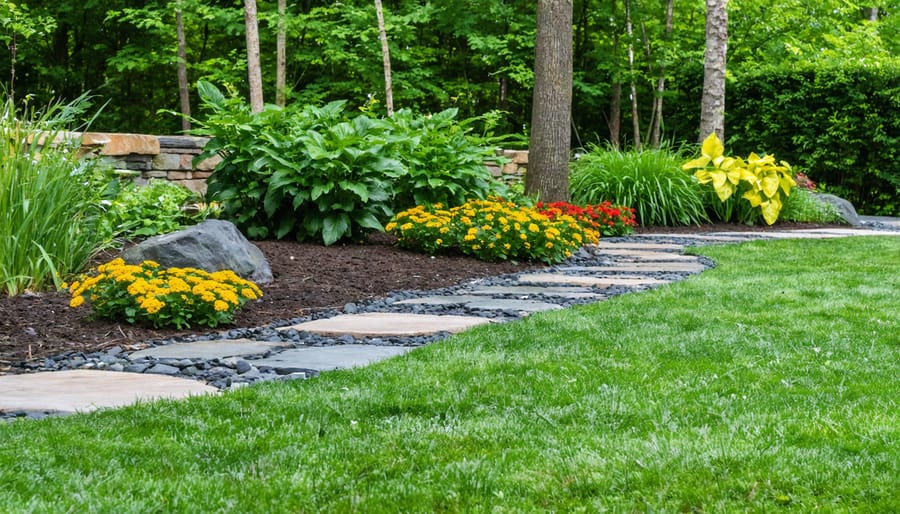
The outer edges stay drier and transition into your regular landscape. New England Aster delivers spectacular purple blooms in fall when most gardens are winding down, while Purple Coneflower adds pink summer color and feeds birds with its seed heads in winter. Little Bluestem grass turns gorgeous copper tones as temperatures drop, providing four-season interest.
By mixing plants from these zones, you’ll create a garden that looks intentional and beautiful whether it’s holding water after a downpour or bone-dry during a drought. Plus, staggering bloom times from spring through fall means you’ll always have something catching your eye.
Native Plants That Do the Heavy Lifting
Native plants are your secret weapon for a rain garden that practically takes care of itself. Their deep root systems—often reaching 10-15 feet down—create natural channels that help water infiltrate quickly while preventing erosion. Unlike those pretty but shallow-rooted ornamentals, natives have spent thousands of years adapting to your local rainfall patterns and soil conditions.
I’ve watched my own rain garden evolve over five years, and the native plant sections consistently outperform everything else. They bounce back faster after floods, survive dry spells without babying, and attract an incredible parade of butterflies and bees that make the whole space feel alive.
My proven performers include blue flag iris for those wetter zones—it handles standing water beautifully and produces stunning purple blooms. Joe Pye weed is my go-to for middle areas; it grows tall enough to hide utility boxes while providing crucial late-season nectar. For drier edges, black-eyed Susans are practically indestructible and bloom for months.
Cardinal flower is another favorite that hummingbirds can’t resist. The key is choosing plants native to your specific region—they’ll establish faster, need less maintenance, and create that climate-resilient foundation your rain garden needs to handle whatever weather comes your way.

Plants to Avoid in Rain Gardens
Not all plants play nice with a rain garden’s feast-or-famine rhythm! Steer clear of invasive troublemakers like purple loosestrife and reed canary grass that’ll take over your yard and your neighbor’s too. Skip water-guzzlers such as hostas and astilbes that sulk during the dry spells between storms—remember, rain gardens aren’t constantly wet like ponds. Also avoid plants with shallow roots or those requiring consistent moisture, like Japanese maples and many annual flowers. They just can’t handle the wild swings from saturated to bone-dry soil. I learned this the hard way when my beautiful impatiens collection turned crispy brown after just two weeks without rain! Choose adaptable natives instead that actually thrive on the challenge of fluctuating conditions.
Building Your Rain Garden: Step-by-Step
Tools and Materials You’ll Actually Need
Let’s talk about what you’ll actually need to build your rain garden without breaking the bank. I remember my first trip to the garden center – I way overthought it!
Essential items include a garden spade for digging (around $30-50), a good quality garden rake for grading ($20-30), and landscape fabric to prevent weeds ($15-25 for a roll). You’ll need compost to amend your soil, which runs about $25-40 per cubic yard. A simple level or even a smartphone app helps ensure proper drainage slope – free to $15.
For materials, grab river rock or decorative stone for borders ($50-100 depending on size), and of course, your native plants ($5-15 each, budget for 10-15 plants minimum).
Optional but helpful items include a wheelbarrow if you don’t have one ($60-100), work gloves ($10-15), and a soil testing kit ($15-25) to check drainage rates before you start digging. A garden hose helps visualize your design layout and costs nothing extra if you already own one.
Total essential investment typically runs $200-400, with optional items adding another $100-150. It’s surprisingly affordable compared to professional drainage solutions!
Digging and Shaping the Basin
Now comes the fun part – getting your hands dirty! Start by marking your basin outline with spray paint or a garden hose, then begin excavating from the center outward. Aim for a shallow, saucer-shaped depression rather than a steep-sided hole. Your basin should be 4-8 inches deep at the center, with gentle slopes no steeper than a 3:1 ratio (that means 3 feet horizontal for every 1 foot vertical).
As you dig, create three distinct zones: a deeper center where water initially collects, a middle transition area, and gently sloping edges. This varied topography looks more natural and accommodates different plant types based on their moisture preferences.
If you’re battling heavy clay soil, you’ve got some options. Mix in compost and coarse sand to improve drainage, or consider installing a perforated drain pipe at the basin bottom that leads to a drier area. For rocky soil, remove larger stones but leave some smaller ones – they actually help with drainage and add textural interest.
Here’s a trick I learned the hard way: save your best topsoil in a separate pile. You’ll want to mix it back into your planting zones later. Test your excavated depth by pouring water in and watching how it settles. The basin should hold water temporarily but drain within 12-24 hours.
Planting for Success
Getting your plants in the ground properly makes all the difference in how well they survive and thrive. Start by spacing native plants according to their mature size, typically 18-36 inches apart depending on the species. This might look sparse at first, but trust me, they’ll fill in beautifully within two growing seasons!
Plant at the same depth they were growing in their containers, keeping the crown right at soil level. Dig holes twice as wide as the root ball to encourage lateral root growth, which helps plants anchor themselves during heavy rain events. Once planted, water thoroughly to eliminate air pockets and settle the soil around the roots.
Apply a 2-3 inch layer of shredded bark mulch around plants, keeping it a few inches away from stems to prevent rot. Mulch is your secret weapon for moisture retention and weed suppression during establishment.
Here’s the crucial part many people overlook: even drought-tolerant native plants need regular watering during their first growing season. Water deeply twice weekly if rain doesn’t cooperate. Think of it like training wheels—your plants need consistent moisture to develop strong root systems before they can handle dry periods independently. This establishment period typically lasts 12-18 months, after which your rain garden will largely care for itself.
Connecting Downspouts and Directing Water Flow
Getting water into your rain garden efficiently is where the magic happens! You’ve built this beautiful basin, and now it’s time to make sure it receives water in a way that works with nature, not against it.
Let me share what I’ve learned through trial and error in my own yard. The simplest approach is connecting your downspout directly to the rain garden using buried corrugated pipe or flexible drainage tubing. I originally just aimed my downspout toward the garden, but during heavy rains, the water carved an ugly channel through my lawn. Not ideal! Instead, dig a shallow trench from your downspout to the garden’s edge, lay in 4-inch perforated pipe, and cover it with soil and mulch. This underground highway delivers water right where you want it.
For the garden entry point, here’s the key: never let water blast straight into your rain garden at full force. That’s like turning a fire hose on your carefully arranged plants! Create a rock-lined splash pad at the entry point using river stones or flat rocks. This disperses the water energy and prevents erosion. I use baseball-sized rocks in a 2-foot-wide area, and it works beautifully.
If you’re capturing water from driveways or patios, consider a swale approach. This is simply a gentle, shallow channel that guides water gradually toward your garden. Line it with grass or small stones to slow the flow and filter out debris.
For multiple water sources, you can create several entry points around your garden’s perimeter. Just remember each entry needs its own splash pad protection. The goal is gentle distribution, allowing water to settle and soak in naturally rather than rushing through like a river.
Maintenance Through the Seasons
First-Year Care and Establishment
Your rain garden’s first year is all about helping those plants get their roots established—and yes, that means you’ll need to water regularly! I know it sounds funny watering a rain garden, but during those first 12 months, your plants need consistent moisture to develop the deep root systems that will eventually help them thrive on rainwater alone. Plan to water weekly during dry spells, giving each plant a good soaking rather than frequent shallow drinks.
Weeding is your other main job during this establishment phase. Those freshly disturbed garden beds are weed magnets, and you’ll want to stay on top of them before they compete with your new plants. Pull weeds when they’re small and the soil is moist—it’s much easier than battling established invaders later.
Keep an eye on how water moves through your garden during storms. You’re looking for water to pool temporarily (that’s good!) and then drain within 24 hours. If water’s still sitting around after two days, you might need to loosen compacted soil or add more drainage amendments. Take notes on what you observe—these observations will help you fine-tune your garden’s performance and give you bragging rights when neighbors ask about your thriving rain garden next year!
Long-Term Maintenance Calendar
Your rain garden needs surprisingly little attention once established, but timing those few seasonal maintenance tasks makes all the difference. In spring, clear away winter debris and dead plant material, then add a fresh layer of mulch to suppress weeds. Check your inlet and outlet areas for erosion damage from winter storms and repair as needed. Summer is all about monitoring—visit after heavy rains to ensure water drains within 48 hours, and hand-pull any weeds before they establish. Fall becomes your planting season for native perennials when they’re naturally preparing for dormancy. Divide overgrown plants and relocate them to fill bare spots. As winter approaches, leave seed heads standing for wildlife and cut back only dead or diseased foliage. Your rain garden actually needs less winter prep than traditional gardens since native plants thrive with minimal intervention. I like to do a final check of drainage pathways before the first freeze, clearing leaves from the inlet to prevent ice dams. That’s honestly it—maybe three hours total across the entire year for most residential rain gardens.
Troubleshooting Common Rain Garden Problems
Don’t worry if your rain garden isn’t performing perfectly right away. These features sometimes need a bit of tweaking, and you’re definitely not alone in facing these challenges.
If water stands for more than 48 hours after rain, your soil might be more clay-heavy than you realized. I’ve been there, watching a puddle linger for days and wondering what went wrong. The fix is simpler than you’d think: create shallow drainage channels leading away from the garden, or amend the bottom layer with more sand and gravel. You can also drill a few deep holes with a post-hole digger and backfill them with coarse gravel to create vertical drainage paths.
Erosion at the inlet where water first enters is incredibly common, especially after heavy storms. Protect this vulnerable spot by placing medium-sized river rocks in a splash pad formation. Think of it like a natural energy absorber that slows down rushing water before it can carve channels through your garden.
Plant failures usually happen because we get overeager and place moisture-loving plants too high up the slopes, or drought-tolerant ones too low in the basin. Take note of where water actually pools and adjust your plant placement accordingly. Sometimes plants just need a growing season to establish deep roots, so give them patience before replacing them.
The mosquito question comes up constantly, and here’s the good news: a properly functioning rain garden shouldn’t create mosquito problems because it drains within two days. Mosquito larvae need at least a week to develop. If you’re seeing standing water longer than that, address the drainage issue first. Adding mosquito dunks containing BTI bacteria provides extra peace of mind and won’t harm beneficial insects, pets, or wildlife.
Remember, even experienced water gardeners make adjustments as they learn how water moves through their specific landscape. Your rain garden will reward your patience with years of beautiful, functional performance.
Creating a rain garden in your yard is one of those projects that just keeps giving back. Every time it rains, you’ll watch your garden do exactly what you designed it to do—capturing runoff, filtering it naturally, and transforming a potential drainage headache into something genuinely beautiful. You’ll notice less standing water in problem areas, possibly lower water bills since you’re relying less on irrigation, and before long, you’ll spot butterflies, birds, and beneficial insects that have discovered your new wildlife oasis.
The best part? You’re working with nature instead of fighting against it. While your neighbors might be dealing with flooded basements or eroded landscapes during heavy storms, your rain garden will be quietly managing that excess water, protecting your home and reducing strain on local storm drains. It’s practical problem-solving that happens to look gorgeous.
If you’re feeling overwhelmed by all the planning and digging involved, here’s my advice: start small. Even a modest rain garden in that soggy spot near your downspout makes a real difference. You can always expand it later once you see how well it works and gain confidence in your abilities. Pick three or four native plants you love, carve out a shallow depression, and give it a try. The learning happens in the doing, and honestly, there’s something incredibly satisfying about creating a landscape feature that’s both functional and beautiful while helping the environment at the same time.