
Simple Water Barriers That Keep Your Pond Looking Perfect
Transform your dream water garden into a secure oasis by installing the right water barrier system. Professional-grade EPDM rubber liners create an impenetrable seal that prevents water seepage and protects surrounding landscape features. Combine thick geotextile underlayment with properly overlapped liner edges to ensure complete water containment while maintaining natural aesthetics. Strategic placement of rocks and aquatic plants along barrier edges conceals synthetic materials while providing essential stability to prevent liner shifting. This critical foundation not only preserves water levels but also protects soil structure, maintains garden integrity, and creates the perfect environment for thriving aquatic ecosystems. Whether you’re building a serene pond or an elaborate water feature, proper barrier installation determines the long-term success of your water garden investment.
Why Your Water Garden Needs a Barrier
Prevent Soil Erosion
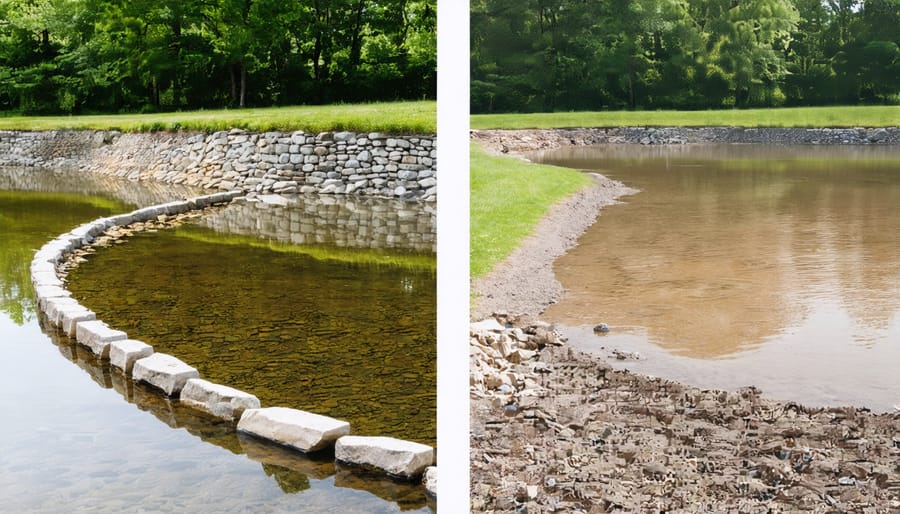
Water barriers play a crucial role in protecting pond edges from erosion, which can be a significant concern for any water feature. By installing proper barriers along the pond’s perimeter, you can prevent soil from washing into your pond during heavy rains or from regular water movement. These barriers work by creating a stable boundary between your pond and the surrounding landscape, effectively holding soil in place.
Natural stones, concrete blocks, or specially designed pond edging materials can all serve as effective erosion control barriers. When properly installed, they create a protective wall that shields the soil from water’s erosive forces. For best results, install your barrier slightly above the water level and ensure it extends several inches below the soil surface.
Consider complementing your water barrier with appropriate plants along the pond’s edge. Their root systems provide additional soil stabilization while creating a beautiful, natural transition between water and land. This combination of hardscape barrier and vegetation offers the most robust protection against soil erosion.
Water Level Management
Water barriers play a crucial role in maintaining consistent water levels in your garden pond or water feature. By creating a reliable seal between different water zones, these barriers help prevent unwanted water loss through seepage and maintain your desired water depth. They’re especially useful in creating distinct areas within your pond, such as shallow shelves for marginal plants and deeper sections for fish.
Think of water barriers as invisible walls that keep water exactly where you want it. They’re particularly effective when designing multi-level water features or when you need to separate different pond depths. For example, you might use barriers to create a shallow bog garden area while maintaining a deeper zone for aquatic plants and fish.
The key to successful water level management lies in proper barrier installation. Make sure they’re anchored securely and sealed correctly to prevent any water from finding its way around or underneath. Regular monitoring helps catch any potential issues before they become major problems.
Types of Water Barriers for Different Garden Styles
Natural Stone Barriers
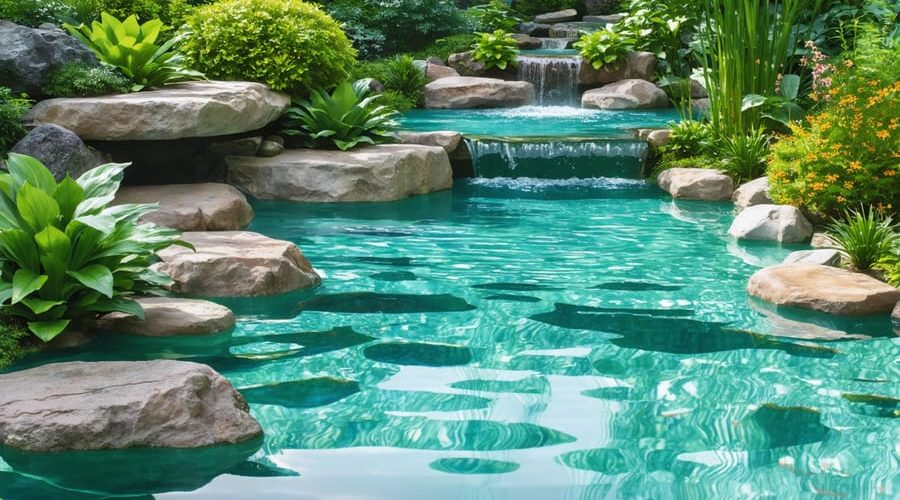
Natural stone barriers offer a stunning and effective solution for water containment while enhancing your landscape’s natural beauty. Large boulders and carefully placed rocks create an organic-looking barrier that blends seamlessly with your garden’s environment. When selecting stones, opt for a mix of sizes, with larger rocks forming the foundation and smaller ones filling gaps.
For optimal water retention, arrange rocks in a slightly overlapping pattern, ensuring they’re partially buried for stability. Choose flat-faced stones for the barrier’s face, as they create better seals against water flow. A layer of pond liner behind the rocks provides additional protection against seepage.
Consider incorporating water-loving plants between rocks to naturalize the barrier further. Moss and small creeping plants can fill spaces between stones, creating a lush, established look while helping prevent soil erosion.
Remember to prepare the ground properly by creating a level, compacted base. This prevents settling and maintains the barrier’s integrity over time. While natural stone barriers require more initial planning and labor, they offer unmatched durability and aesthetic appeal that improves with age.
Planted Barriers
Creating a living barrier with water garden plants offers a natural and beautiful solution to water containment. Consider arranging plants in layers, starting with tall marginal species like cattails and rushes at the back, followed by medium-height plants and ground covers. Understanding planting zones for water gardens is crucial for success.
Choose plants with dense root systems, like iris and sedges, as they create natural water barriers while adding visual interest. Plant them closely together in well-prepared soil along your water feature’s edge. For the best results, incorporate both shallow and deep-rooted species to create a comprehensive barrier system.
Remember to maintain your planted barrier by regularly trimming and dividing plants as needed. This not only keeps your barrier effective but also ensures your garden stays healthy and visually appealing throughout the seasons.
Artificial Barriers
Modern landscaping offers several pre-made solutions that create clean, professional-looking water barriers. Plastic and metal edging strips are popular choices, providing a sleek barrier between your pond and surrounding landscape. These come in various heights and styles, from subtle black plastic to decorative copper-toned aluminum.
Interlocking pond edging blocks offer another attractive option, combining functionality with aesthetic appeal. These specially designed blocks create a seamless transition between water and land while preventing soil erosion and water seepage.
For a more contemporary look, composite decking materials can form elegant borders around water features. These moisture-resistant materials are particularly effective when creating raised pond edges or transitional spaces between decking and water areas.
Pre-formed pond liners with built-in edges are also available, offering an all-in-one solution that’s perfect for beginners. These typically include shelves and depths designed specifically for aquatic plants and fish, making them an excellent choice for small to medium-sized water features.
Installation Tips for DIY Success
Ground Preparation
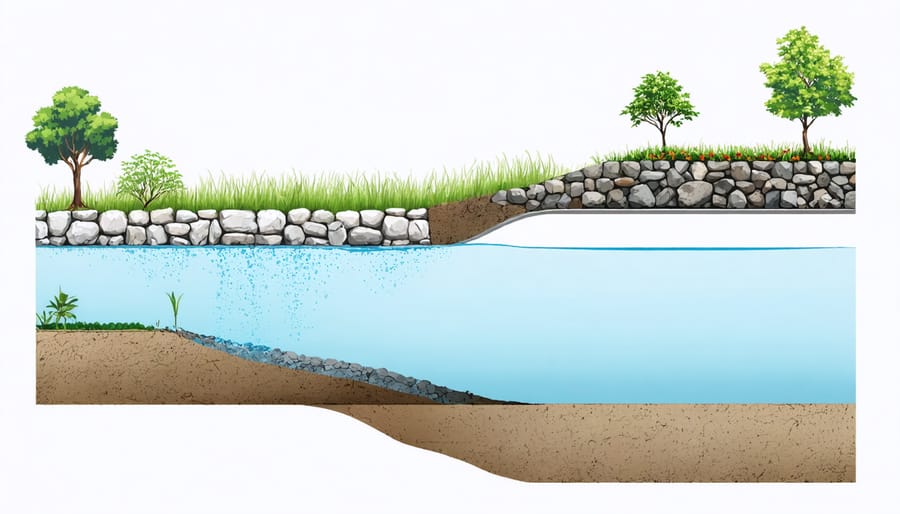
Before installing your water barrier, proper ground preparation is essential for long-lasting results. Start by marking your installation area clearly with stakes and string. Remove all vegetation, rocks, and debris from the marked area, extending about 12 inches beyond your planned barrier boundaries.
Next, level the ground using a rake and shovel, ensuring there are no significant dips or hills. If you’re working with particularly uneven terrain, consider using a ground tamper to create a firm, stable surface. For clay-heavy soils, mix in some sand to improve drainage.
Dig a trench around the perimeter where the barrier will be installed. The trench should be approximately 6 inches deep and 12 inches wide. This creates a secure foundation and helps prevent future shifting or displacement of your water barrier.
Check for any underground utilities before digging deeper than a few inches – this is crucial for safety and avoiding costly mistakes. Once the area is prepared, clean out any loose soil and remove sharp objects that could potentially damage your barrier material.
Finally, lay down a thin layer of sand or fine gravel as a cushioning base. This helps protect your barrier from punctures and provides additional stability.
Securing Your Barrier
To ensure your water barrier remains effective for years to come, proper securing techniques are essential. Start by thoroughly compacting the soil beneath and around your barrier material. Use landscape pins or stakes every 12-18 inches along the edges to anchor the barrier firmly into the ground. For added stability, consider placing heavy rocks or decorative stones along the perimeter.
When joining multiple pieces of barrier material, create an overlap of at least 6 inches and secure with waterproof tape or adhesive designed for pond liners. In areas with high water pressure or steep grades, install a French drain system behind the barrier to redirect excess water flow.
For vertical barriers, reinforce the top edge with a cap or edging material to prevent sagging and deterioration. Regular inspections, especially after heavy rains or frost periods, will help you catch and address any potential weak spots before they become problematic. Remember to trim any aggressive plant roots that might compromise the barrier’s integrity over time.
Common Installation Mistakes
When installing a landscaping water barrier, avoid these common pitfalls that can lead to future problems. First, never skip proper ground preparation – installing directly over uneven or debris-filled soil will create weak spots and potential leaks. Another frequent mistake is overlapping barrier sections incorrectly or using insufficient overlap, which creates vulnerable seams where water can escape.
Don’t rush the edge installation process. Many DIYers make the error of not securing the barrier edges properly above the water line, leading to erosion and barrier slippage over time. Similarly, using regular landscape staples instead of proper pond barrier anchors can result in the material pulling away from the ground.
Watch out for rough handling during installation – dragging the barrier across sharp rocks or tools can create tiny punctures that aren’t immediately visible but will cause leaks later. Finally, avoid cutting corners with cheaper, non-pond-specific materials, as these typically deteriorate quickly and won’t provide lasting protection for your water feature.
Maintenance and Troubleshooting
Regular maintenance of your landscaping water barrier ensures its long-term effectiveness and beauty. Check for tears, punctures, or shifts in the barrier material at least twice a year, particularly after severe weather events. If you notice any damage, patch small holes immediately using a pond liner repair kit, making sure the area is clean and dry before applying the patch.
Keep an eye on the water level in your pond or garden feature. Sudden drops might indicate a barrier breach that needs attention. Remove any fallen leaves, branches, or debris that could potentially damage the barrier. If you have plants near the barrier, trim their roots periodically to prevent them from growing through and compromising the barrier’s integrity.
Common issues include barrier displacement due to soil erosion, UV damage from sun exposure, and winter frost heave. To prevent these problems, ensure proper installation with adequate anchoring and consider using UV-resistant materials. In areas with freeze-thaw cycles, monitor the barrier edges during spring thaw for any separation from the surrounding landscape.
If you notice persistent water seepage despite having an intact barrier, check the soil grade around the feature. Sometimes, adjusting the slope or adding additional barrier material can solve the issue. For severe damage or aging barriers, consider professional assessment to determine if replacement is necessary.
Remember to document any repairs or modifications you make, as this information can be helpful for future maintenance and troubleshooting.
Creating an effective water barrier in your landscape doesn’t have to be complicated. Whether you’ve chosen a liner, clay, or concrete solution, proper installation and maintenance are key to success. Remember to regularly inspect your barrier for damage, address any leaks promptly, and maintain appropriate water levels. The initial investment in quality materials and careful installation will pay off through years of worry-free enjoyment of your water feature.
Consider starting with a smaller project if you’re new to water gardening, and don’t hesitate to seek professional advice for larger installations. With the right approach and materials, you can create a beautiful, leak-free water feature that enhances your outdoor space and provides endless enjoyment. Take the first step today by planning your water barrier project, and soon you’ll be enjoying the peaceful sounds of flowing water in your own backyard oasis.